How I Make Globes
This might take awhile to load. Please be patient!
Thanks!
How I Make Globes
This might take awhile to load. Please be patient!
Thanks!
Hello All. I have been asked to make a tutorial by several people. So here it is. I have looked at other tutorials & I have noticed that everyone does it differently. The way I do it is the easiest for me, however you may not want to do it this way! That is fine. I have added some other tutorials that might be easier for you at the end of this page. Try them out, & see which is easier for you.
I use Paint Shop Pro. SO, these instructions are for that program. But you might be able to do the same with other programs. I have tried to make this as simple as possible. Please let me know if there is any confusion! Don't worry if you don't have the globe or sparkles either. They are here for download if you need them. They'll be located where they will start being used! (In Step 3-Globe & Step 12-Sparkles).
Here we go! Have your Paint Shop Pro Open.......
Step 1:
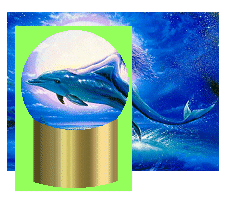
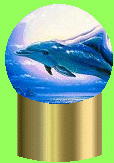
Choose which image it is that you want inside your globe. We are going
to use this one for this tutorial. 
*Note* Be sure that the image is in a JPG or PSP format. NOT a GIF format! If it is a GIF you can save it as a PSP by clicking File > Save As... A box will open. On the top where it says: Save In: Place the image where you can find it. (I put all my work on the desktop as a temporary). On the bottom were it says: Save As Type: Have Paint Shop Pro Image (*.psp) as the format. Then click Save. Close the image that is open and then re-open the image that you just saved. *Note* Make sure you closed the first image first or you will have trouble later. |
Now that you have the image open & in a psp (or jpg) format. We
are ready to get started. Now, in your psp program there is a bar that
looks like this:
|
| Now, open the globe base that you want to use. I am going to use the
Round Dome for this example.
*Note* If you don't have this globe, then click here to get it! (Saved in PSP format - 4 Globes total in zip). This is what it should look like when you open it. 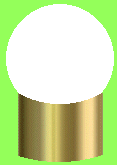 |
| Now, on your tool palette which looks like:
Click on the |
 |
| Now, go to Edit > Copy as shown on the palette below.
This will copy your globe. |
| Now, click on the image that you are using for the inside of your globe.
*Note*
This
tells the PSP that we are focusing in this image now. Click
on Edit > Paste > As Transparent Selection on the same palette as
above.
This will paste the globe on top of your image.
Adjust it to where you want it to sit on the picture. Left click your mouse
once then click on
|
| Now, on the tool palette, click on the Should like like the one to the right. |
 |
Now, click on Image > Crop to Selection.

That will trim the image down as shown to the right. |
 |
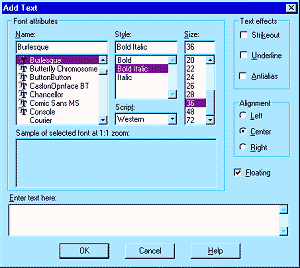
| Here is where you place your text on the base if you want.
Make sure your foreground & background color are the color you want the text to be. As shown to the right. Click on
Then click on your globe. This box will popup. In the Enter Text Here: box type what you want on the globe. Then click on OK. |

|
| Your text will be on your globe with the dotted lines around it. Adjust
to the position you want & then right click on your mouse making the
dotted lines go away & having the text stay where you put it.
This is what it should look like now: |
 |
| Now, click on Edit > Copy. *Note* This
will copy your globe. Now click on Edit
> Paste > As New Image. This will produce another globe just like the
one you have already. Do that again making 3 of the same globes. *Note*
You
should have 3 globes open that are identical.
|
| Click on
On your Control Panel press the down arrow *Note* Circled
in red below.
|
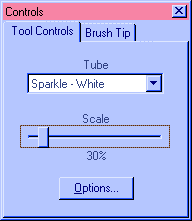
Step 13:
| Click on the globe placing the sparkles on your globe. *Note*If
you adjust the scales percentage it will change the size of the sparkle
from smaller to bigger. Do this one all 3 globes you have. Making
sure that your sparkles don't overlap your globe.
You should now have this: |
|
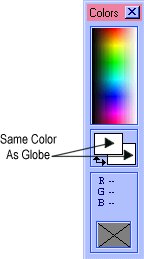
| Now, click on the
Using this tool, click on the green portion around the globe making your foreground & background the same color. As shown to the right. |
 |
| Now, click on Color > Palette Transparency.
Then this box will popup: 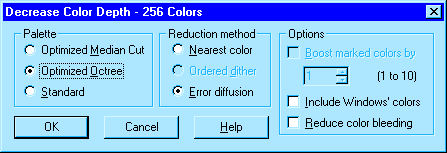 Check the Optimized Octree & Error Diffusion boxes & then click OK. Another box will appear.
Check Set The Tracparency Value To The Current Background Color then click OK. Looking at the image you probably think nothing changed. However if you click on Color > View Transparency you will see that the green is no longer there.
Do Step 14 & 15 to the other two globes. Saving them as 2.gif & 3.gif. |
Animating the Globe:
Click on File > Animation Wizard... Boxes
will popup, here is what you do in order:
Click on File > Save As. A box will popup. Save it as DoneGlobe.gif (or whatever name you want). Make sure you save it as a GIF file! Click Next > Next > Finish. This is what mine looked like:  |
Have fun!