The Mesh-Covered Wood Frame BoxBy Catherine Rigby-Burdette Last updated December 18, 1997
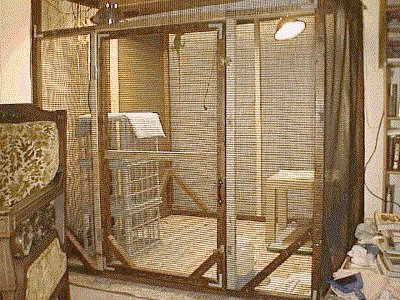
Iguanas require a lot of room to grow in, and if you can start out with a larger cage from the start do so! When I first got Clyde, she lived in a 20 gallon tank for the two weeks it took me to plan, design, and build her real home -- the mesh-covered wooden frame box cage you see almost finished here -- later on it had more shelving and cage furniture. The dimensions of the small cage were 3 feet wide, 5 ft tall, and 2 ft deep. (If I could build this cage with nothing more than a hammer, and one phillips screw driver and no carpentry skills at ALL, so could you!) I planned to let Clyde free roam as soon as possible, and set her free when she was 8" SVL, so I never built her another cage. Instead. the materials from this cage were recycled to make other cages for other iguanas. Since then we have built many other things, and while we are not carpenters, and we did make a few mistakes early on, our cages are stable and fairly cheap, and mostly painless to put together. Don't let the lack of experience stop you from trying! If you do not plan to go to free roaming, this cage will last you until the iguana is about 3 ft in total length, but don't wait until then to plan for his next cage -- they do take some time to save up for, and to finally build. A full grown, non-roaming iguana really belongs in a cage 8 ft wide, at least 6 ft tall, and 4 feet deep. It isn't enough for him to be able to fit in it, he has to be able to walk around and excercise as well. TOOLS:
MATERIALS: Please Note: This is the basic list and does not include shelving, lighting or other accesories! Beyond what is listed here you will need at least:
Depending on your locale, you may find you need other equipment to provide the iguana with proper heating and lighting. You can try to cut costs by skipping the brackets and using only Grabbers (tm) wood screws , but the cage may not be as strong or stable. Try to find used or recycled lumber -- it might even be FREE! We used pine -- it is cheap. Some people worry about aromatic woods harming iguanas (pine, cedar) and choose aspen. While this is a valid concern if the wood is left "bare" -- we used a sealant and sealed the wood thoroughly and have had no problems. Lumber: Have them cut this up at the store!
Hardware: Other: ASSEMBLY. Before building. Sand down any rough places in the wood with sandpaper. Stain and seal all the pieces of wood before you start to make the cage. It is much easier to do it before than to do it after the cage has been built. Let the stain and sealant cure for a few days outdoors so the fumes will go away. 1) Make the door.
Arrange the wood in a rectangle so that the long pieces are UNDER the short pieces. (see drawing). Attach brackets to corners on both sides of panel. Make sure the door panel is squared off and even. Hint: attach all the brackets loosely before you tighten them so you can still wiggle them into place if they are not straight. Next, attach the hinges to the door panel and the half of the bar latch with the bar on it. Place one hinge roughly 6-8 inches from the top, and the bottom hinge 6-8 inches form the bottom. 2) Make the Front & Back Panels.
Using the door panel as a guide, Lay the wood around it for the front panel. It won't be a perfect fit, the door has to be abl to swing freely so there will be a small amount of space in beteween. Assemble the front panel by laying the flat brackets on top, and then laying the inside corner brackets on the inside corners. Remember to make it level and even! Use your T-square or level! The Back panel is the same as the front! 4) Attach the Front and Back.
This is where you need a helper. You will join the front and back with the 2-foot lengths. The top and bottom beams will be bracketed in with inside corner brackets and flat corner brakets. The middle two beams can be wood screwed only. (See diagram.) 5) Hang the door. Fit the door in the front panel, screw down the other sides of the hinges and the bar latches. If all goes well, you should have a snug fit. If you have a problem opening and closeing the door, you may have to get your hacksaw and take apart the door and saw off just a smidge on the long (vertical) beams and then put it back together. 6) Attach the ceiling. Take the pegboard and nail it down to the top! 7) Attach the Mesh. Get apair of scissors or bolt cutters depending on what mesh you are using. Trim the mesh to fit over the sides and either nail or staple gun it into place. TIP: For a more decorative finish, staple, and buy molding trim and stain/seal to match the cage. Then nail over the staples with thin small nails. 8) Tile the floor. Peel the backs off the self-adhesive tile and press it onto the other pegboard or glue down your alternative flooring. 9) Position Cage over floor. Put the floor down where the cage will go and set the cage on it. I never attached my floor to the cage so I could remove it and clean it while the iguana remained in his cage, but if you want it attached just nail it on like the ceiling!. If you want to seal around it after you attach it that is fine -- just use a non-toxic product. (ex: aquarium sealant) 10) Make it Iguana Livable Those side supports are handy places to attach shelving. You could also replace the back mesh panel with all pegboard and use the holes in the pegboard to hang shelving as well. The pegboard ceiling makes installing and under cabinet flourescent light fixture very simple -- all you need is some bolts and nuts and slip them through a hole and attach the light holder on there. If you tile or astroturf the ceiling you can set up the top of his cage as an outside basking area. Be creative in your iguana cage furnishings.! HELPFUL TIPS FOR ADAPTATION Not everyone lives in sunny Florida like Clyde does! So other iguanas may need more supplies in terms of lights, heat pads, ceramic heat emitters, etc. Other iguanas have homes that travel in and out of the house for sunning so wheels are a must! Cold Weather tips: If you live in an area where it is cold most of the year, consider a solid wall design instead of the breezy open-wall design. Although more expensive, in the long run it will save you the cost in heating and electric. If you have hot summers but cold winters, you might be able to use this design, but have removable panels for winter. The easiest solution is make the back of the cage in pegboard, and use acrylic sheets on the open-mesh sides in winter. You will need:
Repalce the back mesh wall with the pegboard. Simply nail the pegboard in palce through the holes and into the framework. The holes in the pegboard will provide some ventialtion and give you more places to hang shelving on as a bonus! You will be hanging the acrylic completely over the door and sides so that on one side it leaves a gap near the top, and on the opposide side it leaves a gap near the floor to maximize air flow through the whole cage. This is why the side panels are not the full 5 ft tall but 6 inches shorter. Carefully mark your holes and then drill all the way through the framework. You will be slipping the bolts out from inside the cage, so be sure to use smooth bolts and not any that can harm the iguana. Next carefully drill the acrylic. Then line the holes up, slip the acrylic onto the bolts sticking out, and secure with butterfly clasps. If the excess bothers you, trim it with a hacksaw. You do not have to remove any of the mesh! When you apply the winter panels, you may have to adjust your heating and lighting inside accordingly to maintain your temps. If it gets overly cold and you need some minor insualtion, get large sheets of foam core from an Office supply place (OfficeMax, Office Depot) and use longer bolts. Then place the foam core between the acrylic and the mesh before you tighten the butterfly clasps. Making it Mobile. If you want it more easily movable. build a small platform from 2 x4's and add casters to the bottom. Then nail or bolt the cage onto it. If this cage is doubling as an outdoor sunning cage, remember to use the sturdier plastic coated wire mesh to prevent the iguana from getting out, or stray animals getting in! Materials:
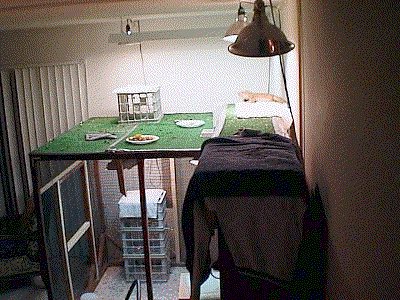
This is pretty straghtforward -- just assemble the wood into a frame, attach the casters to the bottom, make sure it is level, and then set the cage on it and secure the cage onto the little platform. Same Concept, Larger Cage. Follow the same idea, but lengthen the beams and add diagonal support trusses on the bottom corners at LEAST. You will neet a mitre box and saw for this for the angle cuts! This is the cage that we made later by recycling the smaller cage up at the beginning of this document and another cage that was 3 x 4 ft base, and 5 ft tall. What we ended up with was a cage that was 5 x 5 x 5 ft! We did stain the old recycled wood but had to buy a few new beams that we have yet to stain (decor around here is function, not aesthetics) to kind of "patch" things up. A 4 ft double UVB light holder is hung form the ceiling and 2 heat lamps form the corners. The milk crates are secured into a climbing "tower" with cable ties. The little plastic table is a little patio table we had around. Both the tower and table have large heat pads. If you look closely you can see Janis and Stump, the two small igs who live there. A Cage-Top Roost. The nice thing about cages is that the tops can be set up as a basking station for free roaming time. The large 5 ft cubed cage above made a nice roosting area for the free roamers and the mesh sides made it easy to access. Our cage is next to bookshelves whose tops have been converted to iguana-friendly areas with astroturf and lamps hung from the ceiling. Astroturf sections also cover the cage-top "roost" and the edges are secured with duct tape to guard aginst frayed edges so that the iguanas will not be tempted to sample the unravelled "strings". The astroturf itself is still removable for easy cleaning. At the end of the day, the lights start to go out one by one, and the roost is generally littered with iguana messes -- food spills, poop accidents, heat pads flung around... but if you train your free roamers to do all thier business in "their" area, the rest of your home will still be pretty clean.
"The Mesh-Covered Wood Frame Box" © Copyright 1997 Catherine E. Rigby-Burdette
All rights reserved. Comments or suggestions always welcome!
|
 INTRODUCTION