HEAD SCULPTURE
 |
 |
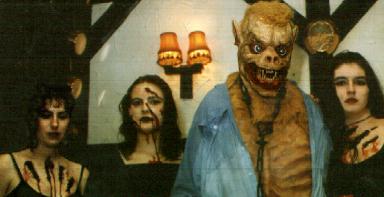
The werewolf costume was designed to be worn in public. It consisted of a full-head mask made in the form of a latex skin over an articulated fibreglass skull, a rubber and fur torso section and a pair of clawed gloves.
This document is a direct transcription of the notes I made during the construction of the costume. These notes were originally made for my own reference on future projects, but may be of interest to anyone else attempting a similar costume.
|
|
The wolf was sculpted on a head and shoulders plaster life cast. I used Roma Plastilina for the main facial detail and Newplast for larger areas.
The mouth was sculpted partially open, allowing access to the backs of the lips, but with the cavity filled. This was to make moulding and casting easier. However, it made judging the position of the wearer's face in relation to the inside of the mouth very difficult.
The ears were made artificially thick, with a wide stem area joining them to the head. This was to simplify mould making, so they could be cast with the rest of the head.
The eyelids were sculpted over plaster hemispheres cast from alginate moulds of the eye shells which were to be used in the mask. It was my intention that these plaster eyes would combine with the plaster of the outer mould. In fact, due to their very smooth surface, they separated with the clay. This proved to be quite useful when painting in the latex for the eyelids.
The whole sculpture was textured using a latex texture stamp cast from orange skin, followed by finer texturing with torn foam and a small brush. I used linseed oil as a blending and smoothing agent. This may have caused some hardening in the plastilina, making it difficult to re-texture areas that had been previously oiled and have dried out.
When complete, the sculpture was coated with a thin layer of Kryolan Sealor. The sealor was airbrushed on, thinned with Kryolan Spirit Gum Remover and Thinner. Too little thinner resulted in the sealor drying before it hit the clay, forming cobweb-like deposits. The cobwebs can be removed with tweezers without damaging the sculpture surface.

A Newplast dividing wall was formed around the sculpture. The wall followed the uppermost part of the cranium, divided the ear stem along the top, followed the inside edge of the ear round to the lobe, down the neck and top of the shoulder to about 1" beyond the sculpture on the life cast. A very thin layer of clay was made on the life cast, extending the bottom edge of the sculpture a short distance. A bottom wall was then formed on this layer, 1" below the sculpture, joining the two ends of the dividing wall.
A thin layer of liquid yellow plaster was painted onto the front of the sculpture using a soft squirrel hair brush. When the first layer had set, a thicker layer of plaster mixed to a creamy consistency was applied by hand, gently agitating it to work it into the surface texture. Finally a more solid layer of plaster was built over the top, taking it to a maximum total depth of 1 1/2". During this build-up, all awkward and deep overhangs (such as under the chin and upper lip) were avoided, leaving just the thin, painted layer. These areas were filled in to equal depth once the back had been covered, allowing the structure to be tipped back. This was to avoid the trapping of air bubbles in the overhangs.
Once the front was dry and had cured, the clay walls were removed. A new thin layer and clay wall were formed under the back of the sculpture in the same way as the front ones. The clay wall wrapped around to join the outer rim of the front mould. Several thin wedge shaped pieces of clay were stuck to the edge of the front mould. These were to provide easy leverage points to separate the two halves. The whole of the edge of the front mould was covered with petroleum jelly to act as a separating agent.
The rear of the sculpture was layered with plaster in the same way as the front, and allowed to cure.
The rear mould was separated by gently working a large screwdriver into the wedge shapes around the join. All visible clay was stripped from the rear of the life cast, working in as deep as possible without damaging the inside of the front mould. The screwdriver was eased between the life cast and the lower edge of the front of the mould. The life cast was gently prized out. The remaining clay was stripped from the front mould.
 |
 |
The finished mask was to be a combination of latex skin on stretching areas, and foam on fleshy areas that would be required to compact with movement. To facilitate the foam casting, a limited internal mould was required. I found that the size and shape of the foam area it was possible to form was restricted due to undercuts formed by deep folds in the facial structure. This gave me the choice of either increasing the thickness of the foam, thus filling in the undercuts, or reducing the foam to a more central area, where it would be clear of the undercut areas at the sides of the mould. I decided on the second option.
A thin layer of clay was pushed into the face area of the mould. The thickness was increased around the lips, cheeks and forehead areas. A clay wall was formed around the edge of the clay layer. The enclosed area formed was checked for undercuts. A cylinder of clay was formed on the mouth area, extending vertically out of the mould, above the level of the clay wall. This would form the pouring hole for the foam. Finally, cling film was pushed into the top of the clay wall, all the way round, using a modelling tool, and extended to cover all exposed plaster in the mould.
The clay structure was filled with plaster and allowed to set. After it had cured, it was carefully freed the front mould and the remaining clay was stripped out. A venting hole was drilled in the forehead end.
All three parts of the mould were painted with two coats of shellac.
All three mould pieces were painted with several layers of pre-vulcanised liquid latex. The latex layer was continued round onto the edge formed by the clay wall. This would later provide a useful seam to help align the front and back rubber pieces. I later found that on some underside areas and deep, sharp folds, even multiple layers of latex ended up too thin, and tore on removal. This can be prevented by laying tissue over the last coat of latex, while it is still wet, adding more latex, and after a few minutes, smoothing the surface with a slightly damp finger. The result is that the tissue/latex mix is broken up, allowing stretching and movement, but reinforces the structure.
The inner mould was then placed inside the front mould. Clay was pushed in around the edges, to ensure a tight seal against the rubber.
Kryolan Cold Cure Foam was then mixed 100:33 by weight. As soon as bubbles began to form, it was poured into the pouring hole on the inner mould, to about two inches below the lip of the pouring hole. When the foam had expanded to the top of the hole, the hole was sealed with a block of clay. A few leaks of foam around the edges were wiped up as soon as they were spotted, and the leaks sealed with clay. Once the foam had cured, the clay was removed. |
 |
The latex layer in the rear mould was lightly painted with petroleum jelly. Squares of fibreglass matting soaked in Fastglass fibreglass resin were laid over the whole of the head area, to extend slightly beyond the lip of the mould. When it had set, the fibreglass piece was gently pulled free of the rubber. Its edges were filed and sanded down to the line formed by the edge of the mould.
The process was repeated on the front part, leaving the inner mould in place. Particular care was made to coat any exposed foam with petroleum jelly. The front section was made in three sections, to allow each piece to be moved free of undercut areas of the mould. The pieces were: front of cranium, left temple to jaw line and right temple to jaw line. Each piece was made separately and removed from the mould. When all the pieces were complete, they were all laid back in the mould, and the overlapping areas were marked with a marker pen. These areas were then removed with a tile saw. All edges were filed and sanded.
The front cranium piece was placed back in the mould. The rear piece was then placed edge to edge with it. Fibreglass was applied around the inside edge. When this had set, the new combined cranium piece was removed from the mould.
The foam was cut away from inside the pouring hole and the edge of the rubber around the inner mould was worked free. The inner mould was carefully removed.
The pouring hole was sealed with clay, and the inner mould was painted with petroleum jelly. The surface was coated with fibreglass. When it had set, the fibreglass was removed, producing a snout and forehead piece.
The front and back rubber pieces were talcum powdered and gradually removed from the moulds, powdering each fresh area as it was exposed.
The fibreglass side panels were aligned with the cranium and held in place with clay. The overall alignment was checked by placing the rubber piece over the top. When the alignment was correct, the exposed clay was covered with petroleum jelly and the pieces were joined using band-aid sized pieces of fibreglass. Next, the snout and forehead piece was aligned and fixed in the same way.
An inner mask was formed by first filling the undercuts on the life cast face with clay and painting it with petroleum jelly, then applying fibreglass. The fibreglass was removed from the face. The eyes and a triangular area including nostrils and upper lip were cut out.
The inner mask was placed inside the fibreglass skull. I found that I needed to cut away various areas around the inside of the skull to get the mask in at the correct angle.
The whole fibreglass construction was tested on the wearer for access. It was found that quite a large area of the lower rear cranium needed to be removed to provide access. When the required adjustments had been made, the inner mask was fixed into the skull using strips of fibreglass.
The mouth area was cut away from the snout. The lower jaw was cut free and was hinged to the rest of the skull using small ball joints. While my original intention was to hinge the jaw in the anatomically correct location (ie the side of the cheek bone), when it was fitted this way, I found that the opening arcs of the fibreglass jaw and the wearer's jaw clashed. This meant that the jaw locked. Because of this I had to rejoin the jaw to the rest of the skull and recut it horizontally away from the mouth. It was then hinged just behind the corner of the jaw. The fixing of the ball joints was reinforced with dental acrylic. Small steel springs were fitted to hold the jaw closed.
The inside of the skull was thinly padded with felt. I found that extra felt cushioning wes required in the bridge of the nose, which applied considerable pressure on the wearer's own nose when he opened the jaw against the springs.
Both pieces were trimmed, leaving a 1mm seam. The eyes and mouth were cut out.
Next, the seams were joined. Two coats of Pro Stick prosthetic adhesive (the thinner the better) were applied to both edges over a 2" distance. The coats were dried with a hairdrier until tacky. The edges were pressed together a little at a time, and the seams clamped with bulldog clips. It was then left for half an hour and another 2" section was joined in the same way. I started joining at the corner of an ear, as this provided a clear indication of alignment. Once the seams were completely dry, the mask was turned inside-out, and the inside line of the join was beaded with liquid latex and reinforced with tissue and latex. When dry, the mask was turned right side out and placed on the fibreglass skull. The remaining seam was trimmed off and finished with a grinding stone and bristle brush on a dental drill.
A number of areas had been damaged on removal from the mould. Where possible, small tears were sealed with prosthetic adhesive in the same way as the seams. Larger tears were sealed by patching from behind with small pieces of latex skin, stuck with prosthetic adhesive.
A line was cut up the centre of the back of the mask to just above the level of the fibreglass skull's lower edge.
A single strip of artificial fur was cut to size and stuck with prosthetic adhesive over the top of the head, down the back of the neck and across the shoulders. It was glued to only one side of the back. Strips of velcro were stuck to the other side, so that the fur strip overlapped the rubber and concealed the velcro.
Prosthetic adhesive was painted around the hairline and dried with a hair drier. Strands of fur cut from the backing were pressed onto the adhesive. This gave the effect of fur growing directly out of the skin and concealed the backing of the main fur area.
The bottom edge of the mask was trimmed with fur in the same way, to aid blending it into the torso.
Rubberised paints were prepared as follows: The colour required was mixed in artist's acrylic paints. The mixture was then thinned with airbrush medium. A little prosthetic adhesive was added to the mixture. The mixture was further thinned with airbrush medium to reach the correct consistency for use with an airbrush.
The whole mask was airbrushed with a pale flesh colour up to the hairline. Blue tinted veins were then added. Fleshy areas such as nose and ears were sprayed a pinker shade. Shading was added in a darker, brown-purple flesh tone. The mouth was sprayed with a red-black mixture. The same colour was sprayed onto the lower part of the gums, leaving a graduation to blend the pink acrylic into the mouth colour. It was also painted into the border between teeth and gums, using a fine brush.
A wash was then applied by mixing a very dilute dark purple-brown colour using water instead of airbrush medium. This was sprayed over the mask. Clean water was immediately sprayed over the paint, causing it to run into the texture. After a few seconds, it was blotted off with a stippling action.
The edges of the hair lines were made more subtle by punching individual hairs into the skin. The eyebrows were formed in the same way.

The incisors were standard acrylic human teeth. The canines were hand made in dental acrylic and pressure cured. A set of three standard teeth were made in Milliput epoxy putty. The set comprised a small, triangular carnassial, a larger three pointed carnassial and a molar. A mould was made of these in RTV31 silicone. Four sets of dental acrylic teeth were cast from this mould and were pressure cured. They were then ground to form a range of different upper and lower teeth.
Wax rolled into long sausages was pressed onto the upper and lower jaws of the fibreglass skull. The acrylic teeth were pressed into place on the wax. Repositioning was achieved by cutting around the tooth to be moved with a hot scalpel, then sliding the tooth into the melted area. When the teeth were correctly located, the gums were built up and sculpted with more wax.
The completed tooth and gum units were carefully pulled free of the fibreglass. Each was coated in white plaster paste, then white plaster moulds were formed around them. When the plaster had cured, the wax was removed by repeatedly pouring boiling water into the moulds.
Pink dental acrylic was poured into each mould. The acrylic was then pressure cured. After curing, a plaster saw was used to cut through the moulds at 2cm intervals. The mould segments were broken free to reveal the acrylic teeth set in pink acrylic gums. Loose teeth were reset with a little dental acrylic. The teeth and gums were then cleaned up and polished on a polishing lathe.
Clay pieces were cut to size to fit in the sides and inside of the mouth. The pieces were sculpted to form two inner lip pieces and a piece comprising tongue, floor, back and roof of mouth, sculpted open. Yellow plaster moulds were made of these pieces. Liquid latex and tissue pieces were made from these moulds and were stuck in place with prosthetic adhesive.
The teeth were stuck in place after painting was complete. They were fixed to the fibreglass skull using dental acrylic.

The eyes were made using 28.6mm clear hemispheres. They were constructed so that the wearer could see through both the pupil and the dark corona around the iris.
The hemispheres were set inverted in plastiline and surrounded by a plastiline wall. Dental alginate was poured in and allowed to set. When set, the alginate was removed and a block of yellow plaster formed over it. When the plaster had cured, the alginate was removed from it, leaving a plaster cast of the interior of the hemispheres. This was then coated with petroleum jelly.
A thin layer of fibreglass resin was painted into each cast. When it had set, the fibreglass was removed from the plaster. A compass was used to mark out the size of the iris and pupil. The pupil was drilled out, the iris trimmed to size and the edges ground down with a burr on a dental drill.
Each iris was then painted with acrylic paints, the colour fading to black at the edges. It was then stuck into the clear hemisphere using clear acrylic lacquer. The sclera was painted on the inside of the hemisphere, stopping short of the iris. The edge of the white was faded to black by mixing clear acrylic lacquer with the white paint to produce a translucent white which was painted over the slightly feathered edge of the solid white paint.
The eyes were placed in position on the mask and prosthetic adhesive beaded around the eyelids to stick them in place.

Only the tops of the hands were sculpted. First, The subject's hands were placed on a piece of board, with the fingers spread. Pencil lines were drawn around the outlines of the hands and wrists. Next, a secondary outline was made by extending the lines around the sides of the digits and wrists by about 1/2".
The hands were sculpted inside the secondary outline, tapering to a fine blending edge. The modelling was done very thinly, as the intention was to form a wrap-around skin.
A clay wall was formed around the hands, and the wall, hands and board were all sealed and treated with a release agent. Yellow plaster was poured into the mould formed by the clay wall and allowed to set.
The latex skins were made from the moulds using liquid latex and tissue. The skins were then carefully applied to a pair of surgical gloves. This was done using prosthetic adhesive, while the gloves were being worn. The edges were blended with a stippling of liquid latex.
The hands were painted and fur applied in the same way as for the mask.
Claws were individually modeled in dental acrylic and polished with a rubber wheel on a dental drill. They were not pressure cured as the intention was to give them a rough, bone-like finish.
The claws were fixed to the hands using a paste made from prosthetic adhesive and cotton wool.
Long fur cuffs were attached to the gloves, extending about half way up the forearms. Velcro fastenings were attached to allow them to grip the arms firmly.
The chest was sculpted in clay on a plaster lifecast. Only the front area was sculpted, forming a sort of breast plate. The ribcage was sculpted low on the torso, to create the barrel chest and narrow shoulders found on wolves and dogs.
The exposed plaster around the sculpture was coated with petroleum jelly and a negative plaster mould was built up over the whole area.
The rubber chest piece was formed by first painting several coats of liquid prevulcanised latex into the mould. Next, a reinforcing layer of tissue and latex was applied.
The deep hollow areas which when viewed from the front would form ribs, muscles etc were painted with more liquid latex, then packed with cotton wool. When the latex had dried, the surface of the cotton wool was painted with more latex and a layer of tissue was laid over it. Several coats of latex was painted over the tissue. The result was a kind of pseudo foam rubber; a cushioned area encased in rubber skin. This was enough to make sure the chest kept its shape.
The chest was painted and fur was applied in the same way as for the mask.
A kind of waistcoat was made to measure from artificial fur. It consisted of a long strip of fur with an arm hole at one end, and another near the middle, leaving a large flap that wrapped right around the front. Velcro fastenings were attached to hold the flap firmly in place.
The rubber chest piece was stitched onto the front of the waistcoat, over the top of the fur. The fur behind the rubber gave it further support and considerably more bulk.
The shirt was thoroughly mutilated with long splits down the back to reveal the fur. Smaller tears were made in the arms, and small areas of fur were glued behind them, suggesting that the whole torso beneath the shirt was fur-covered.
The effect of the fur bulking out the shirt compensated well for the slightly over-large head. This and the extra height given by the mask worn by an already tall (six foot three inch) man gave the impression of a very large creature.
The costume has been used to raise around 600 pounds for a children's charity, and also to entertain the kids at a christmas party for underprivileged children.
 |
 |
(c) Mike Strick 1996