1-
Introduction
I am by no
means a professional, just an amatuer wishing to
share with others in the wonderful world of Anime!
Here is my
guide to drawing your own anime characters, as I have
for the past few years. Thanks, and I hope this FAQ
helps you.
Visit my MAIN
Anime/Asian Page by clicking here!
Visit
my Main Anime/Asian Page
Randy
"Lion"
2- Supplies
This is what I use to
start off with:
(1) Mechanical pencil
[.5mm lead is best]
(2) Extra Fine Tip
Rolling Ball pen. [Pilot PRECISE v5]
(3) Canon FB 320P
Scanner [$80.00]
(4) IBM/PC Compatible
w/16+ MB RAM
(4) Some imagination
and inspiration ... now let's go!
3- Facial Features
(1) With every
drawing, I start off with the EYES. Eyes are very
important if you want to get the Anime look right.
The great thing is, there's no set rule; just have
fun with it. I recommend you look at a lot of Anime
so you can get a feel of all the styles.
(2) Start with 2
crescents, one below the other. Between them, you'll
add the features of the pupil. When drawing the
pupil, don't concentrate on too much detail. The
trick is to draw a few spheres representing
reflections off the eye. You'll never really draw the
actual pupil.

(3) Good. Once you've
drawn ONE eye, you can start drawing the face. Mask
the face around the eye. Start with the NOSE below to
the left, then the MOUTH soon after. Below the MOUTH,
start the base for your CHIN, & CHEEKS, etc...
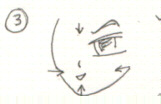
Notice the Alignment
(ARROWS), this is very important. Keeps the facial
features in their place.
(4) Now, complete the
face by adding the other eye. (notice the contour of
the face). Add hair to your liking!

4- The Body
(1) Notice the face.
It's done. Use the FINE TIP pen over the pencil
markings once you're finished completely. Most
scanners don't pic up pencil too well.

(2) Come from
the base of the NECK, you want to draw a little V
shape. This is an important marking on the body. Go
ahead, feel below you're neck, you have it too! This
serves as a pointer to center the body later on.
Extending from the V, draw 2 lines extending outward
from each other. This will serve as the basis to draw
the SHOULDERS; the angle of these lines determine the
position of the SHOULDERS.
(3) If you havn't figured it out
yet, we are working on the skeletal structual. Below
the lines, you'll find 2 red circles, representing
the SHOULDERS. Now draw straight lines extending
outward to position the ARMS.
(4) Half way, don't forget to do
the same circles to represent some elbows.
(5) Ok! Notice the arrow centerline
of the body, which is pointing to the belly button.
The belly button is a marker to let you know where
the HIPS should approximately extend to their maximum
<--o--> . This is important. HIPS should never
really be wider than the SHOULDERS.
Also, in the vicinity of the belly
button, you want to draw a BOWL shape, which will
represent the HIPS and V contour of the female
figure. It's like magic!
From there, you can
"attach" legs from the side of the hips.
(6)FINAL PICTURE:
After you're done with the skeletal
structure, draw the "meat" around it; add
some clothes etc. (it's like playing with a barbie
doll or something). Once that is done, erase you're
skeleton and use your FINE TIP marker over the
pencil.
Here's what it looks like.
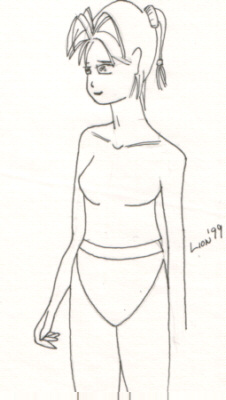
The BOWL I mentioned earlier
automatically serves as the basis for a bikini line
or whatever.
Add color if you want; I use the PC
to add colors and effects.
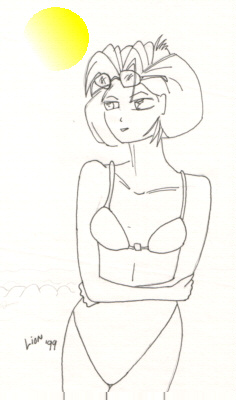
Here is another sample:
Finally, practice! Once you get the
hang of it, you can draw so many positions and
characters. I hope my Anime FAQ helped!
Thanks,
-Randy "Lion"