This tutorial created February 1, 2002 and is the sole property of Bubbles' PSP. Please do not copy or upload this tutorial to any other site without my permission. If you have any problems or questions about this tutorial, please feel free to email me. And remember, "SAVE OFTEN"!
For this tutorial you will need
PAINT SHOP PRO VS 7.02 (Trial Version)
UNPLUGGED EFFECTS
SIMPLE FILTERS
(This tutorial will be using the Diamond, Top Left Mirror, and Quick Tile filters)
This is the image I will be using for this tutorial. If you want to use the same image, just right click and save as to your own server. If anyone knows who the artist is of this lovely graphic, I would appreciate it if you would email me and let me know so I can give proper credit to the artist/or remove if the artist so wishes.

1. Open the graphic in PSP that you will be using for this tutorial. Make a copy of your graphic (Shift+D) and close the original. We will be working with your copy. You will need to resize your graphic to 300w x 300h. Be sure sharpen your graphic after you resize (Effects/Sharpen/Sharpen). If you are using the same graphic as I am, then it has already been resized for you.
2. Effects/Plug-in Filters/UnPlugged Effects/Tangent Deform using the settings shown below:
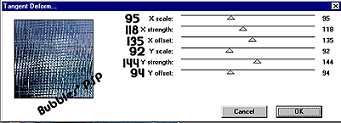
3. Image/Flip. Effects/Plug-in Filters/UnPlugged Effects/Tangent Deform using settings shown below:

4. Effects/Plug-in Filters/Simple/Diamonds.
5. Effects/Plug-in Filters/Simple/Top Left Mirror.
6. Effects/Plug-in Filters/Simple/Quick Tile.
7. Image/Resize. Resize in increments of 85% and don't forget to sharpen each time you resize. Save as .jpg and it's ready to use. Below is what your tile should look like:

And here is another example using different settings with the UnPlugged Effects Filter.


This tutorial and all images, excluding graphic used in
tutorial, ©Bubbles' PSP 2001-2002. Please do not remove from site.

