This tutorial created January 17, 2002 by Bubbles' PSP and may not be copied or uploaded to another site without permission from me. If you would like to use this tutorial for your PSP group, please use a text link. I would like to thank Destinie for testing this tutorial
for me; thanks so much Destinie, you are great!!
This is a two-part tutorial. The first part is making your marble pattern for your frame. The second part is making the frame.
You will need
PAINT SHOP PRO VS 7.02 (Trial Version)
EYECANDY 4000 (Trial Version)(Optional)
You will also need a favorite ding. The ding I am using came from HOUSE OF LIME. I'm using the Corners ding Cap letter E.
The graphic I'm using is entitled "Guinevere II" by Jonathon Earl Bowser. If you use Mr. Bowser's work on your website, you must display a prominent link to his site or a banner linking to his site. I have provided a banner for you at the bottom of this page. Mr. Bowser has a fabulous site so be sure to pay him a visit. If you wish to use the same image that I am using, click here. You will also need the marble mask, you can click here to get the mask. And click here to get the gold fill pattern.
1. Okay, let's get started. Open up your mask, your image and your gold pattern in PSP. Minimize your mask and gold pattern. Make a copy of your graphic (Shift+D)and close the original.
2. With your dropper tool choose two colors from your graphic that you want to use for your marble pattern. I chose a dark color (#3D445E) and a light to medium color (#90B8C2). Make the dark color your background color and your med/lt color your foreground color. Mimimize your graphic for now.
3. File/New and open a new image 150w x 150h transparent background. Now floodfill your new image with your dark color. Layers/New Raster Layer click okay. Floodfill with your med/lt color.
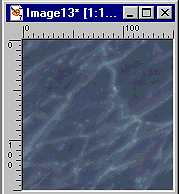
4. Masks/New/From Image. From the source window select 1marble2 source luminance checked invert mask not checked (try it with invert mask checked also and see the different results). Click okay.

5. Masks/delete. A box will pop up asking if you want to merge to current layer? YES. Layers/Merge/Merge All Flatten. Minimize it for now, you will be using in a few moments on your frame. Below is a sample of what my marble pattern looks like.
6. Okay, go to Files/New and open a new image 350w x 450h transparent background. Selections/Select All.
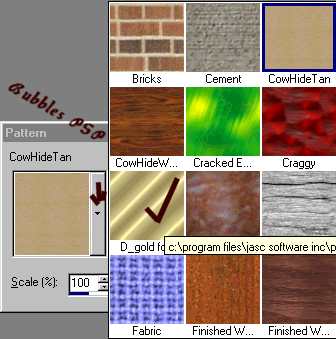
7. On your background color palette, click on the little arrow and select pattern from the popup box that appears.

8. Then click on your pattern square to bring up your pattern cache box. Click on the little arrow and select your gold fill pattern.
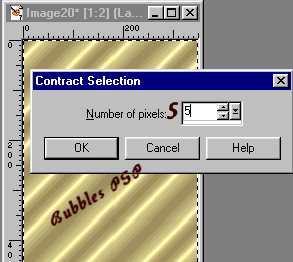
9. Floodfill your selected image with your gold pattern. Selections/Modify/Contract by 5 then hit delete. Selections/Invert. Effects/3D Effects/Drop Shadow with these settings: Opacity 80 Blur 5 Vertical 2 Horizontal 2. Do not deselect.
10. Selections/Invert. Layers/New Raster Layer click okay. Layers/Arrange/Send to Bottom. From your pattern cache select your marble pattern you made earlier and floodfill your selected image. Selections/Modify/Contract by 25 hit delete. Do not deselect.

11. Effects/PluginFilters/EyeCandy4000/Cutout matte cut using the default settings. If you don't have EC 4000, you can easily use any dropshadow or cutout filter (including PSP's)to get the effect you want. I use EC 4000 because I love the matte cut effect. Do not deselect.

12. Layers/New Raster Layer click okay. Layers/Arrange/Send to Bottom. Go back to your pattern cache and once again select your gold fill pattern. Flood fill your selection with the gold pattern. Selections/Modify/Contract by 10 hit delete.
13. Layers/New Raster Layer click okay. Layers/Arrange/Send to Bottom. Then go to Selections/Modify/Expand by 2.
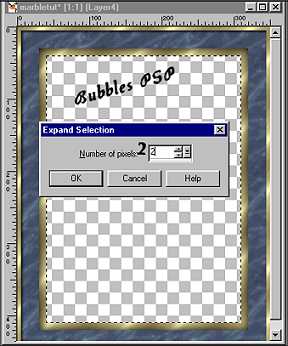
14. Bring up your graphic that you are using in your frame, go to Edit/Copy (you can minimize your graphic again) then make your frame active again and go to Edit/Paste/Into Selection. Effects/Plugin Filters/EC4000/Cutout using matte cut and same settings as in step 11. Selections/Select None.
Before we add the dings, lets make sure your layers are in the correct order. I don't usually name my layers, I only did it here so you can see how my layers are. See screenshot below.

15. Okay, go ahead and go to Layers/Merge/Merge All flatten. Then add a new layer Layer/New Raster Layer click okay. Switch your background palette back to colors and make your background white (#FFFFFF) foreground null. Click on your text tool, select which ding you will be using, set your size (I used size 60) antialias and floating checked. I ended up using a different ding than the one in the tutorial sample above. I used Caps E.

16. Move your ding to the left corner of your frame and position it where you want it. Floodfill your ding with your gold fill pattern that you used on your frame. I added a drop shadow with these settings: Opacity 100 Blur 2 Vertical 1 Horizontal 1, then I repeated the drop shadow using the same settings except Vertical (-1) Horizontal (-1). Select none.
17. Go to your layer palette and make sure your ding layer is active. Right click on it and select Duplicate. You now have Copy of Layer 1 active. Go to Image/Mirror and you should now have a ding on the opposite corner of your frame.
18. Right click on Copy of Layer 1 and select Duplicate. You will now have Copy of Copy of Layer 1 active. Go to Image/Flip this time. You will have a ding on the bottom corner of your frame. Now, right click on Copy of Copy of Layer 1 and select Duplicate. Then go to Image/Mirror and you should now have dings on all four corners of your frame. Layers/Merge/Merge All Flatten and save as a .jpg.


This tutorial is ©Bubbles' PSP 2001. Do not remove from site. Guinevere II
image is ©Jonathon Earl Bowser and is used with his permission.


