Welcome to my Mosaic Glass Frame tutorial. This tutorial
created
January 5, 2001 and is the sole property of Bubbles' PSP 2001.
Please do not copy or claim as your own. If you have any problems
with this tutorial, please feel free to email me.
I want to thank Destinie for testing this tutorial out
for me. I really appreciate you Destinie.

The framed image above is what we will be making today.
There are two more examples at the end of the
tutorial. You will need the following items to complete
this tutorial:
PAINT SHOP PRO VS 7.02 (30 day trial version)
FILTER FACTORY GALLERY M
PAINT ENGINE
SUPER BLADE PRO
EYE CANDY 4000 (Optional)
For this tutorial I used a tube from WintersChild and Old
Guy"s Native American Tube site. They have some fantastic
tubes and lots of them. If you haven't been there before, then
you are in for a treat. You can either choose a tube from the
site or use the one I'm using. To use the same tube that
I am using, click here and then download tube #542.
You can get the mask used in this tutorial here.
1. Let's get started!! Open up your mask in PSP and
minimize it for now. Go to File->New and create
a new image 500w x 400h transparent background.
2. Select a color from your tube that you want to use.
I used color #485D7A. Floodfill your new image with
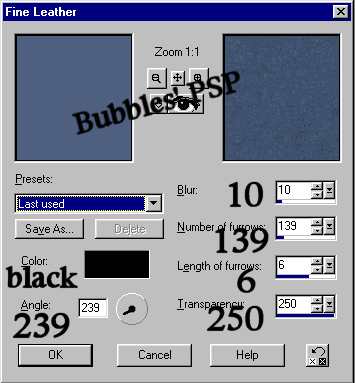
the color you picked from your graphic. Next, go to Effects->
Texture Effects->Fine Leather and use the settings below.
3. Effects->Plugin Filters->Fantastic Machines->Paint Engine
with these settings:

4. Layer->New Raster Layer click okay. Then select your
picture tube tool and find the tube you
are going
to use for this tutorial. I'm using Winters' tube #542. Set
the scale to 75% step 200.

5. Once you have found your tube, go to the center
of your new image and click on it once. Your
tube picture will then be placed on your new
image. Effects->3D Effects->Drop Shadow Opacity-100
Blur-2 Vertical-(1) Horizontal-(1). Apply drop shadow
once again with these settings: Opacity-70 Blur-15
Vertical-(2) Horizontal-(4)
6. Layer->New Raster Layer click okay. Choose another
color from your tube; I chose a lighter color this time
#BDA184. Floodfill your layer with the color you picked and
then go to Effects->Texture Effects->Fine Leather and use the
same settings as in step 2.
7. Time to use our mask. Go to Masks->New->From Image
and from the drop down box select mask0530a.

8. Masks->Invert. You may not need to invert it if
Invert mask was checked on your Masks->New->From
Image box. Then go to Selections->From Mask. While
mask is still selected go to Masks->Delete merge to current
layer? yes. Your mask should still be selected. Go to Layers->
New Raster Layer click okay. Next go to Effects->3D Effects->
Cutout with these settings: Opacity-100 Blur-13.8 Vertical-(2)
Horizontal-(2). Repeat cutout using (-2) for your vertical and
horizontal setting. Selections->Select none. Layers->Merge All
Flatten. This is what you should have at this point.

9. Background color to white (#FFFFFF). Image->Add Borders
symmetric checked 8 pixels. With magic wand (tolerance-0
feather-0) click on the white border to select. Fill with
preset of your choice; I used the liquidgold preset.
Selections->Invert. I used Eyecandy 4000 matte cut default
setting for my drop shadow, but you can use the
drop shadow effect that comes in PSP if you don't have
EC 4000. Add dropshadow and deselect.
10. Background color still white (#FFFFFF) go to Image->
Add Borders symmetric checked 30 pixels. With magic
wand (tolerance-0 feather-0) click on your white border
to select. I floodfilled with the first color I used
from my graphic, the darker color #485d74. Border
still selected, go to Effects->Plugin Filters->Filter
Factory M->Explosive Blur and use the settings below.

11. Border still selected, to to Effects->Texture Effects->
Mosaic Glass and use the settings below.

12. Border still selected, Effects->Plugin Filters->EyeCandy
4000->Cutout using the same settings as in step 9.
Deselect.
13. Your background color should still be white. Image->
Add Borders symmetric checked 5 pixels. With
magic wand (tolerance-0 feather-0), click on your
white border to select. Fill with your preset.
Effects->3D Effects->Drop Shadow using these settings:
Opacity-100 Blur-13.8 Vertical-(2) Horizontal-(2).
Repeat drop shadow but change vertical and
horizontal to (-2). Deselect.
Now all you have to do is resize to desired size and
save as a .jpg. Remember to resize in increments
of 85% and to sharpen everytime you resize
your graphic.
Here is another sample using a different tube.

And here is an example with dings.


Tutorial ©Bubbles PSP 2001. Please do not remove tutorial, images,
background set from site. Thank you.

