AIRFIX 1:72 SAAB 35 DRAKEN
Reviewer: Myself (braithy@bigpond.com)- kit built January 1999
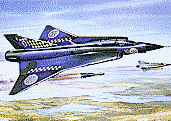
In 1949, when European supersonic aircraft were all research types, Sweden asked its aircraft industry for an interceptor possessing supersonic performance, an exceptional climb rate and the ability to operate from dispersed sites such as short lengths of road. Saab came up with its remarkable single-engined Draken (Dragon) of double-delta design offering large fuel capacity with minimal drag, and capable of the same performance as the twin-engined EE Lightning. When it entered service in 1960 it was regarded as the world's finest all-weather interceptor and the envy of the major super powers. More than 600 Drakens have been built and operators included Denmark, Finland, Austria and Sweden.
I have never been a big fan of Airfix kits because I find they are either full of problematic fits or suffer in accuracy. In this case I was pleasantly surprised to find a good robust and excellent fitting kit, although accuracy is compromised in small sections. In the box you will find medium grey injected molded plastic with raised panel lines and etched control surfaces. The panel lines are very detailed but appear a little overdone. There is also a very minor amount of flash on the parts that will be no trouble cleaning off. The smaller parts are subject to some mold imperfections and ejector pin marks. The small speed brakes in particular will need to be cleaned and trimmed.
For the cockpit you get a pilot and his seat, about as sparse as you can get it. I used the dashboard area to scratch build an instrument panel and gave the interior a medium grey wash. The canopy is one-piece, which suited me, as I had decided to build a wheels-up model anyway. Fuselage halves go together very well and a little bit of noseweight will be required - there's a bit of room in the separate nose cone as well as in front of the pilot.
Wings, fin, engine nazelles and nose cone all attach without a whim. Fit of all these parts (except exhaust) is really excellent, although a little bit of fiddling around was required with the nose. The first bits of accuracy flaws will be noticed at this point, in particular the shape of the fin is just slightly wrongly slanted, the leading edge pitot tube is oversized and there is a noticeable gap between the fin rudder and aft fairing above the exhaust on the kit - there is no gap according to the various sideview reference photos I have on hand. The very tip of the exhaust housing is angled down on the kit whereas it should have a very tiny curl upward. The exhaust itself is very hard to fit into its housing and I would recommend doing this before attaching the housing to the back of the fuselage. You will note that it is angled and unlike the mainstream aircraft where the extended tip should be at the top, this one should be at the bottom so that the exhaust has a distinctive upward facing position. The kit has this feature a little more pronounced than it should be. The nose is not quite as needle-like as it should be and the nose probe is far too thick, leading to this problem.
The undercarriage is nicely replicated although the landing light is a touch small for the main gear and the actuating struts are missing. Its important to remember that these retract outwards which is easy to overlook. The unique tailwheel is nicely done too but these only touch the ground on take-off so should not be allowed to reach the ground when static. The doors covering the wheel wells were an excellent fit, being as near perfect as one could get, and needed only a further dab of glue for filling purposes.
The speed brakes can be postioned open but in the closed position they are a dreadful fit and careful attention needs to be taken to ensure that you select the right brake for the right housing. There are four positions - two either side of the fin and two in approximately the same positions underneath. The housings are best described as being 'left & right'-handed and the brakes themselves fit accordingly - although by my reckoning I believed I was supplied with three 'rights' and only one 'left'. In any case they need to be trimmed and cleaned thoroughly to get a decent fit and if done right, filler still is not required. The fairing for the tailwheel also causes a few problems with fit. The auxillary air intakes just behind the cockpit are a bit too bulky and are not very co-operating in attachment to the fuselage, they need to be trimmed slightly.
For stores you are provided with two underwing pylons to attach what appear to be Hughes Falcon AAMs and two belly pylons for either 279-Gal fuel tanks or Hughes Falcon radar-homing missiles. The fuel tanks don't align correctly and are not very good examples of the long slender examples on the real thing. I chose to attach the Hughes missiles and painted them in emerald green as suggested by the instructions and matching reference photos. Gunmetal was used on missile panelling as shown in reference shots. The Ericsson infra-red seeker is provided in the kit and sits nicely under the nose, I painted the tip in coal black. The small dorsal antennae fin that sits in front of the main fin is also done nicely and care needs to be taken when aligning it to match the main fin position.
Only two examples from unspecified swedish regiments are produced by the kit, both featuring an upperside camouflage scheme of dark olive-like green and extra dark sea grey and the quoted Humbrol colours of (Satin) 163 and 123 respectively seem pretty close to the mark. Underside is painted in a light aircraft grey with the belly fuselage section painted in silver. The nosecone and main intake covers are painted in Satin Black. The instructions say to have the canopy with two distinct frames - my collection of Saab Draken reference photos clearly show that the back portion of the canopy should be overpainted so that there is only one frame for the windscreen. The canopy is also a little too sleek and slender on the kit - in real life there is a more profound rounding.
The decals go on very nicely, they adhere to the surface very well and were a pleasure to work with. But that was where the good stuff stopped. While the register is generally quite good, small slits of white bleed out around the edges of the yellow (checkerboard decals included) and the blue on the roundel is a bit too light. Register of the small serial numbers is a bit blurry and looks like they have been placed on the aircraft in 'bold' writing. Despite this you can manage with them, you need to get very close to the model to see the white backing bleeding out, and there's always some choice from propagteam or extratech to call on.
My finished kit certainly looks like a Draken in spite of the flaws pointed out above but there are some further problems. Most of the panel line detail is quite good and includes the air inlet scoops on the fuselage sides. There is, however, a complete absence of any other antennae including the belly TACAN fin and small probe visible between the auxillary intakes. The model is also slightly oversized to scale - it should be about 213mm in length including nose probe but the model is about 219mm - but this could be more attributable to the bulky nose probe.
Overall this is a kit that needs to be taken according to the modeller's intention. For the stickler for accuracy there is just too many little but distinctive flaws that render it unsatisfactory, and perhaps should be overlooked in favour of a Hasegawa or like offering. However, for those looking for a simple kit that captures the Draken's lines very well and are not so concerned with the little inaccuracies, then this makes for an excellent little kit suitable for all modelling skills.
Related Reviews: Hasegawa 1/72 J35 Draken
Back to home
Kit Review Index: 1/72
1/48