

Regardless of what history or personal opinions say about Italy's performance (or lack of) or behavior during WWII, the fact remains that Italy managed to produce some truly beautiful aircraft. One of those was the Macchi C.202/205 series of aircraft. Personally I can't quite pin down what I believe to be the finest looking aircraft of that era. One day I think it's the late-model Spitfires, another the Mustang, another Kawasaki's Tony, and then some days it's the Macchi C.202/205.
Built around the Daimler Benz DB 601A engine (due to the lack of adequately powerful Italian engines), the Macchi C.202 "Folgore" flew for the first time on August 10, 1940, exactly two months after the entrance of Italy into WW2. The total amount of C.202's produced was only 1,100 units,
Originally only two 12,7mm machine guns were placed over the engine, but this was later supplamented by two 7,7mm machine guns placed in the wings.The Powerplant was a 1,175hp Alfa Romeo AR1000 RC 41-1 Monsone which was the licenced version of the German Daimler-Benz DB-601.
From 1942 onwards, the C.202 was supplied to most of the Regia Aeronautica's first-line fighter units, but by the end of the year the worsening military situation, in addition to the appearance of the Curtiss P-40, the Lockeed P-38 and finally the Spitfire Mk IX, made it clear that the amount of C.202s available was too small to sustain the rate of losses facing an enemy capable of putting hundreds of aircraft in the air at once.
The C.202 however, fought on all fronts including Russia and continued to fight with the Italian Co-Belligerent Air Force even after the Armistice.

This is the second Macchi I have built by Hasegawa, the first was the "Folgore" which I completed last year. I have also just completed the Egyptian Air Force C.205. There are still three more on my shelf to do, one C.202 and two C.205's of which one will definitely be a Luftwaffe machine.
This model was built straight out of the box with the exception of the decals and seatbelts and buckles made from masking tape. Overall I have to give the Brothers Hasegawa their due and thank them for a superb model kit.

Construction begins of course with the cockpit which consists of a dozen finely molded components. The instrument panel is well done with raised detail and dials. You have a choice of painting the instruments on or using kit supplied decals. I painted mine. From there, you basically follow tradition. The cockpit fits nicely between the fuselage sides and the two halves go together flawlessly. Once the fuselage was glued with Tenax, all that has to be done is polish off the glue stain with fine sandpaper and then steelwool. next comes the only part of the kit that is not perfect, the upper cowling. This will take a bit of filing and jiggling about to get a smooth fit. Next the tail planes were attached. Then the wings and main gear bays were assembled and fitted to the completed fuselage. The gear bays are nicely done and have more than acceptable detail. Finally the propeller and radiator were assembled and the completed radiator attached to the fuselage. The model was then washed and painting was underway.

I finished my Macchi C.202 based on the Ministry Of Small Aircraft Production decal sheet #4853. The aircraft I chose to depict was from the 386° Squadriglia, 21° Gruppo Autonomo C.T., at Voroshilovgrad, Russia in 1942. I guess the desert camo befitted the steppes in summer. You can also depict: A: an aircraft from the 79° Squadriglia, 6° Gruppo, 1° Stormo C.T. based in Libya in December, 1941. It was finished in Light Grey undersides and Sand uppers with Dark Green sprayed blotches with a White fuselage band, nose and spinner. B: an aircraft from 151° Squadriglia, 51° Stormo with Light Grey undersides and Sand uppers with sprayed smoke rings of Dark Green with White fuselage band and spinner. C: an aircraft in Luftwaffe markings assigned to III° Gruppo Caccia at Milan in April 1944 finished in Light Grey undersurface and dark Bottle Green uppers with the spinner two-thirds Bottle Green and one-third White. D: an aircraft of 369° Squadriglia, 52° Stormo, 22° Gruppo finished in the same scheme as aircraft B. E: an aircraft from 351° Squadriglia, 155° Gruppo, 51° Stormo finished with Light Grey undersurfaces with Dark Green uppers with sprayed blotches of Yellow Ochre and White fuselage band and spinner. This is the C.202 I think I'll do next. The Luftwaffe version is very plain and somewhat of a disappointment but I have the Macchi C.205 Veltro that Hasegawa released in Luftwaffe colours, so that's not a problem. The decals themselves were excellent. The white cross for the tail was a little translucent, but that's my problem for being stupid enough not to paint the darn thing on. This was the first time I ever used MSAP's decals and can recommend them without any reservation whatsoever.
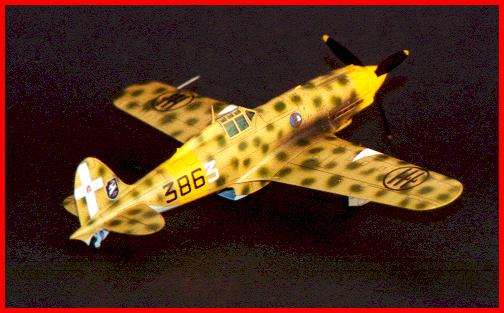
The first Macchi I built had a white nose/prop and fuselage band, so I wanted something different and went with a yellow band and nose/prop. This aircraft also had white triangles on the upper and lower wings. Being the disorganized (stunned, perhaps) lad I am, I managed to paint, gloss and decal the whole aircraft before I remembered the triangles. I had to carefully mask over the finished aircraft and spray flat white to help cover the darker undercoat. Next the entire aircraft was coated with semi-gloss and then exhaust stains were sprayed on.

All paints used were Testor's ModelMaster and I used Tenax 7R and Humbrol glue throughout. Again, I recommend this kit for anyone regardless of modeling experience. As I mentioned the upper cowling was the only item even resembling a problem, and that's why we have files and sandpaper, right?