making a simple harmonograph


This is a simple harmonograph made from a tripod joined at its apex by a rubber band which can be slid up or down to change the ratio of swinging to twisting. The pendulum is started by pushing it. Place paper on pendulum, position pen holding arm on ground next to tripod in such a way that the pen leaves a trace on the paper as the pendulum swings.

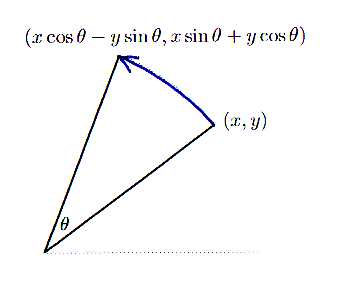
The rate of twisting should be adjusted until it is nearly the same as the rate of swinging, or an exact multiple. Multiples are tricky unless you make a really long pendulum.
Two pen arms are shown, small and large; the size chosen should be appropriate to the size of the harmonograph. The extent to which the pen is balanced by the counterweight determines the damping of the pendulum. The pendulum can be any shape which is approximately symetrical about a pole. A large book works very well. The patterns can be made tiny, especially if very smooth paper is used.

movie of harmonograph in classroom


Perhaps the simplest way of making a harmonograph is shown below

People will want to go through the doorway, a natural impulse is to want to swing on the book.


The images can be controlled if the pendulum is started as shown below: a weighted stick topples off one corner of the pendulum to set it going in a reproducable way.
(needs java-enabled browser)


If there are no materials to make a tripod, three drawing pins in the top of a doorframe work well, the disadvantage of this is that people will be unable to use the door while the harmonograph is in use. A short loop of string round the three suspension strings near the top can be used to control the twisting/swinging ratio in this case; the tighter the loop, the slower the rate of twisting. For a very long pendulum use a stairwell. It's a good thing to do with children because everyone who tries gets a coherent result. They may want to swing on the swing.
Much more sophisticated harmonographs can be made, they lend themselves to string/sellotape/ cardboard construction. If ceramic-drawing felt tips are available, a plate or mug from your local pound-stretcher makes an interesting variation on paper. Try making a tiny pattern inside the lip of a mug. The result isn't dishwasher-proof, but it's quite good.

This is a new design, it requires very little in the way of materials or skills.

It has two weights suspended from cardboard bearings over the edge of a table with bits of string; you can't really see the weights in this photo, they are two pebbles.
This is a drawing of it

This is how you make one of the pendulums

This is how you cut and bend an old vcr box

Detail of the arm

It may be possible to combine this harmonograph with the tripod one: put the tripod on the table and adjust it to roughly the same frequency as the pendulums.
link to movie of VCR box harmonograph


This is a similar design


It can be made using felt tips & cheap sellotape as lego. Although it looks complicated, the basic module is quite simple


If the card between the pivots slips, you can secure it with more blue-tack: anywhere except at the point where the weight bears.
Notice the pivots for the scissor arm are themselves made of blue-tack: this is OK as long as you don't press the two things together too hard.
This is another very simple harmonograph


Like the VCR box one it has the advantage that you don't have to tune it; the detailed drawing of the arm below shows the strings going through cardboard brackets rather than through the arm itself. This is because if a string goes through a hole in a tube it tends to line the hole up with itself. If the string goes through something flat the flat surface is free to rock and isn't constrained by the axis of the string.


similar design on YouTube


This is one that packs away into a miniature cigar box, so you can carry it in your pocket


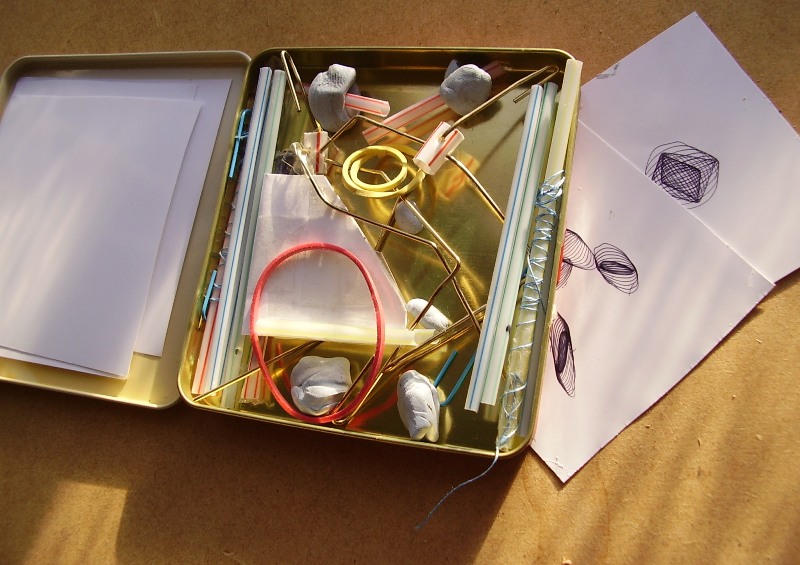
It uses coins for weights (not included) held together with a rubber band


It is similar to previous designs except for the bearings which are made of paperclips threaded at right-angles through holes in a bit of straw


harmony
jonathan lansey's site
automatic harmonograph pattern generator
read about differential analysers
make a cardboard pendulum escapement. About half-way down

movie

back to main site

virtual harmonograph: control by moving/clicking/refresh

(needs java-enabled browser)


how to write harmonograph programs

Most computer languages have a feature which lets you draw circles. You specify where you want the circle, how big & what colour and the computer program draws it. However there is something to be said for writing a program which draws circles 'by hand' using a series of straight lines.

People are not infrequently baffled by the words 'sine' and 'cosine'. They are just a way of describing the proportions of every possible right-angled triangle using numbers. Flat ones, steep ones, all the ones in between. Think of it like a method for categorising roof-trusses in a mail-order catalogue.
Anyway this turns out to have lots of practical uses, one of which is to get a computer to draw a circle.
You can draw a right-angled triangle for any point on the circle: each one a different shape, with different values for 'xoff' and 'yoff' and 'a' but the centre is always in the same place ('x' and 'y') and the radius doesn't change.
This is a program that draws a circle, it isn't written in any specific language

for a= 0 to 6
yoff=r*sin(a)
xoff=r*cos(a)
thisxvalue=x+xoff
thisyvalue=y+yoff
draw line(lastxvalue,lastyvalue,thisxvalue,thisyvalue)
lastxvalue=thisxvalue
lastyvalue=thisyvalue
next a


'a' (a for angle) takes values from 0 to 6 as the program goes round & round the loop, this is because computers usually measure angles in radians rather than degrees and there are roughly 6 radians in 360 degrees. You could, if you wanted make it go round lots of times by making the first line

for a= 0 to 60

because it's quite an angular circle you really would see it go round ten times. If you made the circle smoother

for a= 0 to 60 step 0.1

you wouldn't see it going round after the first time because it would be drawing over the top of itself. However if you made the radius a bit less after drawing every line by putting this in somewhere

r=r-0.001

you would get a spiral that went round ten times. The number '0.001' would control the pitch of the spiral. So with a little ingenuity you could make a spiral with a varying pitch. You can also squash the spiral

yoff=r*0.9*sin(a)


or squash the other dimension, or make the squashing a function of the angle or whatever I find it's a good idea to 'shoot first & ask questions later'. Make a change, run the program, see what's happened then try to understand it if you can. This makes for sloppy thinking, but unfortunately sloppy thinking is my middle name.
Finally, you can make it draw little circles instead of straight lines

smallr=r/10
fasterangle=a*5
yoff=r*sin(a)+smallr*sin(fasterangle)
xoff=r*cos(a)+smallr*cos(fasterangle)


you can make the angles overtake each other

fasterangle=a*5.01


the thing is to experiment.


another use for spirals

Most programming languages have a feature which allows you to paste an image from the clipboard. This means that if you use your program in conjunction with a graphics program you can use the graphics program to select an area of an image which you can then copy onto the clipboard and paste into your program.
Usually there will be two commands 'get pixel' and 'put pixel'. These enable you to detect the colour of any pixel on the image and to put it wherever you want on the screen.
You can use this to re-map an image any way you want, one very interesting way is to distort a circular image of a face so that you can make it into a paper cone

If you print this onto a sheet of A4, cut out the semi-circle & fold it into a cone with the image on the inside it looks exactly like the mona lisa again; but if you tip it slightly up & down you will see the expression of the mouth change to a smile. Tip it slightly from side to side & you will see the direction of the eyes change.
This will work with any picture of a face which is looking directly at you.
The way this is done is by pasting a circular selection into your program then drawing a very close spiral over it that covers every single pixel. In fact you don't really draw a spiral you just get the colour of every pixel the spiral covers. Then you use the colours to draw another spiral, but this time you only draw one half of the spiral: you make a spiral of semi-circles so that you end up with a semi-circle. Because each semi-circle is only half the length of the circle it's getting its colours from, you have to double the rate of colouring.
Imagine that your original image is six foot across & made of coloured sand. Now imagine that you suck up that sand by moving a vacuum cleaner round in a spiral until you get to the middle. Finally imagine that the sand is sucked into a long tube without getting mixed up and blown out somewhere else, so that by moving the end of the tube that's blowing the sand out you can re-create the original picture. Of course if you move the tube in a six-foot wide spiral you will get exactly the same picture. But if you move it in a series of concentric semi-circles you'll get the distorted picture, except that you'll have to make it bigger or you will finish too soon.
When you've eventually created your re-mapped image you can put it on the clipboard by pressing the 'print screen' button, then you can paste it into the graphics program to re-size it & print it or save it.


rotating a point around the origin

Another way you can draw a circle is by rotating a point around the origin

This is quite tricky to prove so I won't. You can draw a circle by rotating a point by a small angle over & over again and draw a line from each point to the next. It's much quicker than the previous method because the angle is always the same so the program only has to calculate one sine and one cosine. Finding sines & cosines is very costly in terms of program speed; you will soon find that speed is the limiting factor of your programs.
Unfortunately doing it like this is harder to understand intuitively however it has another quite important advantage: because the point is rotated by the same angle regardless of the radius you can rotate entire images without changing them. For example you could write a program which drew your initials & then made them spin round & round.
This becomes much more interesting when you rotate the image around the 'x' or 'y' axis as well. When you rotate a point around the origin you are really rotating it around the 'z' axis, an axis perpendicular to the screen. This doesn't matter in the first instance because it's a flat image without any 'z' dimension. If you give the points 'z' co-ordinates as well as 'x' and 'y' co-ordinates and then rotate it around the 'x' or 'y' axis it appears to tumble in 3-dimensional space.
You can generate a 3D image automatically by some such means & then rotate it: that's how the 'virtual harmonograph' above works. When you move the mouse it generates a spiral; when you click it automatically gives each of the points in the spiral a 'z' co-ordinate which gets bigger as you go towards the middle. So when you move the mouse some more and the image begins to tumble, it isn't flat but pyramid-shaped.


how to write mandelbrot programs
object oriented programming


I could while away the hours
Conferrin’ with the flow’rs,
Consultin’ with the rain.
And my head, I’d be scratchin’
While my thoughts were busy hatchin’,
If I only had a brain.

I’d unravel ev’ry riddle
For any individle
In trouble or in pain.
With the thoughts I’d be thinkin’
I could be another Lincoln,
If I only had a brain.

Oh, I could tell you why
The ocean’s near the shore,
I could think of things I never thunk before
And then I’d sit
And think some more.
I would not be just a nuffin’,
My head all full of stuffin’,
My heart all full of pain.
I would dance and be merry
Life would be a ding-a-derry
If I only had a brain.


my email is davidvwilliamson@hotmail.com


angel band
Calon Lan
I dreamt that I dwelt in marble halls
nabucco overture
pasculli oboe concerto
st john passion
twist & shout
amelita galli-curci
nanci griffith
iris dement
tino rossi
doomsday scenario
piano lesson
flute lesson