
To make it worse, the light from your strobe must travel from your camera, to the subject, and back to your lens.
Drew's Photo Tips for the "Serious Amateur"
| Do you want to be a dive
photographer? Bring home more than just memories? Underwater photography is difficult and complicated. The underwater environment is not friendly to electronic equipment, or light, which are both pretty critical to taking pictures. These problems can all be overcome, unfortunately, it costs a small fortune to do it like a professional. Firstly, what is a "serious amateur"? I define it as someone who dives regularly, wants to spend some money on photography equipment, but does not want to mortgage their house to do it. Dive photography can be addictive, and will change the way you dive, and have an affect on everyone you dive with. Firstly, as an amateur, your buddy is your buddy, not your assistant. Your buddy and the rest of your group should not have to wait for you while you hover for 20 minutes waiting for a moray to stick his head out and frame himself perfectly for you. Secondly, you should remember that you took a dive trip to dive, not take pictures. Don't forget to enjoy your dive, see the sights through your mask, not just your view finder. So, here are some tips and comments for the "serious amateur." |
Technique
All dive/photo pros will tell you the first secret to getting good shots is to have good diving skills. Just like on land, you'll never get good photos if the camera is shaking and you are waving your arms around.
Control your buoyancy - Don't touch the reef if you can help it. Good buoyancy control will help you hold still.
Weight yourself right - You know how much weight you normally use. Is your camera positive or negative? It will make a difference, so be sure to add some extra weight if your camera floats. It will make the biggest difference in shallow water towards the end of the dive (where the light and photos are the best!) I always start my dives negatively buoyant, so I end up neutral at the end.
Squeeze the shutter, don't punch it - again, keep the camera as still as possible.
Exhale just before shooting - your own bubbles can interfere with your shot.
Courtesy - Remember the other people on your dive. If they spot for you, don't elbow them out of the way as soon as you approach. Most fish are territorial and will be there when the other divers move on, leaving the scene for you to shoot. Remember, these people will be on the boat when you get back. (My dive buddy is also my fiancé, so this rule applies all the time.)
Most Importantly, Dive Safe - With all your extra gear, dials and meters, don't forget the most important dials. Watch your depth, watch your air, and watch out for your buddy. You don't want your heirs to develop your last photos.
Underwater Photo Physics
Water vs. Light - Water absorbs light 800 times faster than air. That's why it's dark down there.
Light comes in different colors/wavelenghts. Red is the first
color to be absorbed, followed by yellow, lastly blue/violet, which is why the sea is
"Deep Blue." The deeper you go, the less light you'll
have, and the less red/yellow colors you'll have. Your flash will
bring a little light with you, but probably not very much.
Remember, the water absorbs sunlight from the top down and it
also absorbs the light between your camera and your subject.
To make it worse, the light from your strobe must travel from
your camera, to the subject, and back to your lens.
Photography is simply capturing the light reflected off of your subject. If the fish is too far away, what little light there is reflecting off of it will be absorbed before the photons hit your film. Your eyes and brain compensate for the low light, but your camera does not. Remember, the less water between your subject and your camera will make for better pictures. In depths greater than 30 feet, your photos using natural light will only be black and blue.
Refraction & Distance - Light waves move through the air and the water at different speeds. Light waves moving through the water, hit the glass/air of your mask and 'bend' as they hit your eyes. Just like an object in a glass of water, the shape will be changed. As such, everything you see under-water appears 25% bigger and closer than they actually are. It is very easy to underestimate the distance to your subject. Keep in mind, this rule holds true for your camera as well (unless the lens has filled with water, in which case nothing matters!)
Equipment
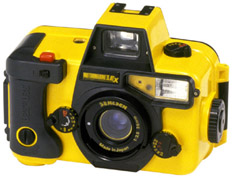
| I use a Sea & Sea Motomarine II-EX. (I also have
an older MMII for a back up.) This has been described as,
"the last stop before stepping off into the
abyss." The MMII-EX is a serious camera, costing
around $500, that will take great photos by itself, both
above and below the water. It is a true amphibious
camera. Its capabilities are similar to what the pro's
use, at half the cost. At the same time, it is quantum
leaps ahead of the lower end of the market, such as
disposable housings. It's much simpler to operate than a
Nikonos V, and less prone to breakage. The MMII has only
two O-rings, while the Nikonos has 22! Less O-rings means
fewer opportunity for floods. I've taken it to 130 ft, and never, ever had any problems with leaks. Sea & Sea says it can go to a depth of 150 ft. You have no business going this deep, anyway. |
 |
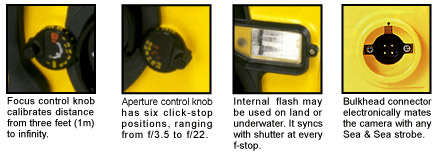 |
Sometimes, especially if I'm diving shallow dives, I don't use an external strobe (costs start at $300), using only the internal flash in the camera. While the additional light would make some shots better, it is a big and bulky rig. I'm looking to buy a wide angle lens at some point. At a cost of $200, it seems to be a value for the increased flexibility it brings. |
The Sea&Sea MMII-EX comes with a built-in close-up lens, which is a nice feature as it gives you the ability to change the type of photography you are doing during the dive. It also has advanced features such as TTL (Thru-The-Lens) light metering when used with a TTL strobe, this makes the strobe turn off when the picture is properly exposed. One of the reasons I bought this camera (my first in 1990, when I was a student) is that I can add on features, such as wide lenses, filters, strobes when I'm ready and have the money. This system can grow with you. It's also simple enough to use that even an amateur can take great pictures.
The light meter is built in, and tells you when your subject is underexposed. Other lenses are bayonet mounted on the camera and can be changed under-water, giving you added flexibility.
There are advantages and draw-backs to this set-up. Most of the drawbacks can be overcome with some careful photo techniques.
I'll separate Simple Tips, and Technical Tips on the next pages, because, there is a big difference between using judgment about framing, light, and distance, as opposed to thinking about f-stops and exposure.
Home - CoCo View - Roatan Dive Guide - Grenada - UW Photos
Drew Thompson ©2000
Camera photos courtesy of Sea & Sea. (www.SeaandSea.com)
