E36 Stereo Upgrades
The 328iC is a wonderful car, but the stock stereo really falls short, primarily due to insufficient bass. The system comes with ten speakers, driven by an alleged 200-watt amplifier located behind the rear seat. There isn't a lot of room for speakers that can put out strong bass -- the fronts are 5-1/4" woofers in the foot well, and 2" midranges and 3/4" tweeters mounted in the doors, and the rears are 4" midranges and 3/4" tweeters. Additionally, the amp is underpowered -- despite its 200 watt "rating" (at 10% total harmonic distortion!). I suspect that this 200 watt rating is derived from the fact that each channel is around 20 watts, times 10 speakers = 200 watts (yeah, right). Here is some discussion that occurred on the UUC Digest on the stock stereo system.
My upgrade proceeded in three phases.
Phase 1, December 1997 - Added a CD Player. I
ordered a factory CD player from The BMW
Store in 
Phase 2, August 1998 - Added a Subwoofer and 2-Channel Amp.
The next improvement consisted of bridging a new Sony 2x50 watt amp off the
rear input to the stock amp to run a JL Audio
8.1 sub in the trunk.  This
is a single 8-inch diameter sub, in a factory-supplied enclosure. It's
the smallest of the units made by JL Audio, which is an important factor for
this car. To get the sound through from the trunk into the passenger
compartment, I removed the part of the trunk liner that sits against the rear
seat bulkhead, and also removed the plastic separator that is mounted behind
the center armrest (removable bolster) in the rear seat (the separator is where
a ski storage bag may be in other models?). The JL Audio sub fits
nicely in the trunk, and in fact wedges in place to stay by itself without
needing any fasteners. The amp is powered directly from the battery (in
the trunk), with an-line fuse conveniently located so that if I need to reclaim
storage space in the trunk by removing the sub, I can pull the fuse so that the
amp doesn't hurt itself trying to put out 150 watts into a non-existent load.
This
is a single 8-inch diameter sub, in a factory-supplied enclosure. It's
the smallest of the units made by JL Audio, which is an important factor for
this car. To get the sound through from the trunk into the passenger
compartment, I removed the part of the trunk liner that sits against the rear
seat bulkhead, and also removed the plastic separator that is mounted behind
the center armrest (removable bolster) in the rear seat (the separator is where
a ski storage bag may be in other models?). The JL Audio sub fits
nicely in the trunk, and in fact wedges in place to stay by itself without
needing any fasteners. The amp is powered directly from the battery (in
the trunk), with an-line fuse conveniently located so that if I need to reclaim
storage space in the trunk by removing the sub, I can pull the fuse so that the
amp doesn't hurt itself trying to put out 150 watts into a non-existent load.
Stereo Pin-Out information is available to assist in wiring jobs. In the convertible, the stock amp is located behind the rear seat, on the passenger side (in the hard tops the amp is in the trunk).
With this improvement the system definitely sounded better than before, but I continued to notice distortion from the stock speakers, especially if the music was turned up loud. I lived with this arrangement for one year.
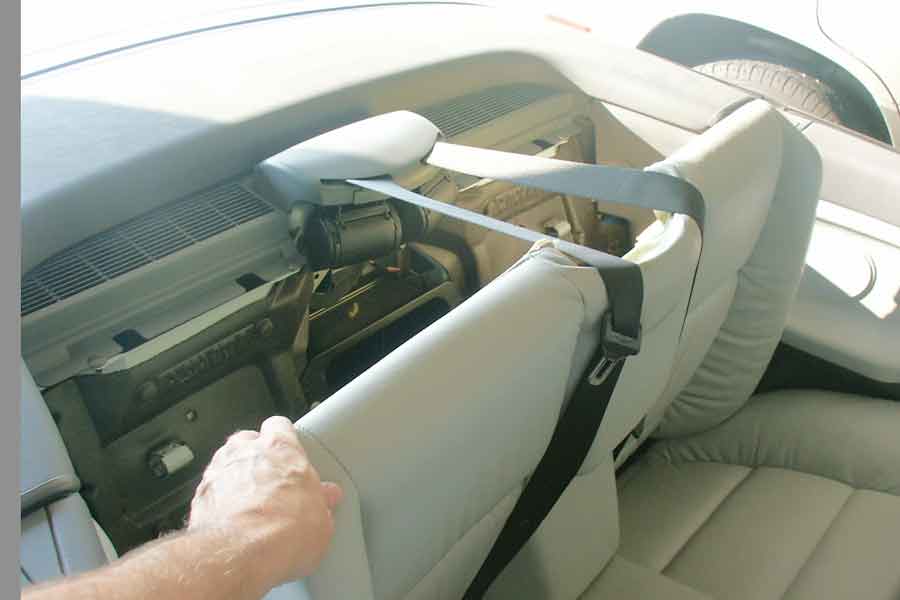
Phase 3, August 1999 – Installed MB Quart Speakers and a
Rockford-Fosgate 4-Channel Amp. The third (final?) phase was to
replace the front speakers with high-quality MB
Quart components, and to power them and the sub with a new 4-channel amp. See system diagram. MB Quart is known for
the high quality of their speakers, and especially for their
"drop-in" components that fit right into the BMW. After much
research, I decided on the 215.03 sound set, which consists of 5-1/4"
woofers, 1" tweeters, and two-way crossovers. I reused the stock
wiring, as I didn't want to have to rip out the entire interior of the
car. The woofers mounted directly into the stock locations in the
footwell, no problem at all, other than having to replace the stock speaker
connectors with the larger size version that comes with the MB
Quarts. For the tweeters I had to be a little more
creative. I wanted to keep the look as stock as possible -- I didn't want
to have to cut extra holes, or surface mount the speakers where you could see
them. I ended up mounting them into the stock tweeter locations in the
door, reusing the stock grill assemblies. To do this I removed the
door panels, disassembled the stock tweeter assemblies, and did a little
sculpting with a rotary tool (dremel) to shave some of the plastic off the
inside of the tweeter grill assemblies so the new tweeters would
fit. This allowed me to press fit the new tweeters into the
assemblies, and remount them into the stock location in the doors.
I disconnected the leads to the stock mid-ranges, as I no longer use them at
all.
and to power them and the sub with a new 4-channel amp. See system diagram. MB Quart is known for
the high quality of their speakers, and especially for their
"drop-in" components that fit right into the BMW. After much
research, I decided on the 215.03 sound set, which consists of 5-1/4"
woofers, 1" tweeters, and two-way crossovers. I reused the stock
wiring, as I didn't want to have to rip out the entire interior of the
car. The woofers mounted directly into the stock locations in the
footwell, no problem at all, other than having to replace the stock speaker
connectors with the larger size version that comes with the MB
Quarts. For the tweeters I had to be a little more
creative. I wanted to keep the look as stock as possible -- I didn't want
to have to cut extra holes, or surface mount the speakers where you could see
them. I ended up mounting them into the stock tweeter locations in the
door, reusing the stock grill assemblies. To do this I removed the
door panels, disassembled the stock tweeter assemblies, and did a little
sculpting with a rotary tool (dremel) to shave some of the plastic off the
inside of the tweeter grill assemblies so the new tweeters would
fit. This allowed me to press fit the new tweeters into the
assemblies, and remount them into the stock location in the doors.
I disconnected the leads to the stock mid-ranges, as I no longer use them at
all.
The speaker cross-overs are located behind the rear set, in the same area as the amp - see below.
I chose a Rockford Fosgate
Punch 600a4 amp.  The front
channels are wired to the MB Quart cross-overs, and the rear channel speakers
are bridged to the sub in the trunk. I mounted the amp to a piece of
plywood, which in turn is mounted to the chassis of the car behind the rear
seats. There are some convenient bolt hole locations to do this -- I
assume they are for the optional roll-over protection equipment, which my car
doesn't have. I upgraded the power wiring so it is all 8 gauge, and used
the 50 amp (!) fuse that came with the amplifier. The signal input to the
amp is fed by the speaker-level outputs from the head unit. All the
wiring is conveniently accessible behind the rear seat, allowing me to easily
adjust the amplifier gain, crossover frequency, and bass boost controls.
The front
channels are wired to the MB Quart cross-overs, and the rear channel speakers
are bridged to the sub in the trunk. I mounted the amp to a piece of
plywood, which in turn is mounted to the chassis of the car behind the rear
seats. There are some convenient bolt hole locations to do this -- I
assume they are for the optional roll-over protection equipment, which my car
doesn't have. I upgraded the power wiring so it is all 8 gauge, and used
the 50 amp (!) fuse that came with the amplifier. The signal input to the
amp is fed by the speaker-level outputs from the head unit. All the
wiring is conveniently accessible behind the rear seat, allowing me to easily
adjust the amplifier gain, crossover frequency, and bass boost controls.
Here are a couple of photos showing this arrangement. The first is a photo showing the location behind the rear seat where the amp is located. There's a plastic vent piece that you have to remove to get to it. First you have to partially raise the storage bin lid for the rag top, then you can pry this plastic piece off. You can see that I mounted the amp to a piece of plywood, which in turn is bolted to the chasis using two existing threaded holes, which I assume are there for mounting the automatic roll-over protection mechanism. The second photo is a shot of the rear seat being removed - you simply grasp the seat near the top and pull it forward. It's held in place by a couple of spring clips.

Here's a picture showing the amp mounted to the piece of plywood, about to be positioned behind the seat:

Once the seat is removed, there's a piece of rubber-like insulation that covers the access to the space behind the seat. The next two pictures show this insulation removed, revealing the cross-overs and the mess of wiring. The amp is actually positioned above the cross-overs behind the metal. I left enough slack in the wiring to be able to pull the amp upwards (as in the previous shot) -- hence the resulting slack in the wires once the amp is bolted in place as in the next two pictures.
 It all
sounded great, for about two days. Then the gremlins struck! The
first thing that happened was the fuse blew. I figured maybe I had turned
the system up too loud (who, me?), so I replaced the fuse and tried it
again. There was no sound at all, so I kept experimenting with other
speakers and sources to try to isolate the problem. Suddenly, there was
some sound, but it was highly distorted. Then smoke came billowing out in
a very ominous way! Doh!! Quick - turn the system, off and yank the
fuse! I sent the amplifier back to Rockford Fosgate and they repaired
and returned it to me in a little over a week (nice service). I wired the
amp back into place, and the sub still didn't work. After a little
investigation I determined that the sub was shot! Could I have somehow
blown the sub, which in turn messed up the amp? I sent the sub back
to JL Audio for repair, which took 3 weeks -- no hassles except for a $10
shipping charge.
It all
sounded great, for about two days. Then the gremlins struck! The
first thing that happened was the fuse blew. I figured maybe I had turned
the system up too loud (who, me?), so I replaced the fuse and tried it
again. There was no sound at all, so I kept experimenting with other
speakers and sources to try to isolate the problem. Suddenly, there was
some sound, but it was highly distorted. Then smoke came billowing out in
a very ominous way! Doh!! Quick - turn the system, off and yank the
fuse! I sent the amplifier back to Rockford Fosgate and they repaired
and returned it to me in a little over a week (nice service). I wired the
amp back into place, and the sub still didn't work. After a little
investigation I determined that the sub was shot! Could I have somehow
blown the sub, which in turn messed up the amp? I sent the sub back
to JL Audio for repair, which took 3 weeks -- no hassles except for a $10
shipping charge.
Phase 3 and a Half, October 1999 - Adding a Second SubWoofer. To help make sure that the sub isn't over-loaded, and with the hope of getting a little more "oomph" from the system, I added a second JL Audio 8.1 Microsub. Each sub is now wired to its own channel from the amp (rear left and rear right) - they are not bridged, as Rockford Fosgate amps reportedly don't like a 2-ohm load bridged (in stereo they seem to be OK with 2 ohms -- this advice is from the dealer).
A tidbit of information that I picked up from the dealer is that the JL Audio MicroSubs are designed to be aimed towards a wall, or downward toward the floor with just a small space between the speaker and the wall or floor. (This helps explain why there are no protective ghrills on the woofers: since the speakers are suppose to be aimed away from the open area of the trunk there is little risk of cargo damaging the cone. However, JL Audio does in fact offer an optional grill kit if you really want the extra protection.) I accomplished this spacing by making some plywood brackets that allow the speakers to face downward with about 2 inches of space to the trunk floor. I believe this actually does improve the sound quite a bit.
Here's a picture of the two subs in the trunk - note that you can see the pass-through hole between the trunk and the passenger cabin. You can also make out the CD changer, which is located just to the right of the pass-through hole.:

With this arrangement there's still room in the trunk for carrying small packages or an overnight bag. For anything larger, I can easily disconnect the subs and reclaim the space.
End Result - How Does It Sound? I think it sounds great! I'm not into heavy, thumping bass (you know, the kind you can hear coming from 1/2 mile away), but rather realistic sounding music that conveys as accurately as possible the sound that the artist intended. I listen mostly to classic rock, and this set up does a great job. The only drawback is that the subs take up a fair amount of room in what is already a very small trunk. When packing for a weekend away, I often end up having to put a suitcase on the rear seat, since anything larger than an overnight bag won't fit into the trunk along with the two subs. Also, storing the convertible wind deflector in the trunk is a pain, because it has to be stored flat on the floor of the trunk underneath the subwoofers.
Phase 4 – Replacing the stock C33 Business Radio Cassette with the CD43 Radio Compact Disc. The CD43 features an in-dash cassette and much improved sound quality over the original radio, and being a BMW product matches the interior perfectly. See the CD43 page for information on this radio.
Page Last Updated: April 20, 2007