
Great shot detailing the wing struts
and wires of a Swordfish Mk.I
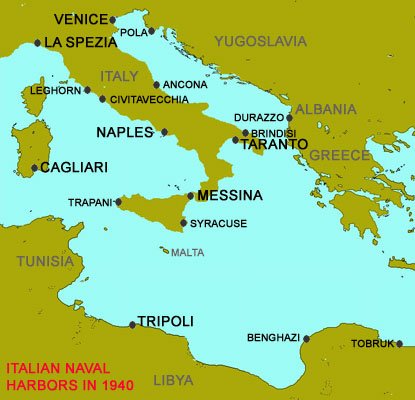
WAR
IN THE MEDITERRANEAN 1940-45
An
aero-naval perspective
THE TARANTO
RAID
(11 November, 1940)
Photos:
Archiv Eles, de Alexandris
collection, IWM, USMM, USNHC
Great shot detailing the wing struts
and wires of a Swordfish Mk.I
PREFACE
Although the British propaganda lamented an alleged "cowardice" on the part of the Italian battle-fleet, which throughout the summer of 1940 had seemingly refused a large-scale engagement, Admiral Cunningham knew the real reason why such a decisive event hadn't occurred, as he would later confide to his memoirs: though already commissioned in the Regia Marina, the two new battleships of the Littorio class (Littorio and Vittorio Veneto) and the last of the converted dreadnaughts (Andrea Doria) were still on trials and therefore unavailable for combat. That left the Italians with only with the two Cavours (Cavour, Giulio Cesare) and Caio Duilio (all three armed with 12.6-inch guns) facing an enemy that in the theater could count on no less than six 15-inch dreadnaughts (Warspite, Malaya, Valiant, Royal Sovereign, Ramillies, Resolution) plus one or two 15-inch battlecruisers (Hood and Renown.) All of this with France already out of the picture: had history taken a different turn, with Germany unable to invade France, the combined Royal Navy Mediterranean Fleet and the Marine Militaire would have quickly made mincemeat of the Italians. But then again I believe that Mussolini would not have been stupid enough to go to war against such overwhelming odds: Italy would stay neutral and would probably follow the fate of Spain, with a dictatorship well into the seventies...

In late 1940, HMS Illustrious was the
most
modern carrier in service with the Royal Navy.
Her armored flight deck, while limiting the air
complement, provided an unmatched protection
that saved her from German and Italian bombs
first and Japanese kamikazes later.
As the summer of 1940 drew to a close, the situation for the Royal Navy had meanwhile grown much worse. The two Littorio dreadnaughts had entered active service and all other battleships, with the only exception of Doria (still on trials), were now available to the Italians. In addition, a few months of war had already proven the impracticality of a coordinated large-scale operation involving both Gibraltar-based Force H and the Alexandria-based Mediterranean Fleet. The five (soon six) Italian battleships suddenly became a very serious threat and it was the Royal Navy this time that might have had doubts before engaging such a force. It's important to understand that while the British still enjoyed a slight superiority in number of large-caliber guns, the modern Italian dreadnaughts had a substantial speed advantage over the WWI-vintage Queen Elizabeth and Royal Sovereign (a.k.a. "R") classes, which they could use to get in and out of range at will. In addition to this bleak picture, what the Italians seemingly lacked (an effective bomber force capable of successfully attacking naval vessels) would soon be provided by the Luftwaffe, a fact that British intelligence had discovered well in advance. Something HAD to be done to fix the problem, and as quick as possible.
THE PLAN
Although the Taranto raid may seem an operation conceived on the spur of the moment and executed with disarming simplicity (approach the southern Italian coast, launch the bombers, sink the dreadnaughts, retrieve the aircraft, get back to base to celebrate victory), in fact it was an overly complex one, involving decoy forces, spies, intelligence, fake radio signals, hundreds and hundreds of hours of reconnaissance flights and, last but not least, a plan that had been conceived back in thirties.
The first idea of an attack on the Taranto naval base was discussed by Admiral Sir Dudley Pound, then commander of the British Mediterranean Fleet, after Italy's invasion of Abyssinia. At the time Pound had a single carrier under his command (Glorious) and invited her skipper, Captain Adrian L. Lyster, to give a realistic study of feasibility on the raid. Lyster was very confident that such an attack, albeit a daring one, could be carried out by his torpedo bombers.
In 1938, after the crisis over Czechoslovakia, the Admiralty decided to further investigate the possibility of an air raid on Taranto and Lyster, now an admiral, was formally asked to provide a plan. According to some historians, after gathering the best naval minds of Britain, the plan was sketched, although no trace of this has ever been found.
It's no coincidence that when the brand-new carrier Illustrious was delivered to the British Mediterranean Fleet in August 1940, with her came Rear-Admiral Lyster. The old plan was resurrected, adapted to the situation and greatly enhanced.
As planned, two carriers were to lend bombers for the raid: Illustrious and Eagle, The attack was originally scheduled for 21 October, the anniversary of the Battle of Trafalgar. Two incidents however would delay the raid and greatly reduced the strike force: while fitting an extra 60-gallon fuel tank in each Swordfish (in place of the navigator which would not be boarded), a mechanic accidentally short-circuited wires and a fire immediately broke out in the hangar of Illustrious. Two stringbags were lost and five more were seriously damaged and would not be available for the raid. Meanwhile, the old carrier Eagle had developed some serious machinery problems and had to be withdrawn. Five of her Swordish bombers however were transferred to Illustrious, bringing the total strike force to twenty-four. Especially in light of these events, the RAF strongly advised against a raid on Taranto. They were planning a massive heavy-bomber raid on the naval base and were afraid that a likely unsuccessful FAA raid would only result in the Italians greatly improving the anti-aircraft defenses of the harbor.

CONVOYS AND FORCES
The entire operation was named MB.8 and involved as many traffic and patrol operations as it was humanly possible to confuse the Italians and hide the real purpose of the mission. These were the convoys and the forces involved in the operation:

"The Night of Taranto", painted
by
Lt. G.W. Bayley, who piloted E4H
"OPERATION JUDGEMENT"
THREE MORE STRINGBAGS LOST
Two days before "judgement day", three more Swordfish were lost to engine troubles while flying patrols, although all crews were rescued and nobody got hurt. That left the striking force with a mere twenty-one machines. Later investigations revealed that the culprit was fuel contaminated with with water and sand obtained from the tanker Toneline. The three stringbags belonged to No.819 Sqn.

RAF reconnaissance photograph showing
the city of Taranto (lower right), the canal, the inner
harbor (top) and the outer harbor (bottom.)
HARBOR DEFENSES AND WARSHIPS
RAF reconnaissance photos pieced together very reliable information on the harbor defenses and the composition of the fleet at anchor. Although the Italian had no radar, thirteen electrical listening devices were located on the gulf coast. These were fairly effective units that could detect incoming aircraft several miles out to sea.
The harbor's anti-aircraft defenses consisted of:
21x 4-inch guns
84x 37-mm and 20-mm automatic cannons
109x machine guns of various calibers
In addition, the 6 battleships, 7 cruisers and 28 destroyers in the inner and outer harbors of Taranto could potentially add a tremendous punch to the Italian AA, lending their 600+ batteries.
About thirty barrage balloons were tethered to steel cables, those were very dangerous and were discovered only at the very last moment by RAF photo-reconnaissance units, forcing the Royal Navy to quickly modify their plan to take the new threat into account.
Anti-torpedo nets had been laid in both inner and outer harbors, however of the 14,000 yards of netting that Supermarina had order to install, only 4,600 were in place. The commander of the harbor, Admiral Arturo Riccardi, had decided that 1/3 of the total was sufficient to protect the warships while more than that would hamper daily harbor operations.
Italian warships at Taranto on 11 November 1940 were disposed as follows:
In the MAR
GRANDE:
(outer harbor)
6 battleships: Vittorio Veneto, Littorio, Cavour, Giulio Cesare, Duilio, Doria
3 heavy cruisers: Zara, Fiume, Gorizia
7 destroyers: Folgore, Baleno, Fulmine, Lampo, Gioberti, Carducci, Oriani
In the MAR
PICCOLO:
(inner harbor)
4 heavy cruisers: Bolzano, Trieste, Pola, Trento
2 light cruisers: Garibaldi, Abruzzi
21 destroyers: Granatiere, Alpino, Bersagliere, Fuciliere, Freccia, Strale, Dardo, Saetta, Maestrale, Libeccio, Grecale, Scirocco, Camicia Nera, Geniere, Lanciere, Carabiniere, Corazziere, Ascari, Da Recco, Usodimare, Pessagno
5 torpedo boats
16 submarines
4 minesweepers
1 minelayer
9 tankers
2 hospital ships

Swordfish bombers are fitted with
60-gallon
auxiliary tanks for extended range prior to
the raid. The tanks was installed in the observer
position. A gunner was not embarked.
THE ATTACKERS
The Royal Navy
aircraft and flight crews that took part
to the Taranto raid were (in order of take-off):
First wave
sqn. |
carrier |
code |
pilot |
observer |
armament |
815 |
Illustrious |
L4A (*) |
Lt.Cdr. K. Williamson |
Lt. N.J. Scarlett |
Mk.XII torpedo |
815 |
Illustrious |
L4C |
S.Lt. P.D.J. Sparke |
S.Lt. A.L.O. Neale |
Mk. XII torpedo |
815 |
Illustrious |
L4R |
S.Lt. A.S.D. Macaulay |
S.Lt.A.L.O. Wray |
Mk.XII torpedo |
815 |
Illustrious |
L4K |
Lt. N.M. Kemp |
S.Lt. R.A. Bailey |
Mk.XII torpedo |
815 |
Illustrious |
L4M |
Lt. H.A.I. Swayne |
S.Lt. J. Buscall |
Mk.XII torpedo |
813 |
Eagle |
E4F |
Lt. M.R. Maund |
S.Lt. W.A. Bull |
Mk.XII torpedo |
815 |
Illustrious |
L4P |
Lt. L.J. Kiggell |
Lt. H.R.B. Janvrin |
4x 250-lb bombs, 16x flares |
819 |
Illustrious |
L5B |
Lt. C.B. Lamb |
Lt. K.C. Grieve |
4x 250-lb bombs, 16x flares |
824 |
Eagle |
E5A |
Capt. O. Patch |
Lt. D.G. Goodwin |
6x 250-lb bombs |
815 |
Illustrious |
L4L |
S.Lt. W.C. Sarra |
Mid. J. Boowker |
6x 250-lb bombs |
| 815 | Illustrious | L4H | S.Lt. A.J. Forde | S.Lt. A. Mardel | 6x 250-lb bombs |
824 |
Eagle |
E5Q |
Lt. J.B. Murray |
S.Lt. S.M. Paine |
6x 250-lb bombs |
Second wave
sqn. |
carrier |
code |
pilot |
observer |
armament |
819 |
Illustrious |
L5A (*) |
Lt.Cdr. J.W. Hale |
Lt. G.A. Carline |
Mk.XII torpedo |
813 |
Eagle |
E4H |
Lt. G.W. Bayley |
Lt. H.J. Slaughter |
Mk.XII torpedo |
819 |
Illustrious |
L5H |
Lt. C.S.C. Lea |
S.Lt. P.D. Jones |
Mk.XII torpedo |
819 |
Illustrious |
L5K |
Lt. F.M. Torrens-Spence |
Lt. A.W.F. Sutton |
Mk.XII torpedo |
824 |
Eagle |
E5H |
Lt. J.W.G. Wellham |
Lt. P. Humphreys |
Mk.XII torpedo |
819 |
Illustrious |
L5B |
Lt. R.W. Hamilton |
S.Lt. E.A. Perkins |
4x 250-lb bombs, 16x flares |
815 |
Illustrious |
L4F |
Lt. R.G. Skelton |
Lt. H.R.B. Janvrin |
4x 250-lb bombs, 16x flares |
819 |
Illustrious |
L5F |
Lt. E.W. Clifford |
Lt. G.R.M. Going |
6x 250-lb bombs |
819 |
Illustrious |
L5Q |
Lt. W.D. Morford |
S. Lt. R.A. Green |
6x 250-lb bombs |
(*) Flight Leader
ACTION REPORTS
From the flight logs emerges a pretty clear picture of how things went. Surprisingly, the action reports filed by the crews are pretty accurate, mostly confirmed, first by RAF reconnaissance pictures and post-war by the Italians. Here is what happened to each bomber:
First wave
L4A - Shot down by anti-aircraft guns after dropping weapon - battleship Cavour hit between the bridge and B turret. - Both crew members survive, are rescued and taken prisoner by Italian navy personnel after dock workers and local fishermen have tried to lynch them.
L4C - Attempts to torpedo battleship Cavour but misses.
L4R - Attempts to torpedo battleship Cavour but misses.
L4K - Torpedo strikes battleship Littorio on the starboard bow, opening a large hole.
L4M - Torpedo strikes battleship Littorio on the port quarter. Littorio begins to settle into the mud, bow first.
E4F - Attempts to torpedo battleship Vittorio Veneto but misses.
L4P - Drops 16 flares and 4 bombs - result of bombing unknown.
L5B - Drops 16 flares and 4 bombs - result of bombing unknown.
E5A - Drops bombs on destroyers in the Mar Piccolo. All miss.
L4L - Drops bombs on the seaplane hangars - extensive damage reported.
L4H - Drops bombs on cruisers - result unknown.
E5Q - Drops bombs on destroyers - one bomb hits DD Libeccio but fails to detonate.
Second wave
L5A - Torpedo strikes battleship Littorio on the stern.
E4H - Shot down by enemy AA while attempting to bomb the heavy cruisers - both crew members die.
L5H - Torpedo strikes battleship Duilio on the starboard side, 30 ft. below the waterline. The ship is beached to prevent her sinking.
L5K - Attempts to torpedo battleship Vittorio Veneto but misses.
E5H - Attempts to torpedo battleship Vittorio Veneto but misses. Heavily damaged by AA fire, the aircraft miraculously makes it back to the Illustrious.
L5B - Drops 12 flares and then 4 bombs on oil storage depot, starting fires.
L4F - Drops 12 flares and then 4 bombs on oil storage depot, starting fires.
L5F - Collides with L5Q before take off and has to be hastily repaired. Arrives over Taranto with a 24 minute delay, as second wave bombers head back for the carrier. Drops bombs on heavy cruiser Trento, one hits but fails to detonate.
L5Q - develops troubles with the auxiliary tank shortly after take-off and heads back to Illustrious.

Conte di Cavour suffered the most
extensive
damage and sank in shallow waters. She would
be re-floatedand sent to Monfalcone for extensive
repair works that put her out of action until
Italy's surrender on 8 September 1943.
AFTERMATH
The morning after the raid, Taranto was in shambles. The British bombers had only attacked a handful of warship, the seaplane hangars and some of the oil depots, yet damage to the harbor and even to the city looked much more extensive. That was because several of the estimated 15,000 rounds of all calibers fired by shore and warship anti-aircraft defenses had landed on the merchantmen and even in the city, causing severe damage.
Three battleships had been hit, one (Cavour) had sunk in shallow waters, another (Littorio) had her bows underwater and her keel in the mud and finally a third one (Duilio) sustained moderate damage but two magazines were completely flooded.


Littorio with her bows underwater. Note the
toppled floatplane on the quarterdeck.
As the mightiest of the victims, Littorio was given absolute priority in dockyard and through inhuman efforts of the repaired parties, working day and night, she would be back in service in only five months. She had three large holes in the hull and, to complicate matters, an unexploded torpedo had settled underneath her keel.

Duilio suffered damage from a single
torpedo hit.
It would take six months for her to return to service.
Even though her damage was relatively lighter and because of the higher priority given to Littorio, Duilio would be repaired and returned into service in six months.

In this famous photograph the
hapless
Cavour is flooded up to the main deck.
Cavour was the most extensively damaged. She would not be salvaged and re-floated until July 1941. She was then sent to Monfalcone (near Trieste.) Early estimates calculated that no less than two years were necessary to fully repair the ship. When Italy surrendered, on 8 September 1943, she was still there. She would be scuttled and later re-floated by the Germans to be once again sunk, this time by USAAF heavy bombers.


Post-strike RAF
reconnaissance photographs showing the cruisers and destroyers in
the inner harbor.
Note fuel leaking from heavy cruiser Trento.
In the inner harbor, heavy cruiser Trento had been damaged by an unexploded bomb which had open a hole in one of her fuel tank. Because she was leaking oil, British reconnaissance believed her to be gravely damaged. Two months were necessary to repair the damage.
Two destroyers, Libeccio and Pessagno, had also been damaged by unexploded bombs, the former had a fractured bow and the latter a dented stern. They would be repaired in less than a month.

The Japanese naval
delegations
in company of Regia Marina officers
is inspecting damage at Taranto
FUTURE IMPLICATIONS
Short and long-term consequences of the Taranto raid would be significant, far outside the basin of the Mediterranean. A Japanese naval delegation was immediately dispatched to Taranto to study the modus operandi and the consequences of the British raid. They would soon put their findings to good use...
For Italy, the night of Taranto would haunt the navy until the day they were forced to the ignominy of bringing their ships to surrender at Malta. With only one Littorio class battleship in service and the third and fourth that could not be available until the end of 1942 (as a matter of facts, the last of the Littorios, the Impero, would never be completed while the Roma would only become operational in 1943) the situation at sea suddenly turned from a promising into a bleak one. Furthermore, the raid had proved the inadequacy of Italian reconnaissance flights (most of the Cant-Z 501 floatplanes that were sent to spot the British had been shot down by newly-delivered Fairey Fulmar fighters) and how vulnerable the ports of southern Italy were. This situation would never really improve because when in 1942-43 more fighters were brought to protect naval harbors, the Americans had already joined the Allied side and were pouring airplanes in the theater by the thousands.
From Commander Wellham's flying log: