
CONSTRUCTING AN ALL GLASS AQUARIUM
The tank we are constructing measures 36" x 12" x 12".
STEP ONE
Once you are satisfied that all is well the tank, after emptying can be
located
into its permanent position.
Aquaria come in many shapes and sizes but the principle of construction
is
basically the same. Glass is the most common material used therefore we set
out
here how to build an all glass aquarium.
The most important consideration is the surface area which is where
the
diffusion of gases takes place. Depth is also a factor as it may be
difficult
to reach the bottom of a three foot deep tank, unless you have very
long arms
of course. Another factor is weight. You must ensure that the
potential site
will carry the weight of the glass, water and decorative
materials.
Glass will deteriorate over a period of time so only use new glass although
old
or scrap glass can be used for a lid/cover. Glass can be obtained in
various
weights or sizes and the following table illustrates the most common
weight
used in the corresponding tank size.
Table 1
Up to 36" x 15" x 12" 6mm glass
Up to 48" x 15" x 15" 6mm glass but with a 10mm base
Uo to 64" x 24" x 24" 10mm glass
Materials Required
Silicone cement [must be formulated for aquarium use]
Masking tape
Scalpel or sharp blade
Right angle set square and ruler
Several heavy weights [I use bricks]
Glass cut to the following sizes
Base plate = 900mm x 300mm 1 piece
Side plates= 900mm x 306mm 2 pieces
End plates= 321mm x 306mm 2 pieces
L Shaped plastic lengths [to carry the cover or lid] 10mm right angle
being
suitable. Two pieces needed about 290mm long.
Prior to commencemnt do
ensure that the materials are secure from small fingers
and a clean, flat
surface to work on is available.
Points to remember
Silicone gives off fumes so vetilation is important.
Always carry the assembled tank by the base.
Always empty the tank before moving it.
In addition we shall require a lid or some form of cover to prevent
livestock
from escaping.
Lay the glass on your flat work surface and fasten lengths of tape as
indicated
in the diagram below about 7 to 10mm from topmost edge.

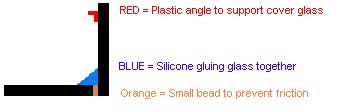
STEP TWO
Glue the L shaped plastic channels to the topmost inside edge of the
side
plates, leaving about a 10mm gap from the top to allow for a lid. Note
that the
length as indicated in the materials list allows a small gap at the
corners for
feeding thermostat cable and air pipe into the aquarium. It also
faciliates
cleaning e.g. no corners to worry about.
STEP THREE
Place a thin, and I do mean thin bead of silicone along the edge of the
base
plate and butt the side against this. This ensures there is no friction
between
the plates.
Now push firmly both plates together and clamp, I use bricks/heavy building
blocks wrapped in plastic.
Now place a second but thicker bead of silicone
along the inside of the butted
edges, overlapping the masking tape slightly.
This will be trimmed off later
prior to the tape being removed and hey presto!
a nice clean, straight edge.
STEP FOUR
Repeat the process with the second side plate and again clamp firmly.
The next
illustration makes this clear.
STEP FIVE
Repeat the process with the end plates bearing in mind that the'thin bead'
will
be needed on three edges.
STEP SIX
Check the angles are correct and the whole appliance is truly
square,
everything clamped togther firmly and now the for hardest part. LEAVE
it alone
for at least 48 hours for the silicone to cure.
STEP SEVEN
Trim off the surplus silicone, that is where it overlaps the masking tape
which
will of course also be removed.
STEP EIGHT
Fill the tank slowly with water, check all the time for possible leaks,
there
should be none but that probably falls into the realm of famous last
words.
My own 'thing' at this time is to place a strip of electricians tape
[white]
from top to bottom, and as each gallon is poured in I mark it off on
the tape
so that I have a clear and permanent indication of water capcity.
USEFUL BITS & PIECES
CAPCITY
If you ommited the 'tape measure' hint previously then capacity can
be
calculated so-
Length X Width X Depth in inches.
Divide the result by 1728 gives the capacity in cubic feet.
Multply this by 6.23 gives the capacity in Imperial Gallons.
To convert gallons to litres multiply by 4.55
SURFACE AREA
Length X Width.
For tropical fish allow 1" of fish per 10 square inches
Marine fish allow 1" per 4 gallons of water
[When measuring fish it is customary to ignore the caudal fin]
WATER WEIGHT
One Imperial gallon = 10lbs.
One U S gallon = 18 ounces.
WEIGHT GLASS
Allow circa 5lbs per foot of 6mm glass.
WEIGHT GRAVEL
Borrow the kitchen scales
WEIGHT FISH
It is customary to ignore this.
If you wish further discussion then please E-Mail me.


