|
You're making a what? You're crazy! That's about what I heard from people when I told them what I was doing. I grew up in the early 80's. Arcades were new and exciting. I was also into programming computers; Apple II, Franklin, Commodore, Kaypro II, Atari and TRS-80's. Well, times have changed, I'm still into video games and computers and so is my oldest son. After he got good at using his computer, and then the Sega Dreamcast. I figured, I'd take the ultimate step; build a full size Arcade Machine. However, instead of using an Acade PCB board and only having one game, use a PC to run the games. The result. The ability to play over four thousand games on a single machine. A good amount of the games are PC games, but most of them run on Emulator programs like MAME (Multiple Arcade Machine Emulator) or NeoRageX ( a Neo-Geo emulator) These are the original classic Games from the Arcades; Pac-Man, Donkey Kong, Galaga, Robotron, Rally-X, Puzzle Bobble, Shenoku, Metal Slug, etc. They basically work like this; the original games are stored on a ROM chip on the motherboard inside the Arcade machine. The software on these chips can be transferred onto a hard drive on a modern PC. The emulator program then plays the ROM (game) on the computer. The Arcade cabinet I built is basically a computer with a 27" TV/Monitor inside a wood cabinet instead of a VGA monitor inside a beige plastic case. |

( PLEASE BARE WITH MY DIGITAL CAMERA, IT'S OLD AND DOESN'T TAKE GOOD PICTURES INDOORS) |
 |
The bug to build the cabinet started last year
when I was looking for an emulated game. I ran across the MAME website.
I've known about the DOS version of MAME for years, but it never really
worked all that great on my PC. I found out that the software had considerably
developed, including a
new 32-bit port that was designed on Windows2000 to be used in Windows. After
downloading it and getting it to work with my Microsoft Sidewinder game
pad, I saw the joystick settings for a HOTROD SE. I then remembered Hanaho
Games, a vendor I saw at the E3 expo. Hanaho Games not only made arcade
machines but they made 2 products for the home consumer. One was the
HOTROD SE JOYSTICK, a joystick console for a PC using authentic arcade joysticks
and buttons. The other is their Arcade PC, a pre-made Arcade cabinet with
an arcade monitor and HOTROD SE built in. I had to have the HOTROD SE, so I ordered one.
It was an easy setup. Plug the SE into the computer, and the keyboard into
the SE. Wow, The first night, I played Robotron for 2 hours, using both
joysticks to move and shoot. Awesome product.
|
|
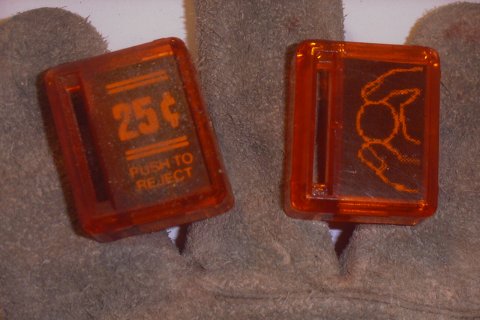
IT BEGINS A couple weeks later I came across Saint's "Arcade Controls" website. An entire website devoted to building arcade controls and machines. I knew I was going to buy a house soon, and I would have a garage to build it in, so I started gathering my parts. I did my research and gathered the important components. I put together a 550mhz AMD Athlon from spare parts. I found for a good large display, you have to have a GOOD television with S-Video. Not any TV or any TV with S-Video will do. You also have to have a GOOD video-card with TV-OUT. Once again, Not any Videocard with TV-OUT will do. I've had a lot of video cards and prefer to stick with the NVidia GeForce2's for my computers. However, The TV-Out was the most important factor and ATI rules that market hands down. (Nvidia's TV-Out chip needs work) I bought a 32mb ATI RAGE FURY PRO for $67(A newer one with the Radeon chip would of been fine too), and a 27" JVC television for $300. (Thanks to Juan and Jimmy for helping me deliver it) I ordered exterior cabinet pieces like T-Molding, monitor bezel, and a marquee retainers from Happ Controls. I bought a coin door on eBay for $10. After shipping, new paint, and new locks, It came out to $40. Not bad considering they are worth twice that. The bottom of the door had 3 holes drilled from a security lock plate, but I covered that up with a Happs 'No Refund sticker'. The mylar coin return decal was torn up and to replace it, I would have to buy a roll of 10. That would of came out to $55.00, so I ended up just printing out a jpeg of a hand holding a coin. After darkening it with a felt pen,it ended up looking pretty original. . In the picture below, the left is the original, and the right it the one I redid. |

|
 |
I also didn't want to worry about a keyboard drawer with a
keyboard and mouse to be daggling, so I purchased a black 900mhz wireless
keyboard with a built in mouse controller. It works great. Since it's
wireless and not infrared, I don't have to worry about pointing it at a
specific area or installing a receiver in the front for line of sight.
As you can see in the pictures below, the sticker on the coin door covers
up the holes where the exterior security lock was and the black T-Molding
makes the edges smooth.
TIME LINE Well, I finally moved into my new house and WOW, I NOW HAVE A GARAGE TO WORK IN. I was having a house warming party in six weeks and I wanted to complete it by then, so I got cracking right away. |
 |
 |
|
CABINET CONSTRUCTION The first step was getting wood. Originally I was going to do it in 3/4" Oak, but ended up using 3/4" MDF ($19 a sheet ) and painting it black. After dragging my friend Tony down to Lowes, I filled up his truck bed with 3 sheets of MDF, and 2 other sheets of thinner MDF and Birch (for other projects) I also bought a bunch of 1x2, 2x2, and 2X4's. I bought the wood at Lowes because it was a little better quality (doesn't apply to the MDF) than Home Depot's. However, I ended up buying all my other hardware from Home Depot. After visiting various arcades and surfing the web looking at arcade machines, I creating my own design on graph paper. I then traced it on to a sheet of MDF and began to cut it. I wanted it big and taller than me, so I made it 80" tall x 34" deep x 28" wide. After the first side was cut, I used it to trace the second side. After the second side was cut. I made the bottom piece and attached 4" rubber wheeled casters I bought on sale at Harbor Freight tools for $2 a piece. (http://www.harborfreight.com )
|
 |
| The next step was to cut and attach the support
2x4s. I recessed the bottom 2x4's 3 1/2" so the casters would
only protrude 1/2" from the bottom. The result would allow me to easily
move it around, but on carpet, you wouldn't be able to tell they were
there. I used 2", 3", and 3 1/2" shooter screws and wood glue to attach
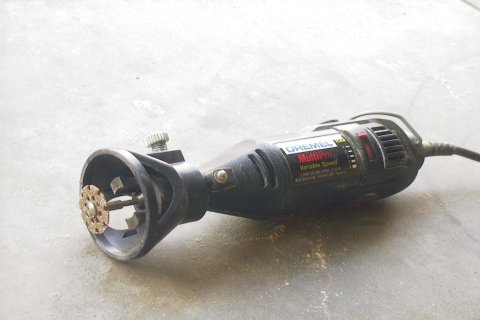
all the support pieces. I used my handy Dremel Multipro to grind the
excess points of the longer screws flush with the wood. I did the same
with the monitor shelf. Once the supports were in place, I placed the
side pieces on their side and attached the bottom piece. Then a 2x4
for support across the top back, and a 2x4 on the bottom front (as a
hidden kick plate).
|
 |
| I then attached 1x2 supports for the top pieces, and 2x2 supports for the rear, front, and speaker panel. I then cut the top pieces and attached the front-top. With a bottom and top support in place, I stood the cabinet upright to finish the work. I made the front panel and cut a hole for the coin door, then the speaker panel and attached them both. To attach my panels, I predrilled and counter- sinked all the holes. |  |
| After the panels were attached, I removed the speaker panel, attached the front-rear piece and patched all the screw holes with Ace Drywall filler. Then sanded of course. Next came the paint. I brushed-on 2 coats of white Ace indoor/outdoor latex primer/sealer. I let that dry for a day. I then brushed and rolled on 3M high-gloss latex black paint I picked up at Walmart for $7. At first I was skeptical of the brush-on gloss. Two coats and it looked uneven. Glossy in some areas and dull in others. After the 3rd coat, it started to look even, and by the 4th, it looked great. Next came the T-Molding. |  |
|
I didn't know what to do about the T-Molding slot. After doing alot of research of other people's cabinets, every one suggested using a router with a 1/16" slot cutting bit over a Dremel with a cutting wheel and self made jig. After spending a couple weeks trying to locate the 'rare' 1/16" slotting bit unsuccessfully, I decided to look back at the Dremel. I figured out why they were probably having problems. 1) a wooden jig does not slide on wood very well. 2) they were probably using a slow speed 3) the regular cutting disc wears out too fast. So, I created a fix. I already had the #565 cutting tool attachment. The attachment was perfect for adjusting the depth of the cut and acting as a jig. (http://www.dremel.com/productdisplay/att_template.asp?SKU=565&Color=99CCFF) All I needed was a disc that doesn't wear out. What's that? Dremel has a New tungsten carbide cutting/shaping wheel? That's right! #542. Picked it up at Home Depot for $15. At 35,000 rpm, it cut like a hot knife on butter. The same wheel came in handy cutting and shaping the Lexan fiberglass that covered the marquee and the monitor bezel. (http://www.dremel.com/productdisplay/bit_template.asp?SKU=542&Color=CC0000) |
|
|
CONTROL PANEL For me, the Control panel was the easiest thing to make. All I had to do was 'transfer' my HOTROD SE onto another piece of wood. I drew the size to allow 1" overlapping on each side of the cabinet and used templates for the joysticks and button placement. Since I was already used to the way my HOTROD SE is setup, I decided to stick with it with 2 light modifications. I wanted the joysticks centered for wrist support, and I wanted the 'Insert Coin' buttons next to the '1 and 2 player start' instead of on the side. I had some extra buttons, so I decided to use blue instead on the plain white ones it came with. I drilled all my holes with a 1 1/8" bit and used marble contact paper for the surface. Transferring the buttons and joysticks were easy. The Hanaho Digital Multiplex Sampling MUX circuit keyboard encoder was a little trouble to remove, otherwise, all the HOTROD SE hardware was easily transferred.
|

|
| SPEAKERS
Five years ago, I purchased a pair of Labtec speakers with an 8"subwoofer. I decided it was now time to upgrade my Main PC with Cambridge FPS-1800s and use my 5 year old speakers in my arcade cabinet. I opened them up and spray painted the front pieces gloss black. |
|
| I then mounted only the front pieces onto the Speaker panel. As you can see below, the result is awesome. They not only look great, but I can still control the power, volume, bass and treble from the front of the right speaker. After five years, the bass still pumps hard on the sub-woofer. |
|
|
|
|
| MARQUEE
The Marquee was made from the help of a online tool at COOLTEXT.com. I then resized it and changed it to high resolution in Photoshop. After I had it the way I wanted it, I saved as an .EPS file and burned it to a CD. I then had Kinko's print it out on a plotter for $21. To mount it, I sandwiched it between 2 pieces of Lexan fiberglass and secured using the marquee retainer I bought from Happs. To light it up, I used a 18" Fluoresant light kit from Home Depot for $9. |
(FYI- Savoia is my name) |
| Here is a shot of the inside. On the day of the party, I actually finished it, however, it kept locking up. I didn't have time to troubleshoot it, so it just stood as a monumental piece, and occasionally a couple of my friends could play it for a few minutes. The next day, I traced it back to the motherboard. The Arcade Cabinet needed another system, (luckily, I have two other computers) so I decided to use a 750mhz AMD Athlon system that I don't use very much. I loaded a fresh copy of WindowsXP RC1 and it now runs like a charm. |
|
 |
Here are some screen shots; Wizard of Wor on the left. Below that, Disasteroids -A great 3D PC port of Asteroids. http://www.lmnopc.com/disasteroids3d/ Below, Primal Rage. Any questions? e-mail me, Joekerr1@netzero.net |
 |
 |