DVD to HQ AVI Tutorial
Written by: Goodsharer
--------------------------------------------------------------------------------------------

Applications needed for this tutorial:
·
DVD Decrypter
·
Gordian Knot
(Includes DivX & XviD Codec’s)
·
DGIndex (
Included in Gordian Knot)
·
VFAPI Reader
·
DelayCut &
GfaWin32.ocx
·
VirtualDubMod
(Included in Gordian Knot)
Application Description:
·
DVD Decrypter:
DVD
Decrypter is a free tool which enables you decrypt and copy a DVD to your PC's
hard disk. From there you can choose to watch them with the likes of PowerDVD
and WinDVD
or you can re-encode them to MPEG1 (VCD) or DivX. Advanced functionality can be
found in the DVD Decrypter context menus.
·
Gordian Knot:
Gordian Knot started out as a simple bitrate
calculator for DivX encoding but has evolved to become an integrated package or
tool for the entire process of DivX/XviD encoding.
·
DGIndex (Within
Gordian knot):
DGMPGDec
DGIndex is an MPEG2 decoder suite. It is used to decode MPEG2 streams from such
sources as DVD VOBs, captured transport streams, dvb/digital/hdtv streams,
*.mpg/*.m2v/*.ts files, etc. Based on DVD2AVI and MPEG2Dec. Can also
demultiplex to video and audio files.
·
VFAPI Reader:
VFAPI
Reader is a tool to create "dummy" AVIs from project files produced
by DVD2AVI, AVIUtl or TMPGEnc.
·
DelayCut:
Delaycut
corrects delay and is also able to cut audio files coded ac3, dts, mpa and wav,
It is also able to fix CRC errors in ac3 and mpa files. CLI support.
·
VirtualDubMod
VirtualDubMod is a
unification of several popular modifications of the famous video editing
software VirtualDub. Unification of three projects, VirtualDubMPeg2,
VirtualDubOGM, VirtualDubAVS and more.
Step 1: Ripping the DVD to your Hard Drive
First things first, create a
new folder anywhere on your hard drive and label it the name of the movie you
want to rip.
Insert the DVD into your DVD
drive making sure that you stop and close whatever program you use to watch
DVD’s.
Assuming DVD decrypter is
installed, start her up.
DVD Decrypter will search for
any CD/DVD drives on your PC and show them in a log. In some cases DD will
alert you of the DVDs region and you will have to make a choice on which region
you want to use. It really does not matter in which one you choose, but we will
choose Region 1.

You will come to the main
window of DD. Examine the image of the main window and follow the directions
below to set up DD for ripping correctly.

1. Enter the “Mode” menu and select “IFO”.
2. Enter the “Edit” menu and select “Select main movie
PCG”.
3. Choose the folder you created as the file destination.
4. Click “Decrypt”.

All
you have to do now is sit back, relax and wait for the DVD to be ripped. After
the DVD has been ripped, you will no longer need the DVD for this tutorial.

Step 2: Extracting the Audio
This next step is as simple s
the first one. Simply start up DGIndex
(It can be found in the “Apps” section of “Gordian Knot” with-in the
start menu/programs.).
Open the “File” menu and
click “Open”. Navigate to the folder
that was created for this rip and choose ALL the “.vob” files in the folder and click “ok”.
After that’s done you should have the following “File list” opened.

Make sure that all the files
are in order. If everything is correct, click “OK”.
For the next part of this
step, we will set up everything needed for the rest of the Audio Extraction.
Follow this easy guide to set
up DGIndex for Audio Extraction.
*Video Menu*
iDCT Algorithm (Leave as is)
Field Operation (Forced Film)
YUV->RGB (TV Scale)
*Audio Menu*
Output Method (Demux All Tracks)
Track Number (Leave as is)
Dolby Digital Decode >Dynamic Range
Control (Normal)
Dolby Digital Decode (Dolby
Surround Downmix)
48->44.1 KHz (off)
*Options Menu*
Process Priority (High)
Playback Speed (Maximum)
Now that everything is set
up, open the “File” menu and choose “Preview”.
The movie should start
playing and DGIndex will open up a status window displaying the information
it’s collecting.

Let the film run it’s course, which may take a while, depending on the film
length & your PC. This is a good time to hang back and do what it is you do
when not following tutorials.
As is quite apparent in the
preview video, there is a huge aspect ratio problem in the source video. Why is
it stretched like that? DGIndex is interpreting it as 16:9 widescreen, when in
reality most movies are shot in a wider aspect ratio such as 2.35:1 or 1.85:1.
This isn’t a problem, in fact we’ll capitalize on this later when we set up
VirtualDubMod to encode.
Finally, select the “File”
Menu And then “Save Project” to save your D2V file to the created folder. I
like to name it something informative, like “NameOfMovie.d2v” but it’s
completely up to you. Your AC3 file (or files, if you selected Demux All Tracks) will also be dumped in this
directory.
Step 3: Fixing Delays in your AC3 Audio
Skip this step if
your AC3 audio files say “Delay_0ms”.
Check out the filename of the
AC3 file that DGIndex dumped out for you. If it states a delay (anything other
than “DELAY 0ms”) we need to fix this delay to maintain the audio/video sync of
our final movie file. Thanks to AC3 Delay Corrector, this is a fairly simple
process.
Load up DelayCut. If the
program crashes right away, you need to get a hold of the GfaWin32.ocx file and
put it in the same directory as your DelayCut.
The rest is very simple and
quick. Follow the image guide to complete the rest of the step.

1. Select the Main AC3 file for your film
2. The output folder will be the same as the input (Done
Automatically)
3. Click “Process” wait for it to finish & your done.
You can do this to all the
Audio tracks you want to add to your finished rip as long as they have a delay.
This will sync all your sound to your video.
For now on you will use the
“Fixed” AC3 file to add to your film.
When it’s finished writing it
will dump a delay corrected AC3 file in the same directory with “_fix” appended
to the filename.
Step 4:
Creating a Dummy AVI
Open
“VFAPI Reader” and follow the image guide to finish this step.

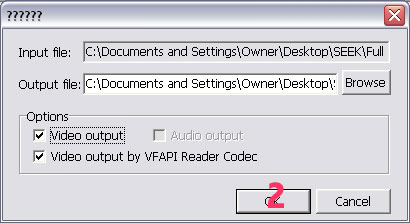
1. Add your .d2v by clicking “Add file”.
2. Your input file will be outputted to the same folder
as an AVI file, click “OK”.
3. Highlight the file in the list & choose “Convert”.
We’ve
now got an AVI file that will frameserve the MPEG
data from the VOB files ready for encoding and an AC3 audio track ready for muxing. Close VFAPI Reader and move on to the next step.
Step 5: Removing Letterboxing And Correcting
The Aspect Ratio
Here
we will work with VDUBMOD to fix the aspect ratio, remove the letterbox and set
up the XviD codec for excellent quality video encoding.
Let’s
start by opening VirtualDubMod. Once open, open the avi
file you just created in VDubMod by going to the
“File” menu and choosing “ Open video file”.
Once
open, go to the “Options” menu and choose “Vertical Display”.
This
now gives you the choice of resizing the top video pane which we will do now.
Resizing the video pane does not affect your video project in any way. We are
setting up your workstation so that VDubMod is
focused on the output video, not the input video since the output video is what
you will end up with when as is said and done.
Right-click
the top video pane and choose “25%”. This resizes the input video pane to 25%
of the original.

Now
right-click the bottom video pane and choose “ Reset to actual size”. This pane
will change size when we do some cropping and resizing to better maximize the
quality and to keep the ratio television friendly.
Time
for some cropping.
First
we must go to the “Video” menu and choose “Filters”.

Another
window opens up. Click the “Add” button and choose “Null Transform”. Click
“OK”.

Now
click “Cropping”

Here
you will remove the letterbox from the output file. This minimizes the encoding
of unneeded parts of the movie.
What
is letterboxing? If you’ve ever watched a widescreen movie you’ve seen it.
Basically, it’s the use of those black bars above and below the image to show
the movie correctly. Why don’t we want the movie to retain its letterboxing
when we encode it? Well, there’s really no reason to keep it. Media players on
computers can handle video files of any resolution, so why not make our movie a
size that exactly fits the video data? Not only that, but if you include the
black bars in the video file they’re going to be wasting some of our precious
bitrate to store their information.
Scrub
to a frame of your movie where the edges of the video are pretty well defined.
Drag the tops and bottoms of the image down until they get pretty close to the
edge of the image and then use the up and down arrows in the Y1 Offset and Y2
Offset boxes for pixel-perfect control.
Please
make sure that all the numbers are even numbers as shown in the image guide
below. It is better to cut off 1/16th of an inch than to waste
bitrate on unneeded stuff. After you are satisfied with the cropping, click
“OK”.

Now
we are back to the filter list, we are going to change the ratio of the film. Click
the “Add” button in the filters window again and click the “Resize” filter.
When you click OK you’ll be presented with an options dialog that let’s you set
the new video size.

Now
here’s where a little bit of math comes into play. To keep the highest
resolution possible, we want to retain our 720 pixel width. We just want to
“squash” the video into the correct aspect ratio.
What
I have in the image above is what I use for certain Fullscreen
movies. Yours may be different though.
|
Common
Aspect Ratio
|
Real
Aspect Ratio
|
Video
Frame Size
|
|
2.35
|
2.35:1
|
720×306
|
|
1.85
|
1.85:1
|
720×390
|
|
16:9
|
1.78:1
|
720×404
|
|
4:3
|
1.33:1
|
640×480
|
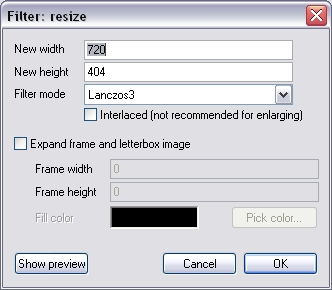
Type in your new width and
height values in their respective boxes on the resize filter options screen.
Under filter mode I prefer Lanczos3 for the highest quality but feel free to
choose something else if you like.
Do not check the Interlaced
checkbox and especially do not check the Expand Frame And Letterbox Image
checkbox, because that would undo all the work we’re doing right now.
Finally, click the “Show
Preview” button. Scrub through your video and make sure that it looks right and
that you chopped off all the necessary black bars earlier.

This is what our output video
file will look like. If it looks good to you, close the preview window and
click “OK” on the resize options screen to return to the filter list. Click “OK”
to close the filter list.
Step 6: Setting up XviD’s
First Pass
We need to set up
VirtualDubMod to run two projects in batch processing mode. The first project
it runs will be the first pass by the XviD encoder, which won’t actually output
anything. Instead it will collect information about each frame to give you
higher quality results when it actually encodes on the second pass.
Go to the “Video” menu and
make sure that “Full Processing Mode” is selected. Next, go to the “Video” menu
and select “Compression”. This will bring us to the screen that allows us to
configure our encoder options. Select the “XviD MPEG-4 Codec” from the list on the
left and click the “Configure” button.
Use the following settings:

|
Setting
|
Value
|
|
Profile @ Level
|
AS @ L5
|
|
Encoding Type
|
Twopass - 1st Pass
|
Click “Zone Options” and use
the following settings.
|
Setting
|
Value
|
|
Start Frame #
|
0
|
|
Rate Control
|
Weight 0.00
|
|
Begin With Keyframe
|
Checked
|
|
Greyscale Encoding
|
Unchecked (unless your
video isn’t in color)
|
|
Chroma Optimizer Enabled
|
Checked
|
|
BVOP Sensitivity
|
0
|

Click “OK”
Click the “More” button next
to the “(User Defined) box and use the following settings.
|
Setting
|
Value
|
|
Motion Search Precision
|
6 - Ultra High (reduce for
smaller files)
|
|
VHQ Mode
|
4 - Wide Search (reduce for
smaller files)
|
|
Use VHQ for bframes too
|
Checked
|
|
Use Chroma
Motion
|
Checked
|
|
Turbo
|
Unchecked
|
|
Frame Drop Ratio
|
0
|
|
Maximum I-Frame Interval
|
300
|
|
Cartoon Mode
|
Unchecked (unless you’re
encoding something like anime)
|

Use the following settings on
the quantization tab.
|
Setting
|
Value
|
|
Min I-Frame Quantizer
|
1
|
|
Max I-Frame Quantizer
|
31
|
|
Min P-Frame Quantizer
|
1
|
|
Max P-Frame Quantizer
|
31
|
|
Min B-Frame Quantizer
|
1
|
|
Max B-Frame Quantizer
|
31
|
|
Trellis Quantization
|
Unchecked
|

Click “OK” and you will
return to the main config menu. Click the “more
Options” button at the bottom and use the following settings.
|
Setting
|
Value
|
|
Automatically Detect Optimizations
|
Selected
|
|
FourCC Used
|
XVID
|
|
OutputDebugString Debug Level
|
0×0
|
|
Number of threads
|
0
|
|
Print Debug Info On Each
Frame
|
Unchecked
|
|
Display Encoding Status
|
Unchecked
|

Click “OK”
From here you want to click
the “More” button next to the “Profile@Level” box.
Here you will save the first pass to file. Click the button next to the “Stats
filename” box. Name the file whatever you want, making sure that you also add
“.pass” to the end of the filename. Save it to the same folder that your other
files are in for this tutorial. Make sure that everything is unchecked as shown
below.

Click “OK” here and “OK” on
the next menu to return to VdubMod main screen. Go to
the File menu and choose “Save As”. Make sure the file type is Audio-Video
Interleave (*.avi) and give it a file name. Most
importantly, check the box that says “Don’t run this job now; add it to job
control so I can run it in batch mode”. Click the Save button. That’s it for
the first pass.
If your “save as” screen looks like the image
below, you have done it correctly and are ready to move on. Do not close VDubMod!

Step 7: Setting up XviDs Second Pass
Go to the “Video” menu and
click “Compression” again. Choose the “Xvid” codec
again. Here we will set up the second pass. Change the “Encoding type” to “Twopass-2nd
pass”. Below that change the box to “Target bitrate (kbps)” by clicking on it.
In the box next to it, type “1500”. This will give you an excellent quality AVI
file. The file size will be about 1.36GB. If you are looking for a smaller file
size just click the “Target bitrate (kbps) box to change it to “Target size (kb)”.
The most common size for CD-R/CD+R is 700MB but since XviD only calculates by
the kbit you may want to type in the box “5734400”. This
number equals 700MB in kbits. Doing so though won’t
guarantee you a high quality file. The choice is yours.

Click “OK” to close the XviD
options window and click “OK” to close the video compression window. Now we’ve
got to add our AC3 audio to be muxed in on the second
pass.
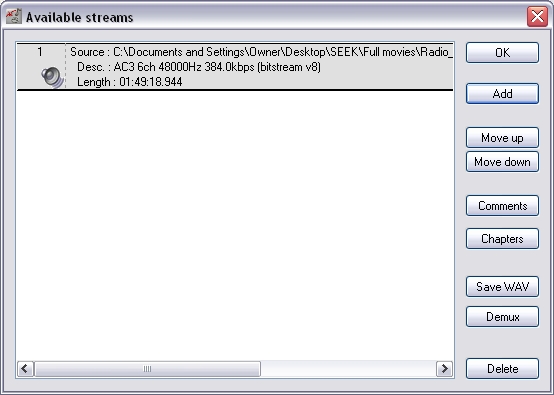
Go to the “Steams” menu and
select “Stream List”. Click the “Add” button and select your AC3 audio file
from earlier. After a short pause as VirtualDubMod parses the AC3 audio, it
should show up in the stream list. If you had a delay in your audio before, use
the AC3 that has _FIX in the file name. Click OK to close the stream list box.

Go back to the File menu and
select “Save As”. Type in the same name you did before (taking care to select
the AVI file type) and again check the “Don’t run this
job now” box.
Click Save to close the
window. Now open the job control box by going to the “File” menu and selecting
Job Control. Both the first pass job from earlier and the second pass job we
just configured should be listed.
Your box will differ from the
screenshot below because I’ve already finished encoding. Just click the Start
button and VirtualDubMod will start the long and arduous process of encoding
your movie.
This would be a good time to
go and do something else for… quite a while. Once the project starts running
you can open a status window from the main VirtualDubMod window that will
display its progress and let you play with the priority settings.

After it’s done you will have
your beautiful new high-quality XviD movie file with AC3 audio. Good luck!
Authors notes:
All the files used for this
tutorial can be downloaded from www.videohelp.com
Please stop by and say hello
to the community.
Leave a Comment!
View Comments!
