
KNOTS
These knots are all illustrated tied LOOSE for clarity; when tying them for real, you will naturally want them as tight as possible.
 | The clove hitch is a simple but useful knot : it can be used to fasten a rope to a pole and will tighten and grip when the free ends have any strain on them. I always start lashings off with a clove hitch, and I use clove-hitches when constructing a temporary flagpole.
Talk yourself through it with "OVER the pole, OVER the rope, OVER the pole and UNDER the rope." |
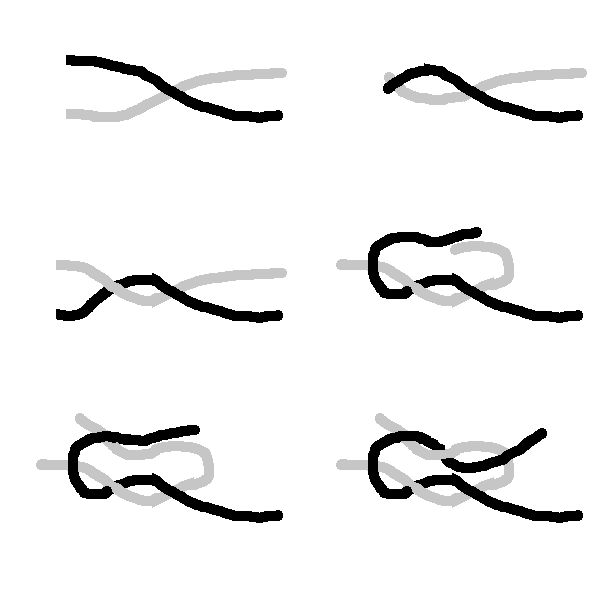
The reef knot is used to tie together two ropes or lengths of string of equal thickness - it will not hold if the ropes are very different in thickness.
Talk yourself through it with "RIGHT over LEFT and under; LEFT over RIGHT and under." |
 |
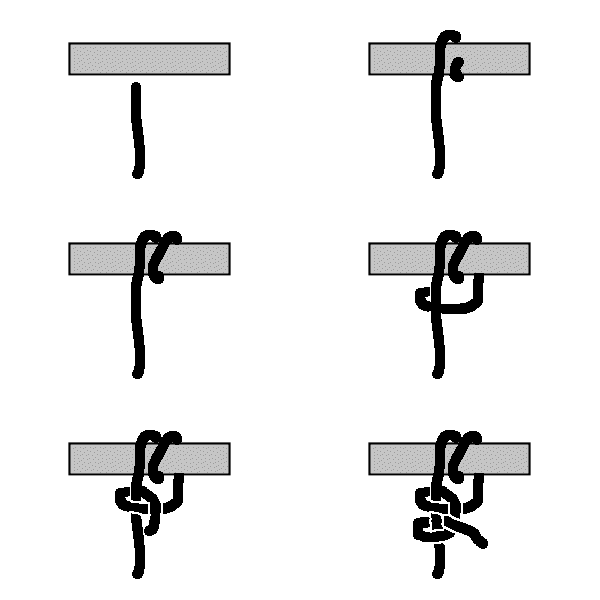 | Most people use a round turn and two half-hitches without even thinking about it : like the clove hitch, it is used to fasten a rope or string to a pole, but it has the added advantage that it is easy to undo when necessary, almost never jams, and will not untwist.
Simply wrap the rope twice round the pole as illustrated, then tie off the free end with two single knots (hitches.) |
LASHING
To produce strong, firmly constructed gadgets you will often need to use different types of lashings - knots join pieces of string or rope or fasten string/rope to pieces of wood or are used to make loops in string etc., lashing uses longer pieces of string to fasten two or more pieces of wood together.
One of the most useful types of lashing is square lashing, so called because it is used to join two pieces of wood together at right angles to each other.
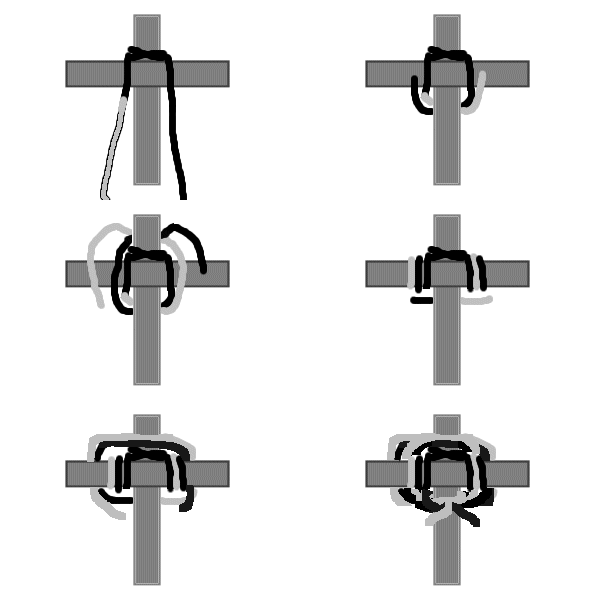
Start off by fastening a length of rope or string (depending on the scale of your project) to one piece of wood with a clove hitch, leaving the free ends roughly the same length. Place the other piece of wood on top of the first piece, in the position you want it fixing, and bring both ends of the string over, take them behind the first piece of wood and cross them behind it, bring them back out and over piece #2, cross behind, back over and so on - see the animated diagram on the right - pulling up firmly all the time; do this three or four times, then wind the ends of the string firmly round between the two pieces of wood (see diagram again) to pull the lashings tight and fasten off with a reef knot. The tighter your lashing, the more firmly the wood will be held.
|
 |
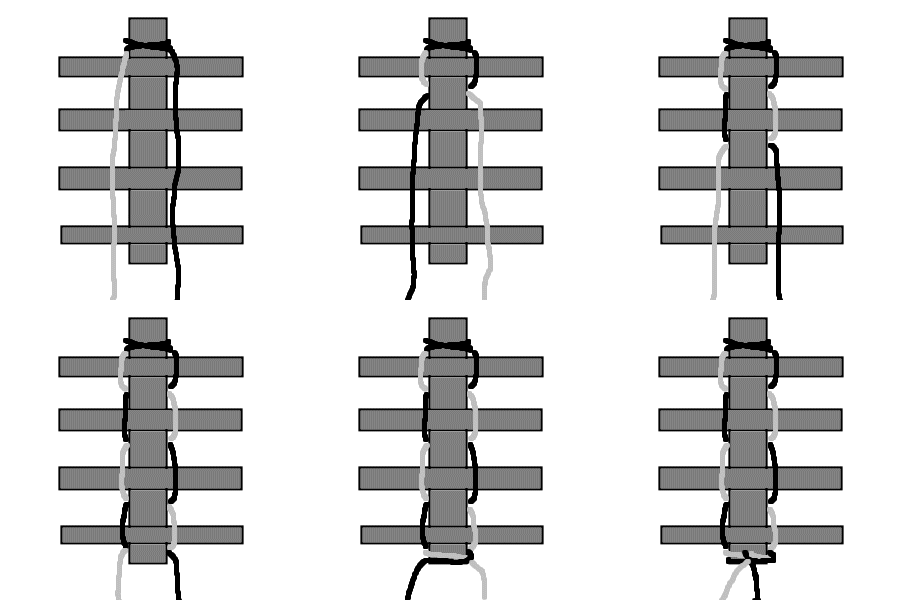 | Snake lashing is used to join a number of lengths of wood to two longer parallel pieces, and is most often used to construct drainers, washstands, tables etc.
This lashing is easiest done by two people working down the length of the two side pieces, keeping pace with each other to keep the work firm and straight. Each will need to fasten their string on with a clove hitch and then it is very simple : just pass the string over the horizontal pieces of wood whilst crossing the ends UNDER the long pieces in between each. Add the horizontal bars one by one as the work progresses, and above all, keep the string pulled tight at all time. Continue until the desired amount of wood has been added, and fasten off with a reef knot. |
West Country lashing is the simplest of all lashings. It is used to join two pieces of wood together to produce a longer piece, or for lashing one piece to another in the same direction (as when fastening a coat-hook to a tent pole.)
Start with a clove hitch again, with both free ends roughly equal in length, and pass them both round the two pieces of wood, tying a simple knot each time (tie in front, tie behind, tie in front, tie behind etc.) keeping the string TIGHT and the turns parallel and not overlapping. Continue for several inches if you are joining larger pieces of wood, or until you run out of string; if you are fastening a smaller piece onto a pole as with a coat hook, use your own judgement as to how much you will need to lash it to take the desired strain.
Long pieces will often be firmer if they are lashed round the join twice, top and bottom. In all cases, fasten off firmly with a reef knot.
|

Tie off with a single overhand knot
at each crossing of the string;
keep the lashings close together
for best support. |
|
 | Tripod lashing is, as its name suggests, a means of fastening together three poles or sticks. When used with large poles and rope it can be used to make sturdy supports for pioneering projects, or using string and small poles, broom handles or strong sticks to make a handy tripod to support a round basin for washing or a pot over a small fire.
Hold the three poles together with their bases level - this is most important if the poles are not the same length (although it easier if they are.) Fasten one end of the string to one of the poles at the point at which you want them joined, using a round turn and two half-hitches. Bind the string round all three poles a couple of times, then take the string in and out of the three poles, under and over - you will find that as you have an odd number of poles, they will all be tied in alternately as you progress. Don't pull this lashing too tight - you will need to spread the ends of the poles apart when you have finished; if you do find you need to tighten it, you can wind the free end round the lashings (see square lashing) to pull it tighter. Fasten off with another round turn and two half-hitches, or if you left a reasonable length free at the beginning of your lashing you can tie the two ends together with a reef knot. |
I think that's enough knots and lashings for now - they should be enough for you to work with!
If anyone can think of any more ESSENTIAL knots, let me know and if I know how to tie them, I will have a go at an animation and may be able to put them on.....
HOME | PLANNING |
CAMPSITE |
THEMES | COOKING | HEALTH | ACTIVITIES | CAMPFIRE | RAIN | LINKS
|