|
|
|
|
|
|
|
|
|
|
|
|
|
|
|
|
|
|
|
|
|
|
|
|
|
|
|
|
|
|
|
|
|
|
|
|
|
|
|
|
|
|
|
|
|
|
|
|
|
|
|
|
|
|
|
|
|
|
|
|
|
|
|
|
|
|
|
|
|
|
|
|
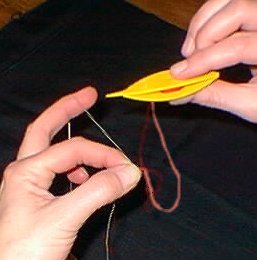
| Figure 1 : Let's start with a chain. I have two different colors I am working with. This is to make it very visible as to the "flip" of the knot. The two colors have been tied together. The knot is being held between the thumb and index finger. The green thread is referred to as the ball thread even though it is on a shuttle. The ball thread goes from between the thumb and index finger, over the index finger and middle finger. It is then anchored for tension by wrapping a few times around the ring finger. Some use the pinkie finger for anchoring. |  Figure 1 |
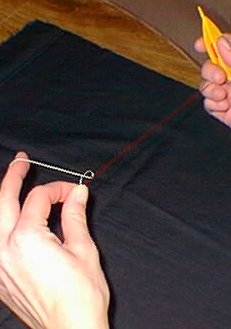
| Figure 2 : Now take the red shuttle thread and let it lay across the palm side of your hand. Bring your hand towards you and turn it so your thumb is now facing you instead of your pinkie and your palm is facing down. |
Figure 2 |
| Figure 3 : Hold the shuttle thread up above the plain of the ball thread with your middle finger, while holding the shuttle between you thumb and index finger as shown. Now slide the shuttle under the ball thread as shown. The ball thread should just slide between your index finger and the shuttle without having to move your index finger at all. |
Figure 3 |
| Figure 4 : Now bring the shuttle back over the ball thread. The ball thread should just slide between your thumb and the shuttle without having to move your thumb at all. Notice with this movement that the shuttle is coming back through the arch you have created above the plain of the ball thread. |
Figure 4 |
| Figure 5 : Pull the shuttle back as pictured. You have almost created the first half of the double stitch. Notice that the shuttle (red) thread is looped around the ball (green) thread. We need to switch it so that the ball (green) thread is looped around the shuttle (red) thread. |
Figure 5 |
| Figure 6 : This is just a closer view of the previous figure. |
Figure 6 |
| Figure 7 : To accomplish the "flip" you need to loosen the tension on the ball (green) thread. To do this you relax your middle finger so the ball thread is no longer tight. |
Figure 7 |
| Figure 8 : Now pull the shuttle (red) thread tight, straight out away from your left hand. Notice that the loop has "flipped"! The ball (green) thread is now looped around the shuttle (red) thread. |
Figure 8 |
| Figure 9 : Now tighten the ball (green) thread using your middle finger while keeping the shuttle (red) thread tight. Snug this loop down towards the knot created in the very first step where we tied the two colors together. You have now completed the first half of the double knot! On to the second half! |
Figure 9 |
| Figure 10 : For the second half we create the arch of shuttle (red) thread so it is below the plain of the ball (green) thread. You don't actually have to do anything special. It just hangs there like we need it. |
Figure 10 |
| Figure 11 : Now slide the shuttle over the ball thread as shown. The ball thread should just slide between your thumb and the shuttle without having to move your thumb at all. |
Figure 11 |
| Figure 12 : Now slide the shuttle under the ball thread as shown. The ball thread should just slide between your index or middle finger and the shuttle without having to move your finger at all. |
Figure 12 |
| Figure 13 : Pull the shuttle back as pictured. You have almost created the second half of the double stitch. Notice that the shuttle (red) thread is looped around the ball (green) thread. We need to switch it so that the ball (green) thread is looped around the shuttle (red) thread. |
Figure 13 |
| Figure 14 : To accomplish the "flip" you need to loosen the tension on the ball (green) thread. To do this you relax your middle finger so the ball thread is no longer tight. |
Figure 14 |
| Figure 15 : Now pull the shuttle (red) thread tight, straight out away from your left hand. Notice that the loop has "flipped"! The ball (green) thread is now looped around the shuttle (red) thread. |
Figure 15 |
| Figure 16 : Now tighten the ball (green) thread using your middle finger while keeping the shuttle (red) thread tight. Snug this loop down towards the first half of the double stitch you created previously. You have now completed the second half of the double knot! |
Figure 16 |
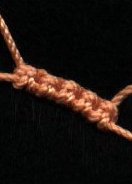
| Figure 17 : Here is a close up example of what double stitches look like. Most patterns don't start with a chain but the chain is an important part of tatting. All components of tatting are made up of the double stitch or a variation of the half stitches that make up the double stitch. The ring is another important part of tatting. Are you ready to make a ring? Let's look close up first at the "flip". This is the whole trick to tatting. |
Figure 17 |
| Figure 18 : In this example the ball thread is red and the shuttle thread is green. I have just done the movements for the second half of the double stitch. Notice the shuttle thread looped around the ball thread. We need to switch it. Just relax that middle finger. |
Figure 18 |
| Figure 19 : Relax the tension on the ball thread by relaxing your middle finger. |
Figure 19 |
| Figure 20 : With the tension still relaxed on the ball thread, pull tight on the shuttle thread, straight out away from your left hand. Did you see the flip? Now the ball thread is looped around the shuttle thread. |
Figure 20 |
| Figure 21 : Still keeping the shuttle thread pulled tight, bring the tension back on the ball thread by bringing the middle finger back up. You can manipulate the little half knot up the shuttle thread with your tension finger. |
Figure 21 |