
 |  |

Carols Place
 | |

 Hi. Below are four of my earlier paintings, all done during a class I took, and all done in the wet-on-wet oil painting technique. Each painting was completed during one 2 hour class.
 |
"What?" you say. "How is that possible?" you ask. It's possible because prior to beginning each painting, the canvas is prepared with a thin, even coat of a very thin oil paint. Then, rather than mixing colors on the palatte, most of the color mixing is done right on the canvas.
 What enables this technique to work, besides the initial thin coat of paint, is that a thin paint will stick to a thick paint. Therefore, the texture of the base color put on for the trees, for example, is quite thick. Then the paint used for highlighting them is made a little thinnner (either with a small amount of paint thinner or some of the initial thin oil paint) so that the highlight color will stick easily.
 |
Usually, the thin paint applied is called Liquid White. This causes the paint on your brush to get lighter as you continue painting. However, there is also two other thin paints; Liquid Black and Liquid Clear. Occasionally, one of the colored paints, that are also transparent, is painted onto a black canvas; as always making sure the coat of paint is quite thin.
What are some of the rules for painting in the wet-on-wet oil painting technique?
 A thin paint will stick to a thick paint.
You need the dark to show the light.
 The Liquid White must always be applied in a thin, even coat.
Things in the background MUST be much smaller and lighter than things in the foreground.
Water always seeks out the lowest spot and is always flat.
The closer an object is the more detail is seen.
The light source must always be taken into consideration when hightlighting anything.
The Liquid White must always be applied in a thin, even coat.
Things in the background MUST be much smaller and lighter than things in the foreground.
Water always seeks out the lowest spot and is always flat.
The closer an object is the more detail is seen.
The light source must always be taken into consideration when hightlighting anything.
When mixing colors, or applying them to the canvas, remember that you can always go darker.

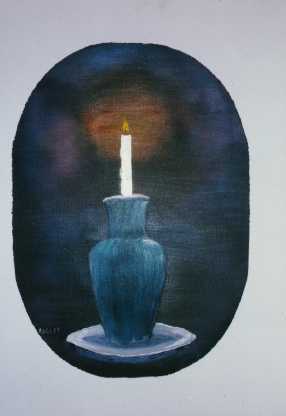
This painting started with a thin coat of blue paint on a black canvas which is created by painting it with a black acrylic paint then allowing it to dry completely before starting. An important thing to always remember is that you need the dark to show the light, and you need the light to show the dark. This is how the illusion of light and dark is created. In the case of this painting, we are mainly concerned with creating the illusion of light.
This painting is another example of starting with a black canvas, but with a twist. Before painting the canvas with black acrylic paint, Contac paper was cut to the size of the canvas, the center oval was cut out, and the Contac paper was put onto the canvas. Then the oval section was painted with black acrylic paint and allowed to dry.
The dark background allows the glow of the candle to really show much better. Notice the highlights. The light source must always be taken into consideration when highlighting, whether it's mountains, vases, or trees.
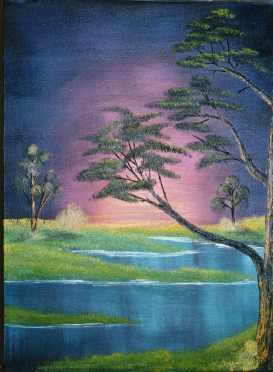
Here is yet another example of a painting that started out black. Notice the background trees, though there are only two. The smaller one on the right is much further away than the one on the left and so smaller in height and size. Also notice the highlights on those trees. The light source was taken into consideration.

This final painting was done on a white canvas. The background color was painted over the Liquid White which allowed for the various shades and hues. An important thing to remember when painting florals is that your background color should never be too obvious, which would take the center of attention away from the floral, and the paint used for it should be as thin as possible.
The illusion of glass is quite easy to create. And when painting a vase or anything else symetrical, you should paint the left side first (right side if you are left handed) so that you can easily match the other side with it. Otherwise, your own hand will get in the way.
Creating the illusion of depth
|  |  |
First thing to think about is sizing. This particular step in creating depth is directly related to the make up of the painting.
As an example, if you were standing on one bank of a lake and look across to the other side, a very tall tree would appear to be only a few inches tall whereas the tree next to you might be a foot wide and 30 feet tall. Or a road will appear to be one inch wide in the distance and 20 feet wide where you stand. And with mountains, if you can see the whole thing, the top will be much clearer and distinct than the bottom. In other words, similar items of a similar size must be painted on a much smaller scale in the background of your painting. And as you work forward, they become gradually larger.
 |  |
Another way to create depth in your painting is by gently hazing out the base of those things in the distance, like the base of a mountain or the bottom part of your foot hills. One way you can do this is by gently tapping one corner of your brush along the bottom edge of your foothills, then gently brushing upwards to remove your tap marks. Or, if you are painting on a black canvas, you can add a little titanium white to your brush before you gently brush upwards.
 |  |
Possibly the most valuable thing to keep in mind, is highlighting. Those objects that are far away, like distant trees, are too far away for you to see any highlights; whereas, those trees in the mid and foreground would have noticeable highlights. You just want to remember, those trees in the mid ground wouldn't necessarily be as bright as those in the foreground. Also, don't forget to highlight all your trees mainly on the same side in both mid and foreground.
 |  |
Lastly for now about highlighting, remember that a tree is basically round. It WILL have branches coming straight out at you. Keeping that in mind, when you do highlight any trees, please remember to NOT only highlight one side of your trees. Once in a while, you should cross over the "center" line of a tree with highlight.Finally, one way to create the illusion of depth is to make things darker as you come forward. The closer things are, the darker they appear to be. And after all, painting anything is just creating an illusion of something on canvas using paint.
Carol's Place Homepage
Carol's Place of Inspiration
page 2
page 3
page4
page 5
Carol's Place Recipes
Page 2
Carol's Place Serenity Prayer
Carol's Place The 12 Steps
Carol's Place Native American Page
Graphics Links Page
Here are the links to my Holiday pages.
Carol's Place Christmas Page
Carol's Place Easter Page
Carol's Place Halloween Page
Carol's Place Thanksgiving Page
Carol's Place New Year Page
Sign Guestbook
View Guestbook
View my old guestbook


This page hosted by  Get your own Free Home Page