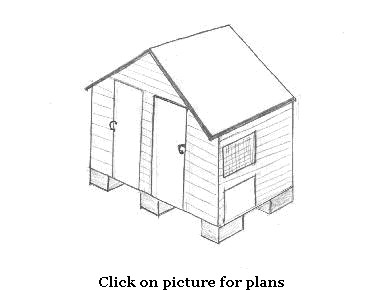
Because of the inquires being posted on bulletin boards requesting information on housing we have posted plans and a Bill of Material for the building that we built in 1980, and are still using. It consist of 2 different breeding pens put together. One is the mirror image of the other, so the dimensions are the same for both. Each can stand alone as a small single house if desired. In fact the design was a modification of a child's playhouse, with an increased in height and using 2 buildings instead of just the one. Having a small hobby flock of Belgian Breaded d'Uccles, we did not require a large building. But because we are working with 2 different groups, mottled and mille fleur, with the blue gene ( See Blue Gene ), we needed 2 different breeding pens, plus a brooding area. As we do not hatch many chicks ( generally 1 setting of 3 dozen eggs from each group, per year, with a May 1 hatch date ). The problem of a brooding area was solved by adding a covered yard. This allowed us to combine the 2 flocks when not breeding. This freed the other house for rearing the chicks. With the size being 4 X 4 and with an area of about 16 square feet, each can house around 10 bantams (16 divided by 1.5 ) or it can house around 5 standard chickens ( 16 divided by 3 ), if that was what we were breeding. As we generally keep 6 - 10 hens plus a cock or two, it met our needs.The covered yard is about 4" X 6", which totals another 24 square feet.
Feeding, watering, and gathering the eggs is all done from the outside, and takes about 10 minutes total for both sides. We also do not have to enter the building for cleaning. All corners can be reached through the door, and takes about 30 minutes total. Because of the small size all birds can be seen at a glance.
Start by cutting out the different walls. Then cut the 2 X 2 strapping. Attach the strapping by laying it under the plywood and nail the plywood to the strapping instead of nailing the strapping to the plywood. The back wall needs to be spliced together, as it consist of 2 "leftovers". This is done when the building is assembled, by nailing it to the side walls.
If 2 are being built, remember that one is the mirror image of the other so when the strapping is nailed to the walls they are placed on 1 side for one house, but for the other house the strapping needs to be on the other side (outside) of the walls as shown in the plans. This will put it on the inside when the walls are set in place.
For the roof, the width is 4 feet (48 inches). However the length depends if there is to be 1 or 2 buildings. For one building a length of 5 feet (60 inches) is needed. This will allows for overhangs. If 2 buildings are being built, the length is 4 1/2 feet (54 inches) Metal stripping is placed on the sides and bottom of the roof(s) in either case.
Set the floor on the cinder blocks , using one for each corner. If 2 buildings are being built than 2 are also need in the middle for support. With 2 buildings, use a 4 X 8 sheet, instead of 2 - 4 X 4 sheets. Make sure that the floor covers the cinder blocks to prevent tripping on an exposed block. Raising the floor on the cinder blocks allows for good air circulation under the floor. This prevents dampness thereby preventing illness.
Once the walls, and roof are cut out and the strapping has been attach to the walls, with the floor is in place, the building can be put together. Start by nailing the right wall to the floor. Once the right wall is in place, the front wall is nailed to the floor and the right wall is nailed to the front. Then the same thing is done to the left wall. Once the front, and side walls are up, the lower section of the back wall is nailed to the floor and side walls. Then the upper part of the back wall is put in place and nailed to the side walls. Use the caulking compound to seal the seam. The seam will be covered when the siding of choice is put on the building. Also caulk all seams where the walls meet each other, the floor, and the roof when in place. Staple the wire cloth over the window. Hinge the door to the yard, and the entry door, so that they swing out. Place the roofing on the roof. Roofing paper is the easiest to put on.
Two modifications that we done is to cut out vents on the front and back walls. These are 4 inches by 12 inches. One is located 4 inches above the door on the front. The other is directly across on the back wall. The vent are high enough to prevent a draft on the birds when roosting, but allows for air exchange. A window was also cut in the door. This allows us to look in at the birds without having to open the door. Both vents and the window in the door are covered with wire cloth. Clear plastic is placed on both windows during the winter. The vents are left uncovered, for air exchange during the winter. All plastic is removed for the summer.
A suggestion from Brett West of Decatur, Texas
"Here in Decatur, TX we get some serious winds and storms. Last year a storm picked up the coop and set it on its roof! One of our banty hens was sitting on a pile of eggs but somehow rolled with the coop and never let and egg move. After the storm was over, a neighbor helped me right it again. Since then I drove some screws down through the floor and into the cinder blocks so that they are permanently affixed to the coop and serve as anchors. I am also going to drive swing set anchors into the ground and strap or chain the base of the coop to them for added stability. I recommend this reinforcement for anyone who lives in stormy or wind swept areas."
Once the house is done it needs to be furnished. Nail a scrape 2 X 2 ( about 2-3' long) to both right and left walls about 2 1/2 feet from the floor. On these nail whatever is going to be used for the roost. Use 1 about midway from the back wall and the window for either bantams or standards ( we use 2 roost as to have a place to set the breeding cage on). Just inside the door, on the front wall nail the nests. This location makes gathering the eggs easy, just reach around and pick them from the nest. Place the nest about 2 1/2 feet from the floor. This will allow space for a water fountain to be placed under them.
Inside, across from the door we also have a 18" X 24" X 24" cage resting on the roost, that is used for pair mating ( See Breeding) when an out cross is needed ( See Out crossing). It is also used for a broody hen, ( See Mother Hen) as we generally let one set, hatch, and brood chicks per year to thrill the neighborhood children. A week or two after the chicks hatch they are placed on the floor with the flock. The cage is then used to confine broody hens that are not going to be set. In a week or two they will get over that idea. It is also useful if a chicken needs to be removed from the flock and isolated due to illness or feather picking. The cage can be removed and placed in a shed to isolate new birds before adding to the flock.
Our coop has clean, crisp lines, that would fit in most backyards. The siding used can even be the same as on the house, thereby tying it to the landscape. Daily care of the birds is easy as there is no need to enter the house, soiling the shoes. Chores can be done in the morning on the way to work and in the evening when getting home.
You are free to down load the plans and instructions to build this coop. The only thing we ask is that you let us know how you liked it and if it met your needs.