The Solarpumpcan
I had the idea of this MOST EASY SOLAR PUMP ENGINE, because I thought:
'It must be possible to extract work from a can exposed to the sun and to
the shade,
without using a (Stirling) displacer, because of the pressure differences
that occur in the can!'
A help to this idea was the design of Arthur Nommensen's RotaColaSola (have a look at
http://www.RotaryStirlingEngines.com) rotary engine.
But this RotaColaSola was to complex,
I thought, and so I simplified it and came up
with this design.
In its most simple form it consists of a can, a automatic valve, a hose,
a labile pendulum,
a tube and a shading shield(parasol).
Because in this design the can's metal body has to be heated, too, it has
a
very low efficiency BUT ITS SIMPLICITY CANNOT BE BEATEN !
Although having only a low efficiency, its mechanic
is NOT FRAGILE !
(as it is in a smaller LTD Stirling)
I did a PROOF-OF-CONCEPT engine and came up with the performance data of:
- 20 strokes/hour
- pumping 60cc of water every stroke
- at about a foot (300mm) height
with a can of about 1000cc(1 liter) of volume.
This is not much, I know, but for the task of just WATERING FLOWERS,
or
having theMOST-EASY-SOLAR-ENGINE
the Solarpumpcan is fine.
...and the performance data can be improved. See, this was just my first
draft
engine and the detailed design sure bares some potential to raise its efficiency.
So, when constructed right, the Solarpumpcan shoud be able to lift water
for up to 1.5 meters (supposed a delta temperature above 60 C).
But its efficiency is surely limited, so for example a Solarpumpcan made
from
an (about 160 liter) oil barrel will hardly reach more than 1 WATT !...but
for watering
this is more than 1000 liters a day !
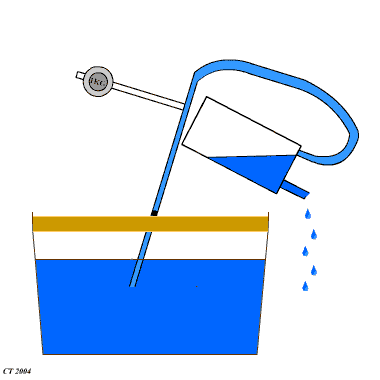
Fig 1
Here, see the PROOF-OF-CONCEPT engine I did. It shows one of the first
experiments I did on
the Solarpumpcan, so the counter weight is just a screw clamp with two round
magnets.
Working mode
Fig 1 shows the engine in heating position. Some water is in the can, which
turned the can
DOWN in that position. Now when the sun(spot light) heats up the can, the
valve (red piece
of rubber; see Fig 3) OPENS and water flows out there (...and that's where
the water drain should be >> under that valve!). By that flowing out,
the can gets LIGHTER
and tends to turn back. But the weight of the labile pendulum (blue clothespeg;
see
Fig 4 & Fig5 ) keeps it from turning fully back, so it turns only a
littlebit, and so the can is still in the sunlight.
When all(most of) the water has flown out,
the can is THAT LIGHT, that it can even overcome the labile pendulum's weight
and starts
TURNING BACK. Because the labile pendulum is about in a rectangle to the
tube's bottom
position, it will toggle(fall) over, after the can has moved 90 degrees.
By that, the can
moves up an irriversible angle (AND THAT'S WHERE THE SHADING SHIELD (parasol)
MUST BE !).
Being under the shading shield, the can starts cooling down, and so
SUCKS IN WATER from
the water reservar (bottle) below. After about two minutes, the can is that
heavy,
that it tends to turn back down, but because of its small torque (being almost
in the most
upper position, it need more water to flow in. When finally more water has
flown in, the can
can overcome its small torque AND the counter
weight effect of the labile pendulum and starts
turning down again. At about a 90 degrees the labile pendulum falls back
and by that the can
moves irriversible down, from the shade into the sun....where the can gets
heated up, air
expands, pressure opens the valve and pushes out the water. The can gets
lighter and....
.....the game starts all over again.
This proof-of-concept engine is restarting, but not perfectly selfstarting yet, due to friction.
.....and here see the rought drawing.
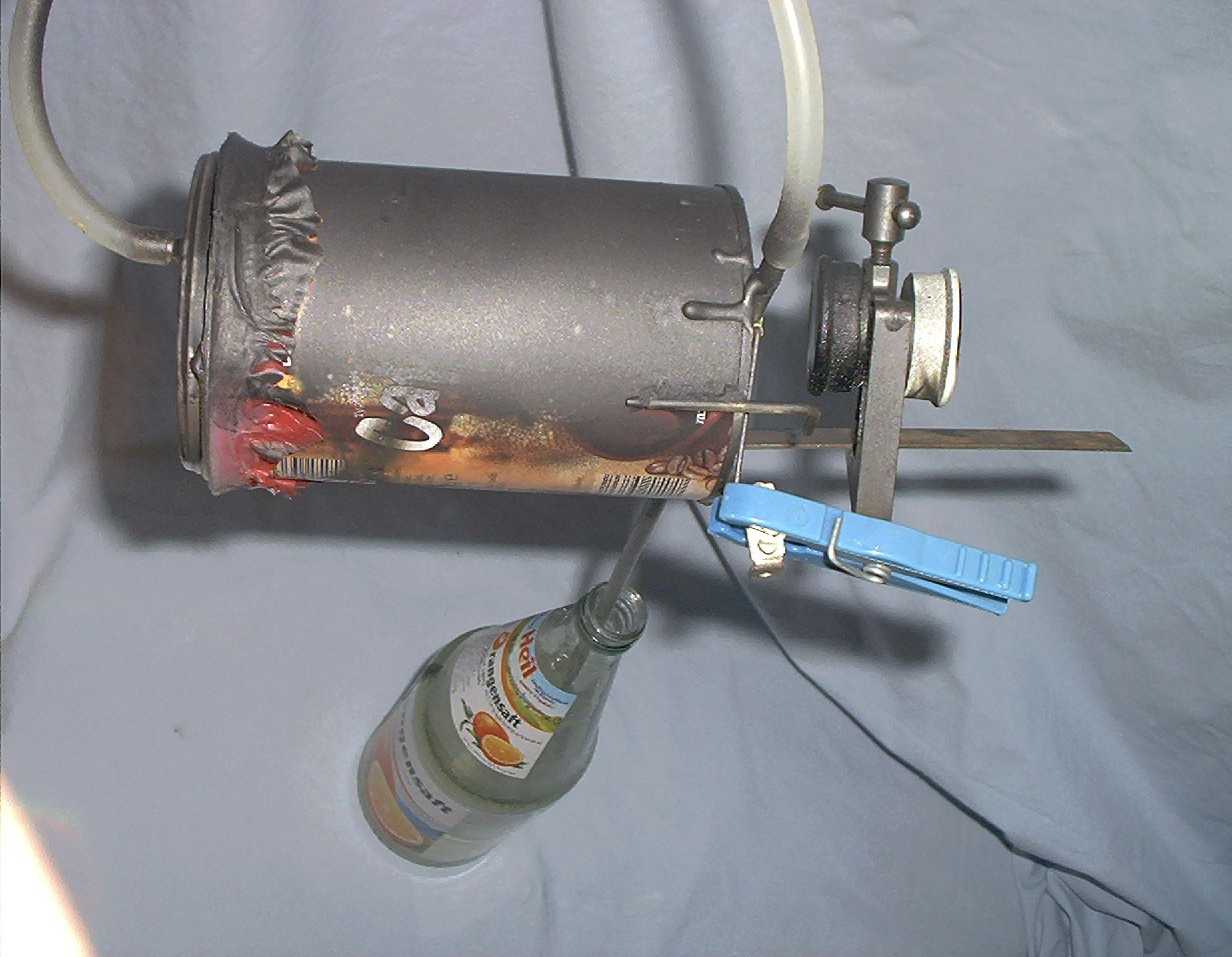
Fig 2
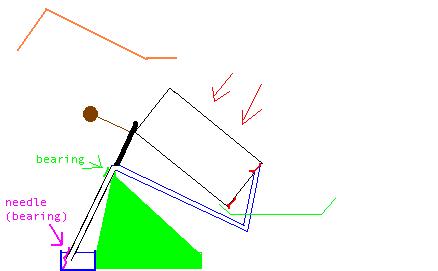
Here in the drawing the can is mounted to the tube at an angle, so the water
cannot flow
back to the center, which would reduce the force to turn back. In my
proof-of-concept
(see Fig 1) engine I took a can with a diaphragm (I already had).
The inlet valve you see in the drawing is not essentially important. It only
helps to
maximize the the output volume, so the volume of the tube and the hose will
not
flow back, when the pressure rises in the can.
The shading shield is shown in the drawing, but not on the photo(Fig 1),
because
I used a spot light (60 W).
Some design details
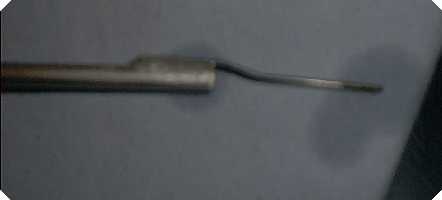
1.) The end of the 6mm aluminum tube has a pin, which acts as a bearing when
standing
at the bottom of the bottle (see Fig 6).
The bottleneck is the second bearing for the tube. Here friction is highest,
and can be
minimized by a bigger opening (instead of 20mm diamter of the bottleneck,
80mm
would be much better, so the tube can easyly 'roll' back and forth.
2.) The valve is made from childrens ballon's rubber, glued flat on the can. This is very airtight.
3.) The labile pendulum has two stops. One stop is the can itself and the
other a
little hook (as you can see from the photos).
Different to the proof-of-concept engine, the axis of the labile pendulum
should be
VERY CLOSE to the tube to get an obtimal balancing.
AND the labile pendulum's angle must be bigger !
It takes some time (or calculating) until the best weight for the labile
pendulum is
found, to get an optimal 'irreversible angle move'. So in an outdoor
application
for real sunlight, the labile pendulum's weight MUST BE HIGHER than
what you see on the photo !
4.) Helpful will be two stops, to stop the can from rotating, so it can only
move in an angle smaller of 180 degrees.
5.) When starting the engine the very first time, of course it will not move,
due to the fact, that no water is in the can.
Of course LOTS OF MODIFICATIONS can be done to that
basic design to improve its performance.
(See Chris's
Solarpumcan He changed to
a back-and forth movement)
For example, if you mount a water container at the OPPOSIT SIDE of
the can, INSTEAD of
using the can itself as a container for air and water, the upper position
of the engine will be
the hot, sunny one. As well instead of moving the can the shading shield
can be moved etc...
Instead of the labile pendulum magnets can hold the can in both two end
positions.
AND EVEN WITHOUT the labile pendulum a Solarpumpcan may work.....but
less reliable.
Fig 3
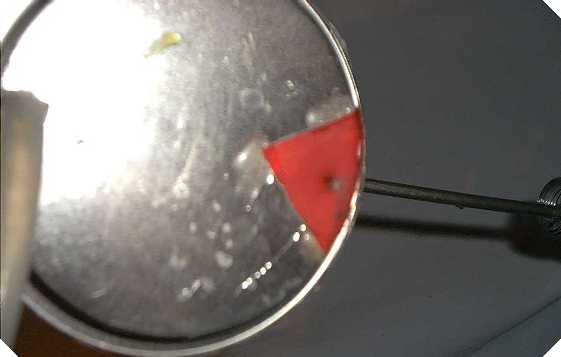
Fig 4
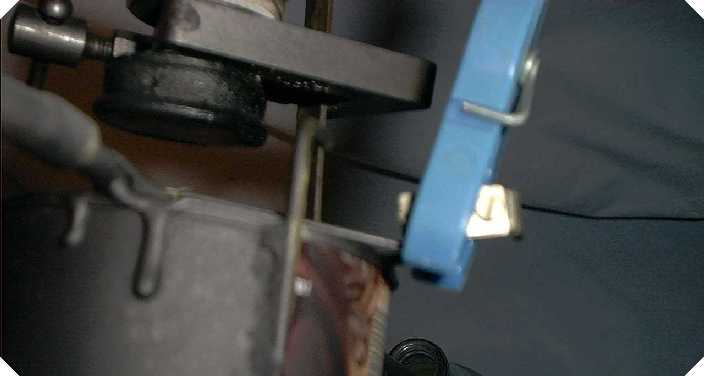
Fig 5
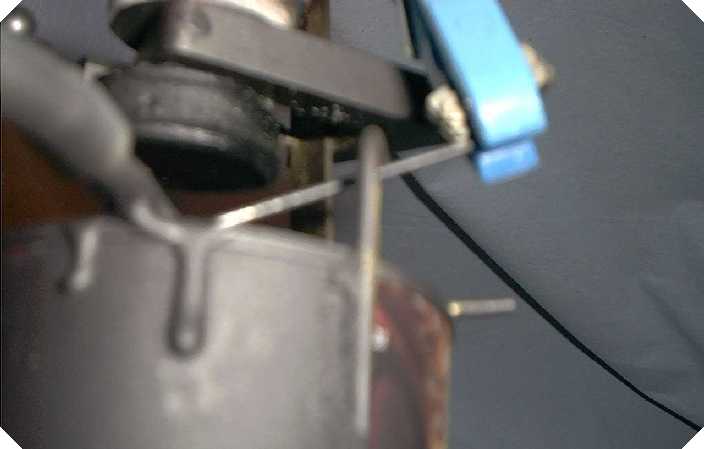
Fig 6
FINALLY:
IF YOUR Solarpumpcan doesn't work well, you may check:- if the valve is really
airtight and CLOSES when inside(can) pressure equal ambient pressure
- the angle of the axis (tube)(to the horizontal) might be TOO close to 90
gedrees (vertical)
I used 75 gegrees (to horizontal = vertical (90) minus 15, but 70 or 65 might be more appropriate in your case ?
- friction of the axis(tube) upper water basin's edge (instead of the small
hole of a bottle
a straight edge, where the axis can 'roll along' is better)
OR friction at the bottom pin
- the thickness of the axis(tube). In my test engine its 6mm thick and I
estimate 12mm
would be TOO THICK, because the length the axis would 'roll' on the edge would get the engine OUT OF BALANCE.
- the labile pendulum. Its lever might be too long OR its weight TOO HIGH
- the ANGLE the labile pendulum moves. The bigger the angle, the bigger
the irriversible
move (at every back- and every forth-stroke), ...but if it's TOO
BIG(> 45 gegrees) it won't
work either. See, the labile pendulum is to MOVE FAST FROM SHADE TO
SUNNY
(and vice versa), which should be a quite small angle, so perhaps your can
is too thick
OR the can should be mounted somewhat away from the axis.
- friction in the labile pendulum's bearing.
- the water head's height. The higher you intend to pump the less water volume
is sucked.
First try a one foot height and then increase your height, while checking
the balancing of the engine.
- the total angle your engine is moving. It should NOT exeed 180 degrees,
because it might
then TURN UP ON THE WRONG SIDE, which would mean, your labile pendulum acts
the
WRONG WAY. SO, stops help here...OR a better balancing.
Try it and send me pictures and comments, please!
---------------------------------------------------------------------------------------------------------------------------------------------------------
And here have a look at Chris's Solarpumpcan and see how he successfully modifyed it.