|
The Unofficial Yamaha CV80 Owner's Guide
Articles
The CV80's Automatic Starting SystemThe CV80 is not equipped with a manual choke. Instead, four components—a bimetal control valve (BCV), a vacuum control valve (VCV), a brass jet inside one hose leading from the BCV to the VCV, and a starter plunger within a chamber in the carburetor—work together to automatically control a starting sequence that depends on engine temperature. Hereĺs how the system works. By making use of the characteristics of bimetal responding to temperature variations, the BCV (which is attached to the cylinder head) determines what happens to a vacuum that is created when the engine is running. With a cold engine, the BCV is completely open, which directs the vacuum to the starter plunger chamber. The vacuum pulls on the starter plunger to open a passage and allow additional fuel to flow into the carburetor. The air-fuel mixture is richer for starting. With a warm engine (above 50C), the BCV is sufficiently constricted or completely closed and the vacuum is diverted to the VCV, which is opened. As a result, the plunger starter chamber is open to the atmosphere. No vacuum is exerted on the plunger, which is forced by spring to close. Fuel flows to the carburetor via its main intake only, and the air-fuel mixture is normal. The function of the brass jet inside the hose leading from the BCV to the VCV is unclear to me. In any case, the system works and in doing so it provides a simple automatic choking mechanism. Now, letĺs take a closer look at each component. Bimetal Control Valve (BCV)
According to the service manual, to check the BCV one should blow through nipple 1 or 4 to determine if the passage is blocked. If it is, the BCV should be fixed or replaced. I am still exploring how to do the latter. Vacuum Control Valve (VCV)
The service manualĺs procedure for checking the VCV starts with removing pipe A from the carburetor. Then suck pipe A to determine if the VCV is open. If itĺs closed, repair or replace the VCV. Similarly, remove the VCV and check if it is closed. If itĺs open, the VCV should be repaired or replaced. Jet Complete
Starter Plunger
So far, the only repair method I've heard about is to use a Plasti Dip® spray-on flexible rubber coating. I haven't tried it myself, but as I understand the process you disassemble the diaphragm from the slide as far down as possible or cover everything but the rubber diaphragm itself. Paint the diaphrapm with a thin coat on both sides, and allow it to dry overnight. Word is you should have a diaphragm that looks almost brand-new and cost you only a few dollars. I wrote to the technical support people for Plasti Dip and asked several questions relating specifically to diaphragm repair and was told that "consumers have been using Plasti Dip for this type of application with success." In Canada, Plasti Dip is available at Home Hardware stores. DISCLAIMER
I make no warranty of any kind, either express or implied, including without limitation warranties regarding the accuracy, reliability or completeness of information on this site. Anyone using such information to perform repairs or mechanical work of any kind does so entirely at his or her own risk. In no event will I be liable for any incidental, consequential, or indirect damages.
|
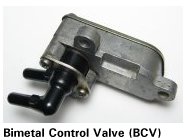 The BCV, which is attached to the cylinder head using two Phillips head screws, is a small metal unit with a plastic insert that has nipples for attaching hoses 1 and 4. My assumption is that heat is transferred from the cylinder head to the side of the BCV. I removed the BCV and unscrewed a plate (held in place with two smaller Phillips head screws) on one side. To my surprise I discovered oil inside. I'm not sure it should be there. If so, what kind of oil is it? The service manual doesn't mention anything about oiling the BCV, so I am at a loss. Would oil help the transfer of heat to allow the BCV to do its job? A mystery. I unscrewed a plate on the other side, which holds the plastic nippled insert, and found out how the valve works. There's a piston-like gizmo inside. It seemed to move freely, depressing a metal tab underneath that works as a spring. This piston is the part that opens and closes the valve to direct the vacuum appropriately.
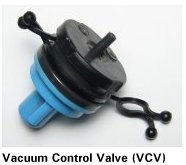 A plastic cap comes off one end of the apparently all-plastic VCV to reveal two diskettes of material similar to the pads you would find in a breather mask. Beyond that, the unit seems to be sealed.
 It's brass and it's about a half-inch or so in length. It has a wire-thin passageway. The service manual says to check to see if the jet is clogged. If it is, replace or repair it. The latter should be simple enough to do: soak the jet in penetrating oil and carefully clean out the passageway with a thin wire.
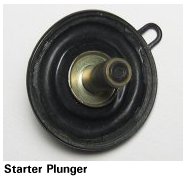 Check the diaphragm for wear. Itĺs unlikely you will be able to find a replacement, so either live with the diaphragmĺs condition—which could affect starting with a warm engine—or try to repair it.