Boston Terrier TutorialJuly 2003
|
For this tutorial, you will need:
Jasc Paint Shop Pro - Get a 30-day free trial here. (Note: This tutorial was made using PSP 7, but it may be possible to do it using other versions.)
My Selections and Pattern Fills - Download the .zip file here.
Feedback is always appreciated. If you are having a problem with this tutorial, please e-mail me for assistance.
Start by unzipping the selections.zip folder. Open the whitefur.jpg and blackfur.jpg pattern fills and minimize them in PSP for later use. Unzip the selections to the folder of your choice (I unzip mine to a folder on my desktop because it's easy to find).
1 - Open a new image in PSP 424 X 415 pixels, 16 million colors, transparent background.
2 - Add a new raster layer & name it Tail. Load the selection 001-tail.sel and flood fill with blackfur.
3 - Add a new raster layer & name it Back Leg1. Load the selection 002-backleg1.sel and flood fill with blackfur.
4 - Using the Airbrush Tool at the following settings, airbrush the lower portion of the leg with the whitefur fill.

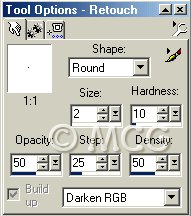
5 - Using the Retouch Tool set to Darken RGB at the following settings, add some detail for toes.

6 - Add a new raster layer & name it Front Leg1. Load the selection 003-frontleg1.sel and flood fill with whitefur.
7 - Using the Retouch Tool set to Darken RGB at the following settings, hold down the right mouse button and run it over the top of the leg a few times to darken. It's up to you how dark you want it (this will create a "shadow" effect after we add the other leg & body).

8 - Repeat step 5 for this leg.
9 - With the Darken RGB at the same settings as we used for the toes, add some detail for the ankle. Using the picture above for reference, darken a semi-circle where the ankle would be.
10 - Add a new raster layer & name it Body. Load the selection 004-body.sel and flood fill with blackfur.
11 - Using the Airbrush Tool at the same settings as before (you may change to a larger size to save time), airbrush the left portion of the body (use the picture above for reference).
12 - Add a new raster layer & name it Back Leg2. Load the selection 005-backleg2.sel and flood fill with blackfur.
13 - Repeat steps 4 & 5 for this leg.
14 - Add a new raster layer & name it Front Leg2. Load the selection 006-frontleg2.sel and flood fill with whitefur.
15 - Depending on how much white you added to the body in step 11, you may need to airbrush some blackfur onto the top of your leg to make it blend with the body. Use the same settings on the Airbrush Tool as we used before.
16 - Repeat steps 5 & 9 for this leg.
17 - Add a new raster layer & name it Head. Load the selection 007-head.sel and flood fill with blackfur.
18 - Using the Airbrush Tool at the same settings as before, airbrush a "blaze" on the face using the whitefur fill and the picture above for guidance.
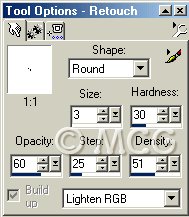
19 - Using the Retouch Tool set to Lighten RGB at the following settings, lighten the center of each ear and the area around the eyes. If needed, you can load 011-eyes.sel on the same layer, then invert and lighten around the selection.

20 - Add a new raster layer & name it Chin. Load the selection 008-chin.sel and flood fill with whitefur.
21 - Using the Retouch Tool set to Darken RGB at the same settings we used in step 7, hold down the right mouse button and run your cursor over the entire chin a few times to darken.
22 - Add a new raster layer & name it Muzzle. Load the selection 009-muzzle.sel and flood fill with whitefur.
23 - Using the Retouch Tool set to Darken RGB at the same settings we used in step 5, darken the lower edges where the mouth would be and a line leading upwards toward the nose (use the picture above for guidance).
24 - Add a new Raster Layer. Using the Paintbrush Tool at the following settings & color #808080, paint some dots on either side of the muzzle. Add a Gausian Blur with radius 0.65.

25 - Reactivate the Body layer. Using the Retouch Tool set to Darken RGB at the same settings we used in step 7, but changing the size to 25, airbrush underneath the chin & muzzle to create a shadow.
26 - Reactivate the Muzzle layer. Add a new raster layer & name it Nose. Load the selection 010-nose.sel and flood fill with black. Apply an Inner Bevel with the Round preset.
27 - Using the Retouch Tool set to Smudge at the following settings, hold the cursor over the nose and click a few times to soften.

28 - Add a new raster layer & name it Eyes. Load the selection 011-eyes.sel and flood fill with black. Apply an Inner Bevel with the Round preset.
29 - Repeat step 27 for eyes.
30 - Go back to each layer & use the Soften tool at the same settings as before, but changing the size to 3, soften the edges of each part individually. Don't forget to soften where the blackfur & whitefur meet on the body, legs, & head.
31 - Merge all visible layers & add any last touches.
That's it! Export as a picture tube or save as a *.psp file for later use!
~Home~
Graphics, web design, & content © 2003 Jennifer Chappell. All rights reserved.
The graphics and content of this site may not be duplicated, electronically or otherwise, without the author's permission.
|
|
|