
Tabby Cat Tutorial
June 2003
|
For this tutorial, you will need:
Jasc Paint Shop Pro - Get a 30-day free trial here. (Note: This tutorial was made using PSP 7, but it may be possible to do it using other versions.)
My Selections and Pattern Fills - Download the .zip file here.
Feedback is always appreciated. If you are having a problem with this tutorial, please e-mail me for assistance.
Start by unzipping the selections.zip folder. Open the ltgrayfur.jpg and dkgrayfur.jpg pattern fills and minimize them in PSP for later use. Unzip the selections to the folder of your choice (I unzip mine to a folder on my desktop because it's easy to find).
1 - Open a new image in PSP 618 x 433 pixels, 16 million colors, transparent background.
2 - Add a new raster layer (you don't have to name it because we're not keeping it for long). Load the selection 001-Front Leg1.sel and flood fill with ltgrayfur.
3 - Using the Retouch Tool set to Lighten RGB at the following settings, lighten the back side of the leg to give it some realistic shading.
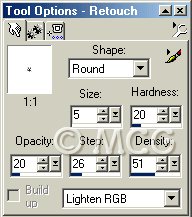
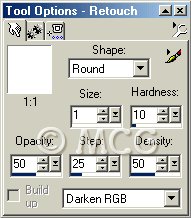
4 - Using the Retouch Tool set to Darken RGB at the following settings, add some detail for the toes.
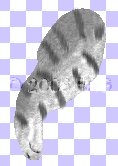
You should now have something that looks like this:

5 - Add a new raster layer. Using the airbrush tool at the following settings and dkgrayfur, lightly airbrush some random stripes.

6 - Apply a Motion Blur with angle 0 and intensity 5. You should now have something that looks like this:
7 - Merge all visible layers and rename Front Leg1.
8 - Add a new raster layer. Load the selection 002-Back Leg1.sel and flood fill with ltgrayfur.
9 - Using the Retouch Tool at the same settings as before, lighten the back side of the leg and add the detail for the toes.
10 - Add a new raster layer and airbrush some stripes using dkgrayfur and the same settings as before. Apply the same motion blur.
11 - Hide the Front Leg1 layer and merge the visible layers. Rename Back Leg1.
12 - Add a new raster layer. Load the selection 003-Tail.sel and flood fill with ltgrayfur.
13 - Using the Retouch Tool set to Lighten RGB at the same settings as before, lighten the underside of the tail.
14 - Add a new raster layer and airbrush some stripes using dkgrayfur and the same settings as before. Apply the same motion blur.
15 - Hide the Front Leg1 and Back Leg1 layers and merge the visible layers. Rename Tail.
16 - Add a new raster layer. Load the selection 004-Body.sel and flood fill with ltgrayfur.
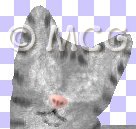
17 - Using the Retouch Tool set to Lighten RGB at the same settings, lighten the underside of the body and the neck area (see photo at top of page for reference).
18 - Add a new raster layer and airbrush some strips using dkgrayfur and the same settings (you can increase the size of the brush if it makes it easier). Apply the same motion blur. Be creative. Not all tabby cats have stripes. Some have swirls, some have spots (like the example at the top of the page), and some have a combination. Use your imagination!
19 - Hide all layers except the two newest ones and merge the visible layers. Rename Body.
20 - Add a new raster layer. Load the selection 005-Front Leg2.sel and flood fill with ltgrayfur.
21 - Using the Retouch Tool at the same settings as before, lighten the back side of the leg and add detail for the toes. You may have to mess around with the Lighten RGB to get it to blend perfectly with the body.
22 - Add a new raster layer and airbrush some strips using dkgrayfur and the same settings. Apply the same motion blur.
23 - Hide all layers except the two newest ones and merge the visible layers. Rename Front Leg2.
24 - Add a new raster layer. Load the selection 006-Back Leg2 and flood fill with ltgrayfur.
25 - Using the Retouch Tool at the same settings as before, lighten the back side of the leg and add detail for the toes. You may have to mess around with the Lighten RGB to get it to blend perfectly with the body.
26 - Add a new raster layer and airbrush some stripes using dkgrayfur and the same settings. Apply the same motion blur.
27 - Hide all layers except the two newest ones and merge the visible layers. Rename Back Leg2.
28 - Add a new raster layer. Load the selection 007-Neck.sel and flood fill with ltgrayfur.
29 - Using the Retouch Tool set to Lighten RGB at the same settings as before, lighten the center area. You may have to play around with the settings to get it to blend perfectly with the body.
30 - Add a new raster layer and airbrush some stripes using dkgrayfur and the same settings. Apply the same motion blur.
31 - Hide all layers except the two newest ones and merge the visible layers. Rename Neck.
32 - Add a new raster layer. Load the selection 008-Head.sel and flood fill with ltgrayfur.
33 - Using the Retouch Tool set to Lighten RGB at the same settings as before, lighten to blend in with the neck (it may take some time to get this right) and the area around the eyes and mouth.
34 - Add a new raster layer and airbrush some stripes using dkgrayfur and the same settings. Apply the same motion blur.
35 - Hide all layers except the two newest ones and merge the visible layers. Rename Head.
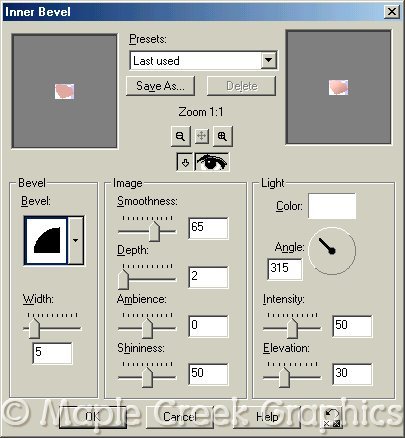
36 - Add a new raster layer. Load the selection 009-Nose.sel and flood fill with #DFA399.
37 - Apply the following Inner Bevel:
38 - Add a new raster layer. With black and the paintbrush set to size 1, step 25, and hardness, opacity and density all set to 100, draw 3 lines on the nose (use picture at top for reference). Apply a Gausian Blur with radius 1.00.
39 - Hide all layers except the two newest ones and merge the visible layers. Rename Nose.
40 - Reactivate the Head layer. Using the Retouch Tool set to Darken RGB at the same settings, but change the size to 4, darken the area for the mouth and chin. You should now have something that looks like this:
41 - Reactivate the nose layer. Add a new raster layer. Load the selection 010-Eyes1.sel and flood fill with #8AB545. Apply a Gausian Blur with a radius of 1.00.
42 - Add a new raster layer. Load the selection 011-Eyes2.sel and flood fill with black. Apply an inner bevel using the Round preset. Apply a Gausian Blur radius 0.65.
43 - Hide all layers except the two newest ones and merge the visible layers. Rename Eyes.
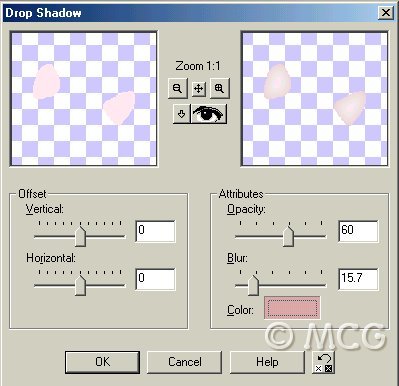
44 - Add a new raster layer. Load the selection 012-Inside Ears.sel and flood fill with #F8EAEB. Invert the selection and apply the following drop shadow (color #DEAAAC).
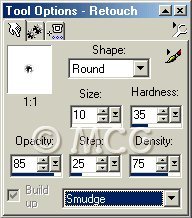
45 - Deselct. Using the Retouch Tool set to Smudge at the following settings, smudge the area around the inner ears. You may have to zoom in to get the right effect.
You should have something that looks like this:

46 - You now have two options. You can either leave your kitty as he is and continue on to step 47, or you can use the Smudge tool at the same settings and lightly smudge over the entire cat to give his fur a more realistic effect (see above picture for reference). It is easier to do this by smudging each part individually without merging the layers. You can always come back later and smudge some more after the layers have been merged.
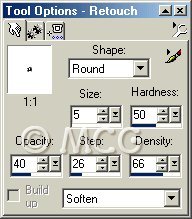
47 - Using the Retouch Tool set to Soften at the following settings, soften around the edges of the nose and inner ears so they blend more smoothly with the face.
48 - Add a new raster layer. Using the paintbrush at the same settings as before and black, draw some spots on either side of the nose.
49 - Add a new raster layer. Using the paintbrush at the same settings as before and white, draw some whiskers on either side of the nose. Lower the layer opacity to 35.
50 - Merge all visible layers (yes, ALL of then *S*). Use the Retouch Tool and Lighten and Darken RGB to add any final shading and details.
51 - That's it! Export as a picture tube or save as a PSP file.
Here is another cat I made using the same tutorial. I used different colored fur fills to make an orange tabby, then used the Smudge tool to make him long-haired.

I'd love to see what you've done with my tutorial! Please e-mail me your creations!
~Home~
Graphics, web design, & content © 2003 Jennifer Chappell. All rights reserved.
The graphics and content of this site may not be duplicated, electronically or otherwise, without the author's permission.
|
|
|