West Highland White Terrier TutorialJuly 2003
|
For this tutorial, you will need:
Jasc Paint Shop Pro - Get a 30-day free trial here. (Note: This tutorial was made using PSP 7, but it may be possible to do it using other versions.)
My Selections and Pattern Fills - Download the .zip file here.
Feedback is always appreciated. If you are having a problem with this tutorial, please e-mail me for assistance.
Start by unzipping the selections.zip folder. Open the whitefur.jpg pattern fill and minimize it in PSP for later use. Unzip the selections to the folder of your choice (I unzip mine to a folder on my desktop because it's easy to find).
1 - Open a new image 362 X 454 pixels, 16 million colors, transparent background.
2 - Add a new raster layer & name it Tail. Load the selection 001-tail.sel and flood fill with whitefur.
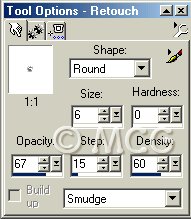
3 - Using the Retouch Tool set to Smudge at the following settings, smudge the entire tail & smudge the edges to give the look of fur.

4 - Add a new raster layer & name it Back Leg1. Load the selection 002-backleg1.sel and flood fill with whitefur.
5 - Using the Retouch Tool set to Darken RGB at the following settings, darken the entire leg.

6 - Using the Retouch Tool set to Smudge at the same settings as before, smudge the entire leg and smudge the edges to give the look of fur.
7 - Add a new raster layer & name it Front Leg1. Load the selection 003-frontleg1.sel and flood fill with whitefur.
8 - Repeat steps 5 & 6 on this leg.
9 - Add a new raster layer & name it Body. Load the selection 004-body.sel and flood fill with whitefur.
10 - Smudge the body using the same settings as before.
11 - Add an new raster layer & name it Back Leg2.sel. Load the selection 005-backleg2.sel and flood fill with whitefur.
12 - Smudge the leg using the same settings as before.
13 - Add an new raster layer & name it Front Leg2.sel. Load the selection 006-frontleg2.sel and flood fill with whitefur.
14 - Smudge the leg using the same settings as before.
15 - Add a new raster layer & name it Neck. Load the selection 007-neck.sel and flood fill with whitefur.
16 - Smudge the neck using the same settings as before.
17 - Add an new raster layer & name it Head. Load the selection 008-head.sel and flood fill with whitefur.
18 - Smudge the head using the same settings as before.
19 - Add an new raster layer & name it Ears. Load the selection 009-ears.sel and flood fill with whitefur.
20 - Using the Retouch Tool set to Darken RGB at the same settings as before, darken a line in the center of each ear.
21 - Smudge the ears using the same settings as before.
22 - Add a new raster layer & name it Chin. Load the selection 010-chin.sel and flood fill with whitefur.
23 - Using the Retouch Tool set to Darken RGB at the same settings as before, darken the entire chin.
24 - Smudge the chin using the same settings as before.
25 - Add a new raster layer & name it Tongue. Load the selection 011-tongue.sel and flood fill with #FAAEC5.
26 - Using the Retouch Tool set to Darken RGB at the same settings as before, darken a line up the center of the tongue.
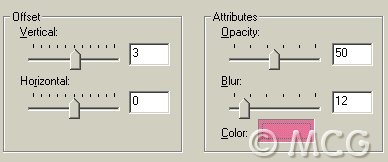
27 - Invert the selection and apply the following drop shadow (color ##EB759C).

28 - Using the Retouch Tool set to Soften at the following settings, soften the edges of the tongue.
29 - Add a new raster layer & name it Muzzle. Load the selection 012-muzzle.sel and flood fill with whitefur.
30 - Using the Retouch Tool set to Darken RGB at the same settings as before, darken the entire muzzle.
31 - Smudge the muzzle using the same settings as before, but pull the fur out and downward (like a moustache, LOL).
32 - Add a new raster layer & name it Nose. Load the selection 013-nose.sel and flood fill with black.
33 - Apply an Inner Bevel using the Round preset.
34 - Using the Retouch Tool set to Soften at the same settings as before, soften the edges of the nose.
35 - Add a new raster layer & name it Eyes. Load the selection 014-eyes.sel and flood fill with black.
36 - This is how I made my eyes, but you may choose to do it differently. I used the Red Eye Removal Tool at the following settings and placed the eyes over the black area. The shade of brown you use is up to you. I used the last shade (#15) for mine. It may take a few tries to get it right, but your patience will pay off!

37 - Merge all visible layers. If necessary, you can go back and use the Smudge tool some more to blend areas together or add some finishing touches. Export as a picture tube or save as a PSP file.
~Home~
Graphics, web design, & content © 2003 Jennifer Chappell. All rights reserved.
The graphics and content of this site may not be duplicated, electronically or otherwise, without the author's permission.
|
|
|