Welcome to my first tutorial and hopefully not my last.
This tutorial is for a picture I created using Paint Shop Pro version 7.04 and various
tools involved there in. What I hope to accomplish with this ,is simply giving clear and
conscise steps so anyone using PSP can create the same image.
|
Please be advised the graphics and tutorial on this page are owned by Mary_lizbeth and are NOT to be
copied or used without her express written permission. If you would like to use the images or tutorial
that you have found here please contact me via email at Email Me
This tutorial was written and published on Friday, August 16th 2002.
|
The first thing your going to need to create this picture is obviously a version of Paint Shop Pro preferably 7.0. To get
a trial version of PSP click the link below and it will take you to they're download page.
Be very sure you follow they're instructions when you download so as not to have errors or difficulty.
|
|
PSP download
|
The second file you'll need is the actual tube for the rose itself.
That is contained in this zip file. Unzip it to your PSP tubes folder and you should
be good to go.
|
|
Tubes zip
|

Now, that you have down loaded those two items and placed the tube in your tubes folder we can
get to the good stuff.. .making the picture.
Open your PSP and open a new work surface the size I used was 400x300 with a transparent background.
We're going to create the background first: click on the flood fill icon on the left hand side of your
PSP program.. select any color you like I use the darker ones because when converted to the pine texture they
are a bit darker you want to fill the work surface, your background color doesn't matter but should be something solid.
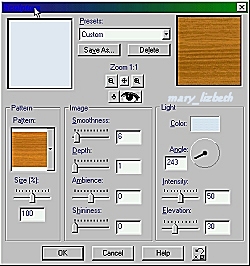
Once you've done that up on the top tool bar click on Effects then click Textures and scroll down an click on sculptures
see the screen shot below:It should be noted in the screen capture it says custom, when you are doing yours it will start off saying pine and
as you adjust things as Ive described it will move to custom.
|
|
Now you've created the inital background for the rose. Open a second work space again with a transparent background.
I left mine sized at 400x300 pixels, however you can save yourself a crop later if you want to shrink it down some.
On the left hand side of you PSP click on the tubes icon once there scroll through your tubes until you find the rose
tube you installed from the zip file. It should look like this:

Now if you downsized the work spaced you placed your tube on you won't need to do the following,
however if you are like me and just quickly open that second workspace and don't think to shrink it
you need to select the crop icon on the left hand side of your psp and crop your rose down to a smaller size.
How big? Well thats up to you and how big your end picture is going to be.
Once you've cropped it copy an paste the rose onto the back ground you have created previously:

Now, you have the basic image done. Go up to your top tool bar and click on Effects then on Sharpen and then on Sharpen more this will
sharpen the image.
Next you want to select a background color similar to that of the woodgrain tones. You can do that
by using the dropper icon on the left hand side of your PSP,once clicked on run it over various
area's of the background or the rose and select your color.It will appear above the color chart click on one shade which will open
a window similar to this:

this will display the hex values and html code for the color.
I have circled in red the shake and the and the html code for the color I use
the html code is #d2a488. If you enter that in that code space it will pull up the color i used
click on it an then click ok.
To do that you go back to Effects..3d Effects..Buttonize once you have go to there you will see this screen:
shown are the settings I used. Click ok giving you this image:

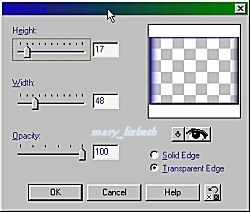
Once you have buttonized your ready to add the frame and be done. Below are screen caps' of the frame settings I used.
The frame used is standard in PSP7 but by no means do you have to use that frame I thought it complimented the lighter grain of the background.
Click on Image scroll down to Picture frames and click there. It will bring up a window like the following:

Shown in that screen capture is the "OldWood"style frame again my personal choice but it looks very nice. You will use the drop box to scroll and
find that frame. Once you have click on it and you will be shown a window asking you to choose a matt color. I chose the background shade,you may individualize it
as you like. After you have chosen your matte color click next and it will ask if you if you want the frame inside the graphic or outside.
I chose outside. Tick the Outside selection and click finish. And walla!
 You have a rosewood graphic similar if not duplicate of how I made mine.
I hope you enjoyed the tutorial and found it easy to use and understand. Thank's for viewing and happy creating!!!!
You have a rosewood graphic similar if not duplicate of how I made mine.
I hope you enjoyed the tutorial and found it easy to use and understand. Thank's for viewing and happy creating!!!!
|
| |

