 |
 |
 |
 |
 |
 |
 |
 |
 |
 |
 |
 |
 |
 |
 |
 |
 |
| Daz3ds' Daz Studios Victoria 3 sr2, Pem for V3, and Casual Hair ***This page contains artistic nudity. Be forewarned*** |
| From Daz Studio to Bryce in a snap :) |
| Hello my friends :) I made this tutorial to help people export their textured characters from Poser or Daz Studio, import them into Bryce, and then set up their materials, textures and transparency maps for awesome Bryce style rendering. I have never written a tutorial before, but chose to elaborate my methods visually rather than verbally, and can only hope my interpretation serves you well... I truly believe the only lesson to be learned in Bryce, and art in general, is to always and constantly think outside the box... I don't believe there is such a thing as a right or wrong way of doing things, it's all a matter of finding what works best for you... |
| Making this tutorial, I am assuming that you have a comfortable familiarity with Bryce, its features and functions plus its interface, so please forgive me if I seem to be skipping or going too fast. Never fear when experimenting. Mistakes are the greatest way to learn, and you can always undo your last operation... Be patient, go slow, relax and enjoy. You're Brycin' now :P |
| What we are going to do during this tutorial is take a nude figure from Daz Studio that is already posed and textured, import the .obj file into Bryce, break down the figure into material groups, and then texture the groups according to their image texture... Sounds simple eh??? Yip... It is :D Ok, I am going to stop running my mouth and get on with the show... There's burnt popcorn in the microwave if anyone wants it :P |
| Assuming you have already posed, and textured your character, we import the .obj file into Bryce and give a test render to see what we're up against... |
| Not too bad, but needs some fixin'... |
| See... Already we are done with the 1st phase :) |
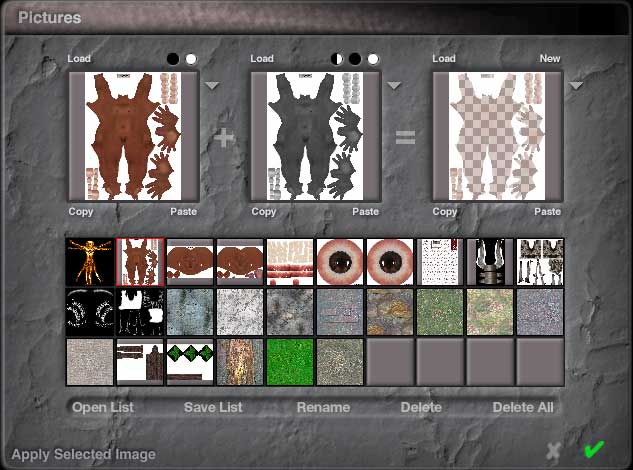
| Now, what we want to do is break down the grouped object into parts that correspond to the different image textures... M3, V3, Aiko, Hiro, The Freak all are similar in that their skin textures are made up of a seperate head, body, left and right eye and eyelash and eyebrow transmap images... We will select the individual sections of the mesh, and sort them into color families for quick selecting and access... |
| Here, you can easily see the parts that correspond to the "body" image texture... |
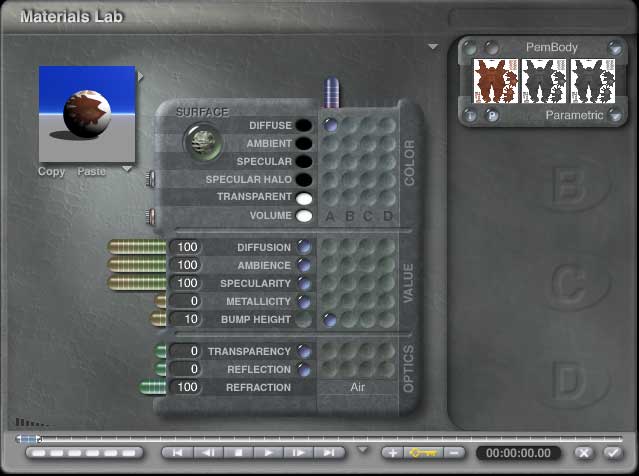
| After all of the "body" parts are selected, go into the materials lab/texture edit and make sure to copy the image texture into the bump map space (the square in the middle). |
| Now adjust the material settings... |
| Next we're going to work on the head of our character... |
| Again, copy/paste the image texture to the bump channel... |
| Notice the similarities in the material options??? |
| Next we are going to do the left and right eyes... One eye at a time... Eye for an eye :D The leftmost image displays the selection for just the left eye... Once again, copy and paste the eye image into the bump channel, and set up the material options and settings the same... |
| Now we are at the spot that I believe gives people the most frustration when texturing Poser/Daz Studio characters within Bryce... Transparency maps, muhahaha!!!!!! Now, within Bryce, select the eyelashes, and then the eyebrows... *** Actually, I prefer to delete the eyebrows *** |
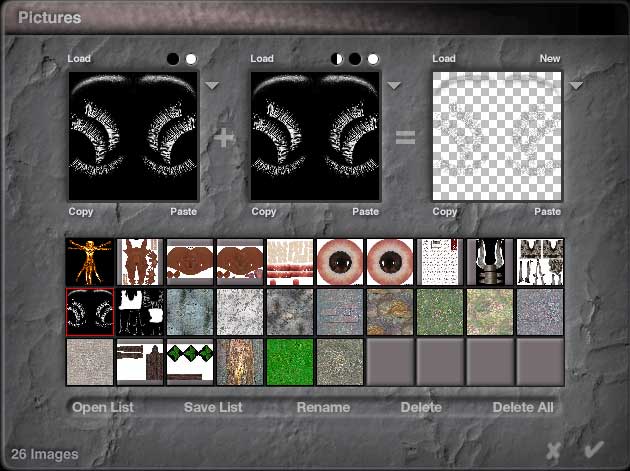
| Here, we are simply loading the transmap, which is nothing more than a black and white image... The negative/black areas of the image are made invisible, while the positive/white areas are totally visible when the image is rendered. |
| For the eyelashes, I use the full black preset in Bryce (You can find it in installed>simple and fast, top row :D), and then apply the transmap... Take special note that we set the material to blend transparency (You access this from the small downward pointing arrow to the left of the material channel control... (That's what I call those little boxes that pops up on the right :P)), and that we activate the transparency for the material (See those little "blue dots"??? Hit the one under the space for channel "A"). |
| Here we can see the textures and transmaps applied. |
| Here, I went back into the matlab and selected the face with make-up option, that most Poser texture artists make in abundance, lol... |
| And now for the hair... Most hair sets will need a 2 channel set up. No big deal, no need to worry :D This time, we set one image under channel "A" for what the hair will look like, and then we set another image, a transmap, to channel "B", for the volume, or the hair strands that we will see... Take note that the transmap is in channel "B", and that is why the little blue dot has been activated in the next channel spot, and yes indeed, we still turn on blend transparency. I cannot speak on other hair sets you may come across. Most people have their hair broken into different groups that need different textures and transmaps, and it can get pretty "tuff"... After this, I am sure you'll have the confidence to tackle the tuffest hair jobs :D |
| And here, we have our beautiful vixen ready to go, all textured, haired up, and transmapped (and NUDE!!! OH MY GOD!!! :P). |
| Add a few props, some basic shapes, some atmosphere, and there you have it :) |
| I hope you found my tutorial helpful... |
| *** Special Note *** To make my selections, I used the selection palettes ability to select meshes, and simply shift+clicked all needed parts for grouping. It's a good idea to sort the groups you make/select to color families, that way you can pick them out easily for editing in the future... |
| Repeat for the right eye... |
  |

|