Changing Virago Fork Oil and Fork Seals
This article is focused on a í99 XV1100 Virago. It is only provided as background and general comments, but you should be using a shop manual as a ďgo byĒ if you are working on your forks.
My í99 XV1100 Virago had a fork seal that was leaking on the left side even when the bike was relatively new. Since it wasnít that bad of a leak, I let it go thinking I would take it in sometime to get it fixed but I never did. Eventually, the seal started leaking to the point that fork oil would show up on the front of the left pod. At this point, I was out of the warranty period so I decided to replace the seal myself. Besides, it was time for a fork oil change anyway.
The first thing youíll notice about the late model Viragoís (Ď94-up I think) is that there is no way to drain the fork oil from the forks without taking the fork assembly off the bike [1]. There is a boss located on the outer fork tubes in the area where a drain screw can normally be found on Viragoís, but on the late model bikes this screw is not there. The screw at the very bottom of the fork is not meant for draining, so the forks must come off and be drained from the top.
Basically, your Virago fork is nothing more than two tubes, one inside the other, that move axially relative to each other. One tube is the lower fork tube, the other is the upper fork tube. The upper fork tube is hollow and somewhat thin walled and is polished on the outside to form the necessary dynamic sealing surface required for the fork seal. All the other parts to the fork are used to control the forks motion and guide the tubes. The upper fork tube is guided during its motion at three points. There is a bushing with Teflon coating on its inside diameter located in the top of the lower fork tube just below the fork seal, a bushing with Teflon coating on its outside diameter located on the bottom of the upper fork tube, and a plastic guide located on the damper rod. The damper rod guides the upper fork tube along the inside of the tube. A spring is located on the damper rod to soften the blow from an upstroke, and the main fork spring sits on top of the damper rod and provides your suspension on the downstroke. The fork oil is used for lubrication of moving parts and to dampen out and control the motion of the main spring. There are small holes in the damper rod that act as fluid passages for the oil.
The allen head screw located at the very bottom of the lower fork tube IS NOT A DRAIN SCREW! That screw mounts the damper rod in the forks. If you loosen this screw, you may have to disassemble your forks to get it tightened correctly again. This is because the damper rod is only mounted by that one bolt, and since the rod is cylindrical in shape, it will tend to just spin with the bolt once you loosen the torque on it.
These are the notes I generated and steps I took while performing this operation.
Step One: Remove the chrome caps covering the fork spring bolt at the top of the upper fork tube. Use a 17mm allen key to just crack loose the fork spring bolts but donít remove them. Be careful not to dump the bike as these bolts are sometimes pretty tight.
Step Two: Put the bike on the center stand. Use wood blocks or whatever under the engine case to get the front wheel off the ground. I like to bring the rear tire to the ground and use wood blocks under the front part of the engine case to keep the front wheel elevated in this position. Two things are important here: make sure you donít use anything that will dent the engine case, and two, make sure your bike is stable as you will be shaking the bike around slightly. Also, it is a good idea to stabilize the front end to prevent it from falling from side to side as you work.
Step Three: Remove the speedo cable from the speedo housing located on the front wheel. Just loosen the knurled knob and ease the cable out.
Step Four: Remove the brake caliper assemblies from the forks. Here it is nice to have a bucket turned upside down or a short stool to place just behind the front wheel so your caliper assemblies can sit without dangling from the brake line. There are two bolts that hold each caliper to the forks. Loosen those and slide each caliper off. DO NOT SQUEEZE THE FRONT BRAKE LEVER WITH THE CALIPERS OFF! In fact, get some small slivers of wood or something to stuff in between the brake shoes on each caliper while they are off the rotors. If you push the brake lever, you will force the shoes together and have a heck of a time getting them apart again for remounting.
Step Five: Remove the front wheel, fender, and the fork bridge that the fender mounts. For the wheel, loosen the pinch bolt first, then unthread the axle bolt. Support the front wheel and slide the axle bolt out and the wheel will be free. The axle bolt should slide out easily with the wheel supported, and when reinstalling it should slide in just as easily. Take note of this when removing the axle bolt as it can be an indication of fork alignment when re-installing the wheel. The speedo housing will be free too. Set the wheel, speedo housing, fork bridge, and fender to the side.
Step Six: Mark the forks in the current position on the bike. I used a marker and some tape but use whatever you think you need to guarantee that you can get forks back on the bike in exactly the same position as they came off. I marked them for relative rotation as well as up and down position. Up and down position is most important here. I also took some length direction measurements of right and left forks for comparison as well as measured each main spring once they were out too. I wanted to make sure I got these back on in the exact position that they came off and you should too.
Note: Work with one fork assembly at a time and donít remove the other until the one you are working with is finished, assembled, remounted to the bike torqued down to the proper tightening, and filled with oil. That is, you arenít going to touch that assembly again. By having one fork in place on the bike at all times, you will not risk misalignment of any of the front end components because nothing can move as long as one fork leg assembly is always installed. This way, if you have trouble getting a fork assembly back on the bike, you know something was bent or misaligned with the front end and warrants further investigation. If you have any trouble removing the legs at all, stop work and take the bike to a shop. DO NOT HAMMER THE FORKS OFF THE BIKE. Something is messed up, bent, twisted, etc., and needs fixing.
Step Seven: Choose a fork leg assembly and remove it from the bike. Everything I say here refers to one fork leg at a time. There are three pinch bolts that hold your fork leg to the bike. One on the upper fork bridge and two on the lower fork bridge. Loosen both the lower fork bridge pinch bolts. Now get someone or something to support the fork assembly and loosen the upper fork bridge pinch bolt. The fork might drop free, it might not. Slide it carefully down and out with a slight twisting motion if it is free. If it is not free, grab firmly and with a downward twisting motion pull the fork down. It should break free and slide with no effort at all. With the fork free your primary concern should be with the polished upper fork tube. Do not let it bang or get scratched on anything. Also, double check the stability of the bike : ^ ). Place the fork assembly carefully on some clean rags on a nice flat and free work space.
Step Eight: Go get lots of clean rags, a drain pan, some mineral spirits, your new fork seal, your new upper guide bushing (you should have one handy just in case), and new fork oil.
Step Nine: Stand the fork assembly up on end with the spring bolt at the top. Being careful to not dent or scratch the polished tube, remove the fork spring bolt from the upper fork tube. It should already be loose because that was your first step. In one hand, hold the upper fork tube firmly, and with the other hand loosen the bolt with the 17mm allen key. The bolt has an o-ring on it and has a load on it from the spring (10-15lbs). As you loosen it, push down so you can prevent it from flying off when it frees. You might even want the hold down the allen key in the bolt and rotate the upper fork tube with your hand instead of rotating the bolt. Either way, when it comes off, there is a spacer and a washer under it, as well as the main fork spring. Once this bolt is off, the upper fork tube will be unloaded so be careful if pushing down on the tube because oil may squirt out if it is suddenly forced into the lower fork tube. Itís best to be grabbing the top of the upper fork tube and have the fork hanging by the upper tube just slightly off the ground when you remove the spring bolt. With the bolt out, remove the spring spacer. Then slowly push the upper tube into the outer tube and remove the washer and spring when they appear. Lay the bolt, the spacer, the washer, and the spring on the rags as they come out, some of these will be dripping with oil. Now, firmly support the upper and lower fork tubes and tilt the assembly into the drain pan so the fork oil drains out of the inside of the upper of fork tube. Pump the fork several times to get all the oil out. Now lay the fork assembly to the side on some rags being careful not to dent or scratch the upper fork tube. When the main spring is out, I like to try to keep the upper fork tube bottomed out in the lower fork tube (fork as short as possible)during handling. The reason is that the sealing surface of the fork will be buryed inside the lower fork so that if the upper tube does get scratched or nicked, it wonít be on the sealing portion of the tube.
Step Ten: Clean the spring, the washer, and the spacer with mineral spirits. Measure the spring free length and write it down. Compare this to the other spring when you remove it. If you are just changing fork oil, you might want to use new fork oil, mineral spirits, or a solvent of your choice to pour into the fork assembly to swish around and drain for cleaning the inside of the assembly. Typically, there is a residue of sludge in the bottom of the fork that even a drain screw wouldnít eliminate. If you donít use new fork oil to clean the inside of the assembly, I would recommend placing the fork assembly tilted up for a few hours to make sure all the solvent drains out. Many times this stuff wonít evaporate quickly and might thin your new oil slightly.
Note: If you are only changing fork oil, you can begin the re-assembly process once everything is clean. Place the spring back in the upper fork tube and slowly slide the upper fork tube out of the lower fork tube until the spring is just even with the top of the upper tube. Place the washer on the spring and continue slididing the tube out of the lower fork as far as will travel. Pour in the correct amount of new fork oil, drop the spring spacer in, and put the spring bolt back in. Tighten the spring bolt, and give it a final torque once the fork assembly is assembled back on the bike. If you are replacing seals, read on.
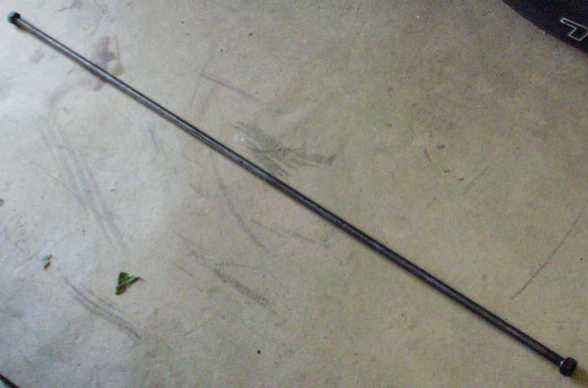
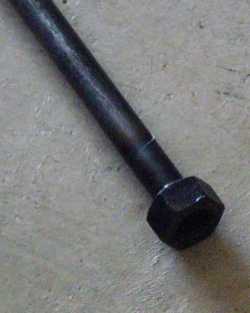
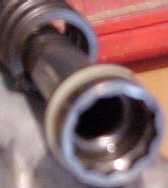
Step Eleven: Here you will remove the damper rod. If you shine a flashlight inside the upper fork tube you can see what looks like a 12 point hex head socket at the bottom of the tube. That is the damper rod. To remove it, you need to slip something inside that socket to hold it while you loosen the allen bolt at the very bottom of the lower fork tube. It turns out that a 9/16-12 nut will fit this socket very well. I made a tool to fit the damper rod from parts from my local hardware store. I got a piece of ĹĒ steel dowel rod about 3 to 4 feet long (wish I could have found some shorter), and two 9/16-12 nuts. The nuts almost slip over the rod but not quite. I hammered the nuts one on each end of the dowel rod. I also welded mine on but I really donít think youíll need this. There is a picture of my tool at the bottom of this page. Slip the tool in fork tube and into the socket of the damper rod. Hold a wrench on the exposed end of the tool and loosen the allen bolt at the bottom of fork leg. DONíT DENT OR SCRATCH THE UPPER FORK TUBE! Once the allen bolt is out, you can tilt up the fork and let the damper rod and rebound spring slide out of the upper fork tube. Lay the parts on the rags.
Step Twelve: Slide the dust seal (at the top of the lower fork tube) off the forks and place to the side. Now, the only thing holding the upper fork tube and lower fork tube together is a circular-clip (snap-ring) just above the fork seal, and the upper and lower guide bushings. Well, I suppose the seal itself can be considered as holding them together too. Remove the circlip from its groove with a small screwdriver. Careful, this is a time when you could scratch that upper tube. With this clip removed and damper rod out, the upper fork tube can be reverse hammered out of the lower fork tube taking the upper guide bushing and the seal with it. The seal does not add much resistance to tube separation. The hammering is done because the lower guide bushing is slightly larger in outside diameter than the upper guide bushing is inside diameter. Thus, the lower bushing will drive out the upper bushing which in turn drives out the seal. I was lucky in that my tubes separated very easily. I extended the fork assembly, grasped the upper fork tube in one hand and the lower fork tube in the other and lightly swung the tubes together, then apart in one motion to WHACK! the bushings. One time, and the seal and upper guide bushing came out and the tubes separated. Careful with the upper tube when it frees. Once the tubes are separated, there is a taper spindle (also known as an oil lock???) that fits onto the damper rod that will be free to come out. There is also a seal washer that is between the upper guide bushing and fork seal that will come out. Place them on the rags too. Thatís it for disassembly.
Step Thirteen: The parts you should see on your rags are: allen bolt and its washer, taper spindle, damper rod, rebound spring, upper guide bushing, fork seal, circlip, dust seal, fork seal washer, main spring, spring washer, spacer, spring bolt and o-ring, upper fork tube assembly, and the lower fork tube, as well as your new parts. Donít mix the new parts with the old. Clean everything with mineral spirits and check for damage. Check the upper and lower guide bushings for wear. If they look worn replace them. Hopefully, the lower guide bushing wonít be worn too much. This piece is actually only sold new as part of the upper fork tube assembly, and if yours is worn you need to head to the salvage yard to try to find one or buy a new upper fork tube. Ha! Who can we thank for this one?????
Note: Some say you can remove the seal by prying it out and thus prevent having to disassemble the fork tubes from each other to replace seals. I say this may be so, but it is also good way to *@$#-up the upper fork tube and scratch it. I donít recommend it. The manual says you can (leaving in the damper rod but having the main spring removed and the circlip) extend the fork full stroke, fill up the fork tube completely with fork oil all the way to the top, and install the spring bolt. Then using a press, push on the top of the upper fork tube and let the pressure of the oil drive out the seal. As you can probably tell, I donít like risking damage to the upper fork tube, and as long as you are replacing the seal because of a problem, I believe you should check the guide bushings and fork internal parts as well. Some might disagree but thatís how Iím writing it up. Besides, this is all just my $.02 anyway.
Re-assembly: In general re-assembly is the reverse of disassembly except that the new seal and upper bushing need to be installed, follow the manual, it is pretty straight forward for this procedure. In summary the parts go in this order: rebound spring on damper rod, slide damper rod into upper fork tube and let it slide down to extend through the bottom, place taper spindle on damper rod end and shove rod with the spindle on it back into the base of the upper tube, ease the upper fork tube into the lower fork tube, install allen bolt and washer through taper spindle and into damper rod, torque damper rod using your tool, install upper guide bushing, install seal washer, install fork seal, install circlip, install dust seal, install main spring, install spring washer, fill with oil, install the spring spacer, install and torque the spring bolt, reassemble the fork to bike with emphasis on alignment, positioning and proper torquing of the pinch bolts.
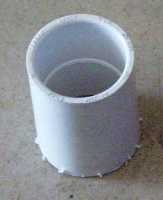
SEAL AND UPPER GUIDE BUSHING INSTALLATION: THE DAMPER ROD, REBOUND SPRING, TAPER SPINDER, AND UPPER FORK TUBE, MUST BE INSTALLED IN THE LOWER FORK TUBE BEFORE INSTALLING SEALS AND UPPER GUIDE BUSHING! To install the upper guide bushing and fork seal you need something to drive them into position into their mounting bores. I used a piece of 1 ĹĒ PVC pipe straight coupling which fits perfectly for this operation (see photo). Slip the bushing over the upper tube and slide it down into its bore. You can probably press this in by hand with the PVC coupling. If not, lightly tap around the periphery to drive in the bushing. AGAIN, DO NOT SCRATCH THE UPPER TUBE! Next get the new seal and wipe a light coat of fork oil on the sealing surface and slide the seal onto the upper tube and down to its bore in the lower fork tube. Make sure it is on it the proper direction. Again use the PVC piece to lightly tap around the periphery of the seal to drive it into the bore until the groove for the circlip can be seen around the entire diameter. Take your time tapping it in. It may look like the seal is not moving into the bore but it is. Follow that up with installation of the circlip.
As you reassemble the fork legs and install them back on the bike, make sure to double check everything as your forks are a safety critical part of the bike. Remember, each leg is only held in place on your bike with three pinch bolts, so make sure you get these tight and check them often. The fork legs should slide back into the bridges without forcing, and since you marked the forks for alignment, the wheel and axle should assemble without force as well. Follow the manual, and feel free to email me if you have questions.
[1] Now that I have a tool for the damper rod, for future fork oil changes I will probably use the damper rod bolt as a drain screw and perform the change with the forks on the bike. I couldn't do this initially because I needed my hands on a damper rod to size up a tool. I had to improvise with some metal strip to get the damper rod out of the first fork leg I worked on.
The damper tool

Close-up of tool

PVC seal driver

Top of the damper rod
