
Making EPS foam decoys, where to start, I got involved when I saw the opportunity to acquire a set of all three decoy molds presently available for less then the cost of a new mold. Making the decoys has been rewarding but the days are long. While the production numbers are good for homemade decoys, don’t expect large numbers overnight. The benefits of these foam decoys are many but there are drawbacks. Neglecting the cost of the molds the average person should be able to make these decoys for between $4 & $6 each for ducks and $7 to $10 apiece for geese.
Those who want to get into it in a big way can buy the EPS directly from the manufacturers in thousand pound (1000-lb) Containers and buy the propane or natural gas at much better prices then 20 lb. at a time. The benefits, foamers will not sink when shot and you can position the heads at different angles to prevent the “tin solder” look and you can paint them in whatever male/female ratio you desire. The drawbacks are as numerous, first you have to make them and paint them. Juggling four molds I was able to turn out only about 2 dozen a day that still had to be washed, trimmed, fitted with keels and painted. Now keep these guys away from gasoline, as they will dissolve. You will also have to treat them maybe just a bit kinder then the hollow plastic decoys although they should last longer if treated well. Do not confuse these foam decoys with the foam decoys available from Herter’s. These decoys are much tougher!

EPS (Expandable Polystyrene) Beads:EPS is available on the open market but it is hard to find sources willing to sell it in quantities less then 1000 pounds. You will also have to watch the bead size. The molds need a medium sized bead to form the desired density decoy. Too small of bead and you will get a three pound decoy rather then the desired one pound block. Additionally you will burn up the EPS at three times the rate of the R&R bead. Too large of a bead and you may end up with soft beer cooler decoys. For normal runs it’s hard to beat small batches from R&R. Another draw back to EPS beads is that they have a shelf life. Do not buy more then you plan on using in a two (three at the most) month period. Plan on ducks taking a pound of EPS and Geese taking two pounds each.
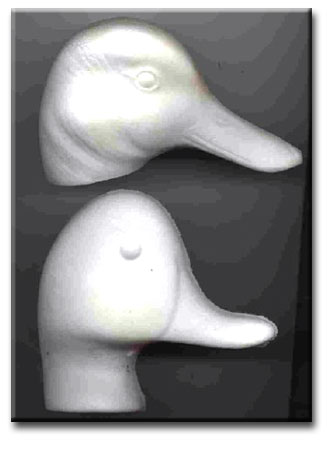
Molds: Decoy Unlimited molds are available at R&R Sports in Clinton, Iowa . However they only carry three molds, each with one head design, a goose, a mallard and a generic diver (bluebill). They also sell the EPS beads in 20-pound units. The goose requires 2 lb. of EPS, the mallard 1 lb. and the diver 14-oz. Beads delivered will run about $3 a pound, with quantity discounts. Molds also come up frequently on E-bay, but be careful. The name Decoys Unlimited is old and many different designs and styles have been made over the years. One gentleman bought one that made a very small diver with the head on it that did not look much like a real duck. They have also made a canvasback, a wood duck, a brant, and a couple of sizes of mallards and divers. Some of these are in great demand others less so, just determine that you are getting what you want. Earlier decoy molds were “flat bottomed” with out much detail. The newer molds from R&R molds are much more detailed, and have a hollow body that helps with filling and reduces the amount of EPS required. These suc–bottoms will even work without a keel in relatively calm waters.

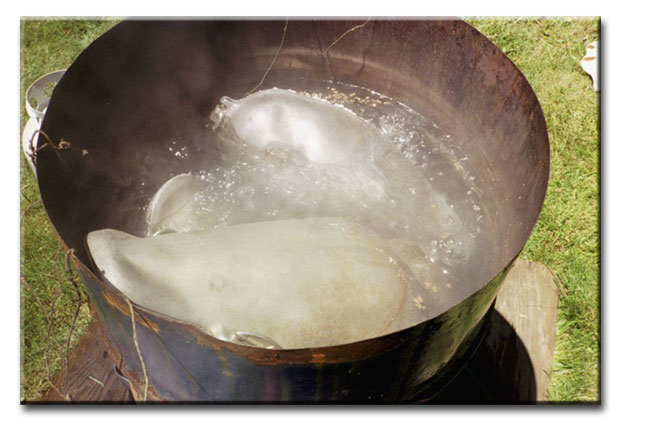
Boiler: The container that you select to boil the molds in must have a cover of some type to hold the steam in. The body molds float when filled with the R&R standard size beads requiring a head of steam to properly cook the decoy. The cover also helps save energy/money. The pot will heat up faster and reduce the heat input to maintain the boiling water. Base the size of the pot you select on the number and type of molds you will be boiling. Big is good. The more water you have boiling the less effect a cold mold going in will have. Additionally if you are constantly adding water to make up for water lost due to evaporation and molding activities the more propane required. To date I have made two boiling containers; a 120-lb oil can from a fire department and a 55-gallon drum. The lid off a canning pot fit the 120-lb oil can while for the 55-gallon drum, I used the end I cut off for the top. By this I mean I used a jig saw to cut the top off the drum roughly a 1.5 inches down. Using pliers I flared the 1.5-inch rim out so it would fit over the cut top of the drum. I then ground both edges smooth. Size wise, these two containers handle 2 duck molds in the 120-lb can and one goose and three duck molds in the 55-gallon drum. There is room for the head molds with the body molds.
Warning: Both of my containers were originally used for petroleum products. I had problems getting quality decoys out of both of them the first use. The second use for both of them went perfectly. I can’t prove one way or the other that they contaminated the water but that’s my suspicion.

Heat source: You need BTUs to get the water boiling. A camp stove or low BTU burner is not going to cut it. The 120-lb can fit on my propane fired fish fryer stand and worked very well. However there was no way the 55-gallom barrel was going to balance up there. So I bought a high BTU output double burner stove from Northern that’s low to the ground. This unit gets 40 gallons of water up to a boil in 45 minutes on both burners then boils nicely on one turned down burner. Propane bought in small containers is expensive. A hard day boiling with the 55-gal set up will burn 30-lb of fuel. This divided over close to 3 dozen decoys adds about $.50 to each one. If you are using a smaller set up and only using one mold at a time your fuel use per decoy goes up. If you know you will be burning up 100-lb or more of propane you should go to propane dealers and see if you can get a 100-lb tank. I have not done this to date but two people have recommended it to me and I’m kicking myself for not having arranged it at the beginning. Prices quoted were in the $25-$30 range for the 100-lb. tank. I don’t know if there is a rental charge for the physical tank, or if the price of the propane covered it. If you are on a gas line and have an available tap for a gas grill I hate you! (Just kidding but I am very jealous.)

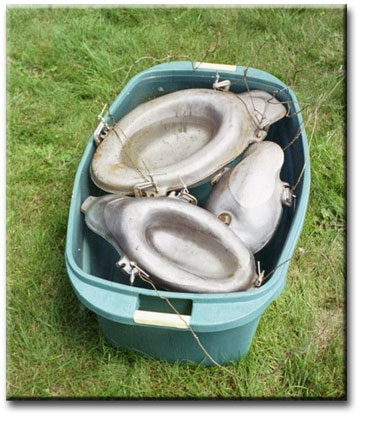
Cooling tank: After boiling the molds you will air cool them, then you need to make sure they are cooled off. You can hose them down or as I do, you can put them into a container of cold water. I use a large (30-gal.) Rubbermaid storage container. When I was just juggling two duck molds I was able to get away with a 5-gal pail. This does not work with multiple molds or the larger goose mold. The lid of the storage container is a great surface to fill the molds on; you can recover the spilled EPS easily. This container can also double for a wash basin when you clean the release agent (oil) off the decoys.
Clamps or screws and nuts: The molds are two pieces which must be held together while boiling. The two older duck molds I borrowed had threaded inserts installed in them and were held together with screws. The new molds have tabs with slots. They can be clamped or bolted together with ¼” screws and nuts. There is not room for wing nuts so you will need a wrench if you elect to use screws. I used small c-clamps purchased from home depot. I bought a bunch of the 1”size but have had about five of them fail. I also bought four 1.5-inch clamps for the goose mold but they have bent out of shape. For the goose I have resorted to heavier 2” clamps.
Wire:To handle and control the molds I use a heavy single strand wire. The heads especially need to have support wires because they sink and you need to suspend them from the back of the head to prevent nail drift and soft spots, but we will get around to that later. String does not work; it tangles and is not fixed in place by simply bending it over the rim. Additionally if left long it will burn.
Gloves: a heavy pair of leather gloves is perfect for handling the cover and molds when they are at 212F/100C.
Old pillowcase: This is the perfect tool for pre-boiling your EPS. It works as a strainer to prevent bead loss and you can beet the EPS in the bag to break it up after the hot water dip. One caution, if your pot is smaller then the pillow case be careful of how much EPS you put in, in one shot. It is not unheard of for the EPS to expand the pillowcase out against the sides of your container and lock it in place.
Big stick: You must stir the Pre-expanding EPS and it is a good tool to beat the expanded EPS with to break it up. Also it’s a good tool to generally poke the pot with.
Big containers: For the expanded EPS. I use both 5-gal buckets and a metal canning pot. The metal canning pot cools the EPS faster and makes handling easier. I work out of the pot and store batches in the 5-gal buckets.
Plastic containers and coffee cans: Coffee cans make great containers to scoop and shake with. A good low-sided plastic container with airtight lid is recommended for the EPS/Crisco mixture required for the bill. I brushed the molds with oil, which requires a brush and another container with a lid. Others use a spritzer/spray bottle and spray the molds.
Consumables: Vegetable Oil and Crisco, plus galvanized nails: The EPS reacts with the vegetable oil/Crisco and forms a denser/harder plastic. A Crisco mix is used in the bill and oil is used on all internal surfaces of the molds. The oil works as a release agent and results in a hard protective shell. Use Vegetable produces, DO NOT USE petroleum products. The nails should be 2.5 – 3 inches long and are used to reinforce the bill.
Wrenches and screwdrivers as required to connect propane fittings, open molds, etc. If your decoys stick in the mold a small pry bar allows removal with only one smallish hole at the split line. When I tried prying with screwdrivers the foam would tear if I put enough pressure to pop it out of the mold. If this happens a number of times, polish the mold with emery cloth.
Paper towels: Everything is wet and covered with Crisco and oil. You will go through paper towels. Regular towels are good too but they will get covered with oil. The Crisco in the bill boils out and coats the outside of the molds and clamps. Wiping with a paper towel keeps the build up manageable.

Get your pot on the stove and fill with as hot of water available. Whatever heat you get elsewhere saves you propane. I run a hose off my domestic hot water supply (oil burner). If you have an electric water heater you will have to figure the cost difference but I bet it’s still cheaper then propane. Heating 40 gallons of my hot water to boiling takes 40 minutes. This forty minutes should be used to get your equipment ready, make up the Crisco raw EPS mix for the bills. Fill the head molds for the first boiling. The heads use raw beads and sink so you can pre-boil the EPS beads for the body molds over the cooking head molds.
Instructions:

Heads: Heads are made from raw (not pre-expanded) beads. Both sides of the bill get packed with a Crisco/raw bead mix. If you can get some of the smaller size beads they make great bills. Make the Crisco mix by adding beads to the Crisco until the mixture threatens to no longer stick together. As a guess the mixture will be two parts EPS to one part Crisco but don’t bother to measure. If you use too much EPS the mix won’t hold together, if you use too much Crisco, grease will build up quickly on everything, because the excess boils off into the pot.
Back to filling the head mold. Start by coating the mold internal surfaces and flange with oil, try not to leave pools, oil soaked EPS does not expand well. Pack the bill with the Crisco mix on both halves of the mold. Take one of the mold halves on the palm of your off hand. Insert a nail with the flared head to the inside of the bulk of the head. Fill the rest of the head to heaping with raw beads. Do not let the beads flow onto the flanges (although a few won’t hurt, lots will mess up the alignment). The more beads the denser the head. Gently, so the Crisco mix stays in place, put the top of the mold on, do not tilt until clamped. Clamp at all tabs, and have a wire attached to clamp on the back of the head. When water is boiling lower head into water by the wire off the back of the head. Hang in place keeping the mold off the bottom of the pot. The mold must stay vertical with the split on the vertical. All of the air must be able to escape or you may get soft spots that ruin the head. The nail will sink to the lowest point so the bill must remain pointing down. Boil 20 minutes, air cool for 5 minutes or until it stops making popping noises. Then place it in the cooling tank to make sure all expansion stops. If the head or body gets taken out of their respective molds before the expanding process is stopped the part will crack. It is normal to have to pry the head out of one half of the mold. Sticking the bottom of the head with a screwdriver at the split line works best for me.

Pre-expanding the EPS for bodies.
This step is required to get the proper density decoy. It will also decrease EPS consumption, cost and the time required boiling the decoy. The bead arrives as a hard little bugger and when subjected to moist heat it blooms into a little ball of foam. The goal is to dip the hard little balls into boiling water and get a majority of the expansion. The mold is filled with these “pre-expanded” beads and boiled for a much longer period to complete the expansion in a mold that does not let them expand to their full size. This bonds them into a finished form the shape of the mold. Much the way a beer cooler must be made. But better then a beer cooler the EPS you need to be using will result in a denser object and the oil coating the mold will react with the surface EPS beads and made a hard surface the is almost impossible to stick a finger nail into.

To pre-expand your beads put a scoop of raw beads into a cloth bag like a pillowcase. No more then one coffee can in a very large pot, or two coffee cans in a 55-gal drum. Lower into rapidly boiling water poke and stir constantly for 10 to 15 seconds. Let drain for short bit over the pot, then lay the bag down on a surface that hot water won’t damage (it will kill grass). Use your stick to break up the mass. The beads will have increased their size by 3 to 4 times. They also will have started to clump together. This is normal and if possible without burning yourself break them up. Dump the EPS into a container and repeat. Get enough EPS pre-expanded to make a bunch of decoys. At a minute or two a batch this goes quickly.
Making Bodies
Coat the inside and flanges of your mold with vegetable oil. Try not to leave puddles. Now sprinkle raw EPS beads into the molds forming a coat over the whole internal surface. Small voids won’t hurt; small accumulations of beads in an oil puddle, instead of an even coat may result in blemishes in the surface but nothing horrible. This coating will add to the toughness of the surface coating.
Fill the top half of the body mold with the pre-expanded EPS. For suck style / hollow bottom molds fill roughly level with maybe a little extra bit at the tail to make sure it fills well. For flat bottom molds, heap the EPS about an inch higher then the mold all around. Put the bottom half of the mold down over the EPS. With the hollow bottom mold the hump that makes the hollow will poke into the EPS and push it up into voids in the bottom half of the mold. The flat bottom will simply cover the EPS you humped up. Excess EPS will be forced out as you compress it. Go ahead and clamp the two halves together, the EPS that gets crushed will not hurt anything as long as the two halves line up. Too much EPS on the flanges will prevent the centering keys from working properly. The tighter you pack it in the denser the decoy. Place the filled mold into rapidly boiling water. Make sure a seam is located at the top so all the air can come out. Water should rush in and then, when the EPS starts expanding you can see the water squirting back out. The mold will float to the surface. Cover the pot to let the steam build up.

After five to ten minutes flip the mold. Keep this up for the full cooking time. Towards the end you can get away with longer periods between flipping. Cook for 30 minutes for ducks and 40 minutes for geese. I have been able to reduce this by five minutes with my set up at roughly sea level. Approach shortening the cooking time carefully. After the decoy has cooked the desired time take the mold out of the pot and set it down to air cool for 5 minutes. When you remove the mold from the water, you will hear it hissing and popping as the expansion continues. By the end of 5 minutes the mold should be quiet. Place in cooling tub of water to make sure. Remember this foam is an incredible insulator and it takes time for the center to stop expanding. Get in the habit of wiping the molds down before you open them to remove grease build up. The decoy should have stuck to the top half. Backing the pipe plug off should free the decoy body. If the decoy remains stuck in the mold you will have to pry it out. A small pry bar with a ¾ inch wide blade works best for me. Plug the resulting hole with a piece of foam cut from a shipping container. To eliminate this, polish the inside of the mold with emery cloth.
Basic assembly
Washing and trimming: Both the heads ad the bodies will have a coating of oil on them, which will have to be washed off before gluing or painting. R&R recommends a strong detergent, I have used T.S.P. and T.S.P. substitute, hot water and a scrub brush. Rubber gloves are recommended. Air dry. Your EPS decoys and heads will have excess material were the molds came together. The best way I have found to remove these is with a belt sander. I have a 4x36 sander that kisses the seams off quickly without cutting through the tougher outer skin of the decoy. The belt sander is also used to flatten the neck area of the body if required and to change the head angle by sanding the bottom of the head/neck. A sanding drum on a Drummel takes the excess off in the tight throat area of the heads.
Attaching the heads to the bodies:Because my decoys are destined for salt water, stainless steel fasteners and polyurethane glue were selected. O.25-inch X 1.25-inch OD SS fender washers and 3” long SS deck screws were purchased. To keep the cost down the fasteners were bought by the box of 100. This required special ordering the washers. Instead of paying $0.55 each, the box was about $12.00 for the full 100. For those of you not familiar with fender washers they have a very large outside diameter for the bolt hole size. This spreads the load from the screw over a much larger area then a “normal” plain washer. This is important when dealing with foam. The polyurethane glue was selected for its strength, it is waterproof, and it expands into voids left by prying heads out of molds and from the pipe plug area in the neck. Some decoy makers recommend drilling extra holes into the components for the glue to expand into for additional strength.
The actual attachment is as follows. Locate the head at the desired angle of rotation. Holding the head in position, drill a slightly undersized hole for the deck screw, up from the undersize of the body. If the drill is not as long as the screw, separate the head and deepen the hole further into the head. Coat both mating surfaces with light coats of the polyurethane glue, and screw the head in place with the fender washer under the head of the screw. If you have used too much glue it will leak out and expand before hardening. Scrape off the excess glue before it hardens to greatly simplify cleanup.
Keels will be covered in the future when I have more experience. The two recommended ways of adding keels are to glue and screw a strip of board to the bottom of the decoy. A keel is then screwed to this much larger surface area board. The keel is weighted per the Frankenscoter instructions. The other method given to me by Rex Ruth, is to use PVC conduit filled with concrete. This is the method I plan on experimenting with. Rex glued and screwed these keels directly to the bottom of the foam decoys.