|
4 Section Frame
Supplies Jasc/Corel's Paint Shop Pro. Toadies Band Surpressing Noise Filter FM Tile Tools Blend Emboss Filter. The free demo version with 7 of the 21 filters enabled is located here. Tubes of Choice (4) - For this tutorial, I used the delightful images created by Suzanne Woolcott. You can purchase her wonderful art in tube and full form at AMI which stands for Artistic Minds, Inc. Supplies: Frame created by me. Butterfly animation is from Peachie's Collection. Do check this site out for the most wonderful animations of all kinds. These supplies can be downloaded here. Ribbons and flowers by Clarey. I have attached her newest scrap set, Friends, where there are many choices of ribbons and elements. You can download it here. If you love scrapping and scrap kits, do join Clarey's Yahoo Group, Bag of Scrapz, by clicking here.
SETTINGS USED IN THIS TUTORIAL Magic Wand: Mode: Add/Shift, Match Mode: RGB Value, Tolerance 0, Contiguous checked, Feather: 0, Anti-Alias checked and outside selected. Drop Shadow: Vertical Offset 2, Horizontal Offset 2, Opacity 80, Blur 5, Color Black This tutorial will be in three parts. Part I will show you how to create the frame. If you would rather use the pre-made frame, skip Part I and start at Part II Part II - will show you how to create the tag with your frame. Part III - will add the animation. PART I - CREATING THE FRAME Step 1 Open a new transparent image 800 width by 500 height. We will start big and resize later. Have your four tube images open as well so you can select a color for your frame that will work well with all of your tube graphics. At the Material Palette, in the top color box, set it to black. In the bottom color box, set it to a color that will work with all of your tube graphics. Left click the preset shape tool set to rectangle, with solid line, and line width of 5.05. Nothing else should be checked. Going from left to right and down, draw a rectangle that fits within a little less than a quarter of your transparency, leaving enough room to add the additional frames, some graphic decoration to the frame and text to the top of the frame. Also leave some room for your copyright information. Step 2 Go to Layers/Duplicate. Go to Image/Resize using the percent option at 85%, bicubic and resize all layers NOT checked. Go to Layers/Merge/Merge Visible. Step 3 Left click the magic wand using the settings from above. Left click the magic wand inside the middle of the frame and hit the delete key. Go to Selections/Select None.
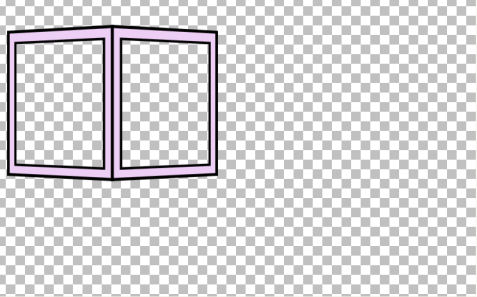
Step 4 Left click the Raster Deform tool. Holding down the control key, with the left mouse button, left click the right top corner node and move the frame up just a little bit, so it looks like this:
Step 5 Go to Layers/Duplicate and Image/Mirror. Left click the mover tool and move the duplicate layer directly next to the original layer with just a bit of overlap of the two frames (see below) and go to Layers/Merge/Merge Visible.
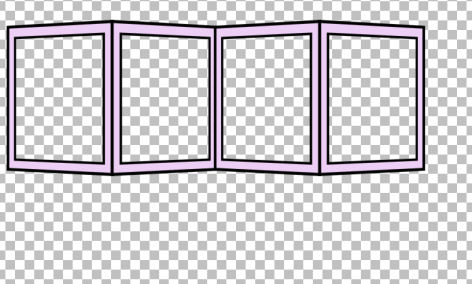
Step 6 Go to Layers/Duplicate and Image/Mirror. Left click the mover tool and move the duplicate layer directly next to the original layer, again overlapping the frames somewhat in the middle where the two sets of frames meet (see below) and go to Layers/Merge/Merge Visible.
Step 7 Go to Effects/3D Effects/Drop Shadow and use the settings from above.
PART II - CREATING THE TAG Step 1 Have your frame psp image on your desktop. (If you are using the pre-made one, go to Adjust/Hue and Saturation/Colorize and by moving the controls, select a color for your frame). Step 2 Left click the magic wand using the settings from above and left click the outside of the frame portion. Go to Effects/Plugins/Toadies/Band Supressing Noise, use the default settings, but do not Deselect. Step 3 Go to Effects/Plugins/FM Tile Tools/Blend Emboss and use the default settings. Go to Selections/Select None. Step 4 Left click the magic wand and left click inside the first frame section. Go to Selections/Modify/Expand 14. Go to Layers/New Raster Layer. Step 5 Flood fill the selection with a color that will coordinate with both your frame and your tube graphic. Go to Layers/Arrange/Move Down, but do not deselect. Step 6 Open up one of your tube graphics. Copy and paste the tube graphic as a New Layer. If the image is too large to fit within the selection, go to Image/Resize using the percent option, bicubic and resize all layers NOT checked. Move the tube graphic within the selection. Go to Selection/Invert and click the delete key. Go to Selections/Select None. If the image is not beneath the frame, go to Selections/Arrange/Move Down. Step 7 Open up your layer palette and make sure you are on the frame layer. Repeat Steps 4-6 but this time you will be working with the second frame section. You can use the same color for the background of your frame or select a different color. Step 8 Repeat Step 7 but this time you will be working on the third section of your frame. Step 9 Repeat Step 7 but this time you will be working on the fourth section of your frame. Go to Layers/Merge/Merge Visible. Step 10 Open up the Clarey crossbow ribbon and either use this color or colorize it to one that works for you. Go to Image/Resize using the percent option at 50% bicubic and resize all layers checked. Paste the ribbon as a new layer on your frame. Add a drop shadow using this settings from above. I applied the crossbow ribbon to two areas of the frame - see my tag. Step 9 Select one of the bows and again, colorize, if necessary and resize to 50%. Apply the bow to the bottom middle portion of the frame and add a drop shadow. Step 10 Add a flower to both sides of the frame. Again, colorize, if needed and resize to 40% and apply a drop shadow. Step 11 Add the copyright information and go to Layers/Merge/Merge All (flatten). We will add our text in animation shop. Step 12 Left click the crop tool and draw a rectangle around the area you wish to keep, eliminating the white background palette that you will not need. To leave some room at the top of the tag for your text. Step 13 Go to Image/Resize using the percent option at 85%, bicubic and resize all layers checked. Step 14 Go to Layers/Duplicate and duplicate the layers 3 times so you have a total of 4 layers. Step 15 Save the tag as a PSP or PSD file. We will finish the animation and add the name text in Animation Shop. Click here to continue.
|


