

This page may present nothing new for paddle building, as I have borrowed much from Shawn Baker's (1) and Doug Alderson's (2) paddle building pages (and probably others I forgot to mention). It may, however, give an additional amount of courage to the aspiring paddle builder as what one hand can do, so can another. Build that paddle! The important thing to note is that you can build a great paddle using their techniques. If I refer to something and you don't know what the heck I'm talking about, then go to the links provided below.
I have to admit that after buying my first boat there wasn't a lot of money left over for a top quality paddle. I looked at the $40 "entry level" paddle momentarily, then looked at the $90 oval aluminum shaft/ plastic blade shaft a little more seriously. Then I picked up the $200 wood paddle and finally the $200 fiberglass shaft / fiberglass blade paddle. Each step in price presented leaps of refinement, and I didn't dare even look the more expensive "bent shaft, carbon fiber, gold-plated titanium" paddles. So many choices....symmetrical or asymmetrical blades, aluminum or fiberglass or plastic, feathered or unfeathered....Hmmm, Isn't the hard part supposed to be choosing the boat?
First I needed to determine how long a paddle to buy. Therefore, my first paddle was made from 3/4 inch steel conduit and Plexiglas blades. It worked OK but was equally effective as an anchor. I varied the length by the "cut and try" method until I found the length of paddle that was comfortable for my build and my boat. I slit the ends of the conduit, inserted the plastic, and drilled a hole for the nut and bolt that sandwiched each blade in place. It was UGLY but effective. I started at 96 inches and slowly shortened it to something like 80 inches. Shorter does seem to be better (to a limit). I settled on 84 inches and started building laminated wood paddles. They first two were heavy and last was quite light weight.
Wood paddle no.1 was a learning experience. That's it on the far left. I bought a quart of Bondo polyester resin from Home Depot for about $10. It isn't the marine version but it really doesn't seem to matter for paddles provided you apply a few coats of UV blocking polyurethane spar varnish afterwards and I continue to use this resin. I hurried my way through the process by making the shaft from 3 strips of spruce lattice and a fir 1x2 that I sawed lengthwise into two more lattice style strips for the outer edges. No fiberglass was used and I didn't drill holes through the sandwiched strips to reduce weight. To cut corners further I used the strips of lattice material that were made from spliced short pieces of wood. I spread my resin without a filler over the lattice sandwich and used all the "cheap clamps" I could make from some 2" PVC pipe. (You need about 15 or so clamps). The PVC clamps are great, they provide firm clamping force but not so much force that all the glue is squeezed out.
I clamped this "sandwich" to a straight 2x4 and worked fast because this resin sets up in 15 minutes. Later I planed the shaft into a rectangular cross section and then marked off where the blades were to be applied. Then I laid out the first blade by sandwiching a stack of a couple of pieces of 3/4 inch spruce and an outer piece of fir above and below the stack of shaft laminates. The total blade width including shaft sandwich was 6 inches because that is the limit of my wood clamps. The blades were 18 inches long. Again, no fiberglass was used between the blade laminates.
The next step was to choose a blade shape. I started with a picture of a store-bought blade and blew it up to full scale on a copy machine. I modified the blade shape to accent its asymmetrical attributes based on a comfortable paddling stroke and shaft angle. I completed the template by gluing the optimized shape to a piece of cardboard. Then I traced the shape on to my wooden blank and sawed out the shape with a sabre saw. After that I worked the shaft and one blade for ages with all manner of violence and tools. I ended up with an oval shaft that fit my grip and the blade was thinned to a1/4 inch edge. I added the other blade in a non-feathered form. (Its no feathering for me after reading John Dowd's Sea Kayaking, where he points out a benefit in a head-on gale but detriments when the wind blows from all other directions. Also, what about carpal tunnel syndrome?).
When I was done I spread two coats of resin on the paddle and three coats of spar varnish. The second time I used the paddle it appeared to crack! I sanded off the varnish and added a front and back face of fiberglass. That's a technique that takes practice and my first attempt looked terrible but was highly effective and I continue to use the paddle for punishing river work without a problem. Weight: 55 oz, cost about $22.

Wood paddle No. 2 used everything I learned from "paddle no. 1" but I spent more time slicking things up and used unspliced spruce laminates. I also used 6-lb. fiberglass between all the blade laminates and where the blade halves meet the shaft. Some important improvements included the positioning of the blade template so that the area above the shaft equaled the area below the shaft to minimize "flutter". This was done by balancing the template in a knife-edge and marking the centerline with a pen. Another thing I learned at this point was to buy and install a pair of rubber drip rings before installing the second blade. That means sliding them over some pieces of plastic soda bottle so they can easily slide up and down the shaft while putting on the finish. I added an additional piece of spruce lattice to give a thicker oval grip and thinner fur outer strips on the outside of the sandwich. I drilled lightening holes in all the inner shaft laminates. Weight: 50 oz, cost about $22. Still too heavy but feels great in the hands, looks great, and works acceptably.

Wood paddle no.3 was a departure from the previous blade design and was an effort to make a very light and durable paddle. It also gave me a chance to try out my new spoke shave. This time I used a 1/8 inch thick piece of birch plywood from the hobby shop ( marine grade). I sawed a 3/4 inch deep arc in the shaft ends and used plenty of resin and sheets of fiberglass as noted in my reference pages. I drilled holes in all internal layers of the shaft laminates. What a difference! Weight: 42 oz, cost about $38. This paddle is such a pleasure to use as it is light with a low swing weight (or polar moment of inertia). I'll make another like this one and drill some holes in the blade to lighten things up a little more. Janet will want to use this paddle and I'll be stuck using one of the "rock bashing" paddles.

Some technical notes and tips:
Wear gloves and a respirator when working with epoxy or polyester resin. Work outside when possible to keep the harmful vapor out of your house. I recommend epoxy rather than polyester because it is safer to work with and stronger when cured.
I mix my resin in one, two or three ounce batches. I like to use clear plastic disposable cups to mix in. Solo brand cocktail cups are cheap, shallow, and wide- brimmed. Collect up some coffee stirring sticks to mix with.
To accurately measure I recommend you get some dosage syringes from your local pharmacy or Vet. There are usually given away for free! Look for 10 cc syringes. Collect up some different drinking straws and find some that fit snugly over the nose of the syringe so that you can draw epoxy out of the bottle. Mark the syringes- one for resin, one for hardener and don't mix them up. They can be used over and over until your project is done, and you can always have an accurate mix!
Get some "fumed silica" to mix with your epoxy as a thickener. Use it when joining two pieces of wood to keep the thin epoxy from flowing out of the joint. (paint some unthickened epoxy on to both surfaces first, then apply some thickened epoxy to one surface before stacking the two together.
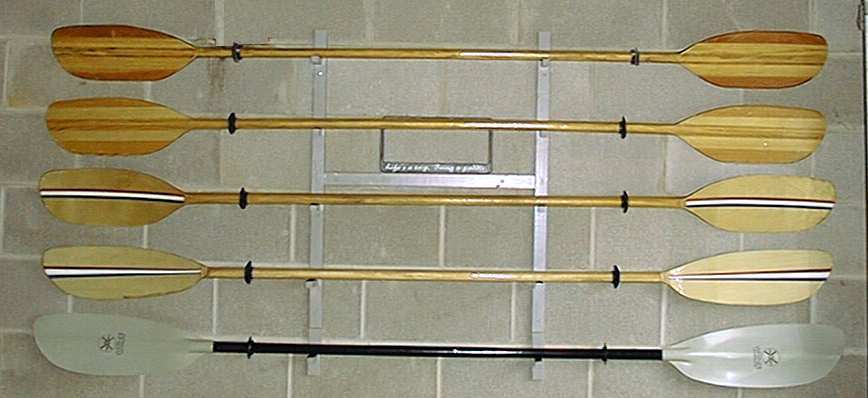
Oh oh... what's that in the bottom of the picture? Ok, its not home made and it's not wood, but it is fiberglass and epoxy. Its a $160 Werner and it has fiberglass blades and a two piece fiberglass shaft. You could say its a bench mark of sorts for me. I haven't been able to design a paddle to meet or exceed its performance... yet. I think I'd rather have this one for a long sea kayaking trip or for one of my friend Randy's excursions out into San Francisco Bay. But if it is damaged it may be unrepairable. The wood paddle is quite repairable or easily replaced. I still prefer my wood paddles for the custom fit to my hand. I didn't like the feel of the aluminum shaft paddles. I guess this is an issue like wood or metal baseball bats. Consider the warm feel of wood in cold weather to the cold feel of aluminum. If you like the feel of the fiberglass shaft, the lightened wooden shaft is comparable. Another feature about the Werner is the fact that it is two piece and easier to take along as a spare.
A final note about finishing. Whatever my final finish whether paint or spar varnish, I always like to add some lettering. My name, date, paddle weight, length, etc. The way I do this is to use an old-fashioned ink pen with paint for ink. Just dip and write. Paint is waterproof, ink usually isn't. Finish up with a coat of spar varnish to seal in your lettering.
A pair of credit cards make great epoxy spreaders and allow you to hold the fiberglass in place with one hand (at the strengthening hump on the back of the paddle for example) while spreading and smoothing with the other.
Update- July 2005:
I've put several years use on my three wooden paddles and some of it hard service. Paddles 1 and 2 have been severely bashed in white water but some sanding and touch-up with a coat of resin on any bare wood followed by coats of spar varnish keeps them in first class condition. I regularly use paddle 3 for touring and it has seen some long, hard service. The shaft on paddle 1 and 3 began to delaminate after a year or so. This could have spelled potential disaster, particularly on a long trip. My solution was to sand the shafts down to bare wood, pour resin in the spaces where the shaft delaminated, then cover the shaft in a layer of 6-oz fiberglass and resin. I used two long, thin strips of fiberglass making sure the middle portion of the strip covered the laminates to keep them from further delamination. A small space between the fiberglass strips occurs at the solid top and bottom portion of the shaft. Several months of hard use has shown this to be a suitable repair.
I would recommend fiberglassing the shaft on a new paddle if polyester resin is used. Raka (www.raka.com) sells a sample kit of epoxy and filers that should be enough to make a complete paddle.
Email me with questions or suggestions at paddling212@yahoo.com .
1. http://www.oocities.org/shawnkayak/paddle/
2. http://www.guillemot-kayaks.com/Building/PaddleLetter/paddle.html