
How to make full depth spars for foam wings
This is the method that I use for making strong (not light) spars for foam wings. A spar in my open class plane, 50 inches long, weighs 7.5 oz with 0.060 top and 0.030 bottom CF spar caps. These spars are easier to add to a foam wing core than a carbon tube, and cheaper too.
Pick a design safety factor depending on the proximity of the parking lot to the winch turnaround and how spectacular a zoom launch you want. Do your cantilever beam calculations and design the layup schedule for the wing skins. I use the Joe Wurts Excel Program(tm), adjusting for a fixed beam moment carried by the spar.
I've made several dozen spars using this method and there are a few variations that are worth noting. The first is to eliminate the spruce/hard balsa in the spar cap and glue the CF directly to the vertical grain shear webs. This works fine and will save a little weight, but it will require a better fit up of the shear webs to prevent steps and voids in the spar/shear web joint. Another possibility is to eliminate the bias cut FG skin and hand wrap the spar with Kevlar tow or thread. This will result in a spar with high strength but it will be less stiff than the FG wrapped version. I did this on the Bubble Dancer and it requires more work to grout the spar into a foam wing.
For the ultimate in spar stiffness, go with the CF braided sleeve, I'm using the 1/2" diameter 3k sleeve from CST. While the cost of the braided sleeve is high, in the total cost of the wing it's not that much more to get a very, very stiff wing. It's difficult (impossible) to get the assembly into the bag using the braided sleeve, so vac bag the spar caps to the shear web in one step, then add the braided sleeve in a second bagging operation. This gives you the advantage of sanding the shear webs to width after they are glued to the caps. When applying the CF braid, you can vacuum bag with peel ply to suck some of the resin out.
If you use the braided carbon sleeve, the stiffness seems to be now limited by the shear modulus of the balsa web. To overcome this, I sometimes use a laminated shear web with 1/4" plywood in the center and balsa outer. I would imagine that a bias plywood shear web would be the stiffest possible combination. Now the spar assembly is becoming a little complicated. The last spar I made with plywood webs, CF sleeve and a stepped thickness carbon cap took three vacuum bag operations and about 10 hours to build. The satisfaction will be that you are approaching the engineering limit of strength to weight ratio for a home made structure.
 |
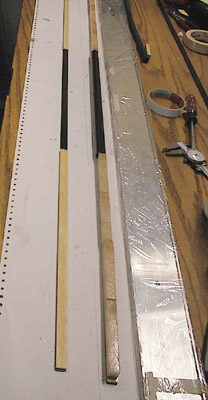
This spar will have a 5/8" center joiner rod and is 24" long per side. The spar will be built and bagged in one piece to ensure that the tubes align with each other. Here we see the main parts (l to r) joiner tubes, top spruce caps, 0.060" top CF spar cap, 0.030" bottom spar cap, lower spruce caps, and joiner rod with dihedral. The CF joiner tubes are too large in diameter to have spruce caps, so a filler strip is made to get the right fit. |
 |
The spruce pieces are CA'd to the Carbon Fiber. and the parts measured for thickness. 1/2" balsa shear web is cut to exact depth for final sizing, this spar will be tapered so it is full depth in the first panel of the wing. A little trial and error gets the spar to taper from 0.920" at the root to 0.830" at the ends. Try that with any other method! |
 |
Resin has been added to the end grain and spar caps. The aluminum channel is wrapped in cling wrap to prevent glueing to the spar. |
 |
After assembly of the components, bias FG has been wrapped around the spar. The spar is laid next to the aluminum channel and then.... |
 |
the entire mess is taped together. Alignment is not at all necessary, the parts will be straightened out in the bag and vacuum will hold it in place. |
 |
The spar is in the bag. Dark green felt in the foreground is breather to connect the vacuum connection to the part. |
 |
14 inches of Hg is pulled and the individual pieces are squished into place. Press the shear web parts even with the caps and get the tubes flat on the table. |
 |
A few bags of lead shot will hold everything flat until cured. Total time from start to finish, 2 hours. |
 |
| The spar is cut in half for insertion into the wings of my latest and greatest world beater sailplane. This picture shows the core prepped for the spar slot. I have bagged a strip of 3 oz. unidirectional CF onto the top surface strictly for the purpose of the spar slot. The slot will be cut by hand from the bottom surface, the fit needs to be close, and a little on the looser side of fit. |
 |
| Here the slot is cut into the bottom surface, and you can see where the slot is a little wider to accomodate the joiner tube. The joiner tube on this spar system is 5/8" inside diameter, so it is wider than the spar which is 1/2" wide. |
 |
| Lastly, glue the spar into the slot, and grout the bottom surface flush. Resin will leak through the top cap so tape over the uni-CF to reduce the leakage. The end of the spar is abrupt, so the the skin layup will have patches to help distribute the load and prevent the spar end from punching out of the wing core. A 1/16" plywood root rib will help on the fuselage end of the spar. |
This method results in a really nice spar that you can control the dimensional accuracy to within a few hundredths of an inch and, more importantly, is perfectly straight. You can vary the CF thickness and strength to whatever loads you wish the spar (versus the skin) to carry. Without good engineering data on shear strength of vertical grain balsa, my guess is that the shear web with glass cloth facing is overbuilt, but the ease of adding it into the foam wing is worth building a rectangular spar shape. By the way, I build the spars as constant strength, and use tapered CF cloth layup to decrease wing strength towards the tips.
Copyright 1999, Warren Man-Son-Hing