Starting
- Sandpaper - son of Scary Sharp! To make sandpaper work locally, I made special sanding blocks; I made some small square blocks with working surfaces varying from flat to a camber (dome?) of around 1/8". The dome allows smaller areas to be worked late in the process. I also found a small stick with a convex end worked well (must make a proper version of this prototype-from-scrap tool sometime). In all cases, the paper is cut to a 1" wide strip, and wrapped around the tool. Moving to a fresh area of grit must be done frequently, since the SiC gums quickly with the greasy blue.
- Files work rapidly, but can leave deep scratches leading to a cosmetically unhappy final result; you also need a file than can work locally, which (in practice) means a large tapered square file. You'll also need a "file card" to periodically extract the grease and swarf from the file's teeth.
- Scrapers - the traditional engineers' approach, but only appropriate for highly accurate working. Planes can be made flatter than you need without scrapers or scraping.

Two Stations
This flattening process is repetitive - print-cut-repeat - so your workshop needs to be set up to facilitate this. It is also important that your surface plate (marking) area is a good distance from your cutting area; swarf and muck from cutting is fatal to taking an accurate print. I put my surface plate on my nice woodworking bench (with newspaper to protect against the pervasive blue), and the dirty cutting process is done on my humble workmate (which isn't really rigid enough, but it serves).
Printing
The process starts by applying a layer of blue to your plate. The theory page describes how thick it needs to be. My applicator is a tightly rolled strip of cloth, and I put blue onto the rolled end using a bamboo skewer. The applicator is then used to apply and spread the blue on the plate: you're aiming for a reasonably even layer.The plane sole is given a wipe with the (fairly clean) rag kept for the purpose. Now we take the print. Lower the plane fairly gently onto the blued surface plate. Try to avoid banging it down on one end, or one side, since this might create a deceptive print. Now apply a little downward pressure, and slide the plane a small distance (say 1/4") across. Remove the plane, and check the sole for a print. If it's ok, proceed, otherwise wipe the sole clean and try again.
If you have a speck of dirt on the surface plate or the sole, and the layer of blue is thin, you'll get no print at all, which is quite disconcerting, and the reason for all this cleanliness. The only solution to dirt on the plate is to clean it down and re-blue.

Cutting
Over at the cutting station (the dirty area, remember?), you'll need a means of holding the plane decently still, that is also quick to use. My solution comprises some 2x4 scrap, a chipboard base, and an old Record #1 vise, which may be overkill.Anyway, having secured the plane, take your metal cutting tool, and ... well ... attack anything blue. Don't be too gentle, especially in the early stages. When all the marked blue areas have been attacked, brush off the swarf and dirt, remove the plane from the fixture, and use the (fairly dirty) rag to wipe the sole down.
Now take another print (as described above), and keep going.
Making Progress
As the plane gets flatter, the blue will need to be thinner in order to continue to reveal information. This usually happens pretty much automatically, since each print removes some blue, so all that's needed is to even out the remaining blue with the applicator. If the blue becomes too thin too early, just add a little more. As the process continues, you also need to remove metal more finely. This is easy; use either less pressure, or fewer strokes. If you're using SiC paper, you can change to a finer grit. Don't go too fine too early. Even a fairly coarse technique, used gently, can work to fine tolerances. Eventually, you can change to a finer grit, smaller (or more pointy) block, and finally to a scraper. But I suspect careful use of 60 grit is good enough (probably overkill) for most practical purposes.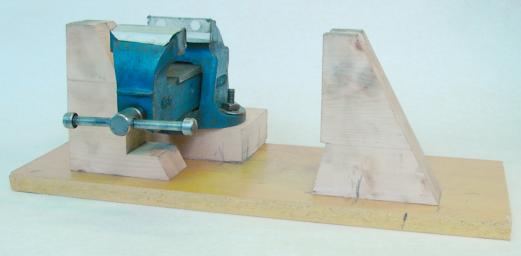

A slide show
I've saved the best 'til last. Since almost no-one believes this process works, I did a demo run. I flattened the sole of an old and broken Record #4½ and took a picture from a camera on a locked tripod after every print. There are only 54 photos, and from the EXIF timestamps on the originals, I can tell you the whole job took 149 minutes, including taking all the photos. I started with 60 grit SiC on a 1" square flat block, changed to the convex stick, and finished with a scraper. The changes in the blue pattern are (I hope) most revealing and informative.You may need to zoom in to the montage photo; it's a good deal bigger than most computer screens, and modern browsers often "shrink to fit", so detail is lost. You'll need it "full size" for best effect.

