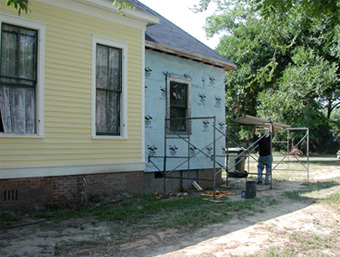
Our new addition is wrapped and its roof installed. We are ready to install siding boards (clapboards). We have recycled the old kitchen window, since the plan for this side of the house required only one window. This was a small isolated wall and suitable for us to develop a technique for clapboard installation.
In the picture below, Jim secures soffit which was cut from 1/2-inch exterior-grade plywood. It was cut to size on our table saw then hand nailed in place using galvanized nails. It takes a lot more effort to drive a nail uphill because one does not have gravity to aid in the impact.
|
 |

We stopped by the local sawmill to get pricing for some clapboards. By a happy chance a gentlemen who disassembled old homes for the materials was at the sawmill. He invited us to his house to see a pile of old clapboards about the same vintage as our house he had been trying to sell. For a fraction of what new materials would have cost us, we now owned two truckloads of fine old growth timber clapboards. We worried about what might come crawling out of the pile as we neared the bottom but were assured by the owner not to worry. Funny, but he left.
Below, we process and sort each clapboard according to length. We set up an assembly line and cut off pieces that were split, cupped, or otherwise unsuitable for use. We also removed a bucket full of nails from them. Note that we had our very own cheering section.
|

We scraped the old paint off the clapboards before they were nailed up. It was much easier to scrape old paint and catch the fallout with the boards in a horizontal position. We lined up our new boards with boards on the original house as can be seen here.
|

We fabricated a ledger board from 2-inch material that sits between the skirt and clapboard. This board serves as a starter by pulling out the first clapboard bottom and encourages rain water to drip away and not run down the foundation wall. We used a piece of removed material as a pattern. The skirt board will be installed after the brick veneer is applied to the foundation.
Elizabeth applies glazing to a window recycled from the other side of the house. While some glaziers today simply squirt caulk from a gun to seal glass, she uses the old-fashioned method of applying glazing compound. Silicone caulks used today may have a 20-year life, but glazing compound is known to last much longer than that. Hopefully it will last another 100 years.
|
 |
 |

Above, we used 5-1/2-inch-wide boards of the same 1/2-inch thickness and spacing of 4-1/2 inches between them. This layout brought us exactly up to the upper trim board. This fit is seen below. Also below, Elizabeth uses a finish nail gun to attach short pieces of clapboard to the indented side of our house after Jim sawed them to length on the chop saw seen sitting on a scaffolding plank.
|

We had to experiment with the brittle boards to come up with a technique that would not split them while being installed. After they were cut to length and width, we scraped off all loose paint. After marking the ends of each wall with a story-stick, we randomly tacked each board in place on its upper side (down 3/4-inch) with a finish nail. These nails were small enough that they didn't split the board and they would be covered with the next board 1-inch overlap. When all the boards were nailed up, we located and marked on the clapboards location of all wall studs. We then drilled a small hole through both clapboards about 3/4-inch up from the bottom of the clapboard and hand-drove an 8-penny rim-shank galvanized nail securing them to wall studs.
It is acceptable to have clapboard joints in the wall. Fewer joints are better for any number of reasons and we went to great length to avoid them. Every clapboard was hand-picked for where it was used and where we would have minimum waste. It is not practical to have all joints occur over a wall stud so some joints naturally occur mid-stud. We sheathed the walls with plywood so we could nail into it which, while not providing a perfect hold, was the best solution we could devise.
|
 |

Who would ever guess that our addition was covered with recycled materials including clapboards and a window?
One day a visitor saw our progress hanging the recycled clapboards on another wall. We mentioned we didn't like to see too many joints in the clapboards, but we didn't have much choice when dealing with recycled boards. He assured us that it was OK to have joints and motioning to this section of wall said, see the original wall had joints too. We smiled and said, we created that wall. That was one of the best compliments we could have been paid because it was one of our main objectives.
Our great neighbors, Dave and Bill, have been watching this project since day one. Their visits were always welcomed and looked forward to.
|
 |
|
|