
Before we could begin to surface the north wall, we had to finish the gable returns. We had to construct small sections of roof and finish soffits and facia.
Below Jim erects sections of scaffolding. The red tiedown strap is used to maintain tension to steady the structure. We place outriggers and planks outside of the scaffolding to permit easy and unobstructed passage, but this makes for an unbalanced situation.
|
 |

While in West Virginia we fabricated corner boards and window surrounds. We purchased 2-inch thick lumber and planed it in our Dewalt thickness planer to the desired dimension. The corner boards also required us to be creative in producing a bead on each edge. We made the boards using 8-foot lumber to fit in the back of our truck for the trip to Georgia. When corner boards longer than 8-feet were required, we joined them with biscuits. This produced an invisible joint (after painting).
|

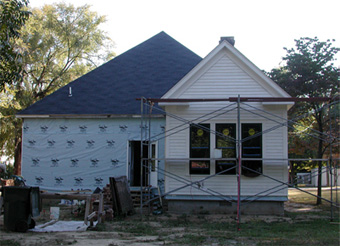
We purchased an entire pile of clapboards from a person who deals in demolished house materials. The two truck-loads contained boards of many different lengths. We sorted out the shorter ones just for this application. This side of the wall went up pretty fast because the wall has large windows.
When we reached the point below, we had to install soffit boards so our clapboard would fit snugly against them.
|
 |

In the picture above Jim has nailed up all the clapboards and final trim is installed. The next step is to sand the entire wall using our contour sander, secure the clapboards where necessary, caulk the nail holes and joints, and prime with an oil-base primer.
|
 |

Elizabeth usually starts painting at the top and works down. She does this to clean up any drips that may occur as she works her way down the wall. We were running a little short on time, so Jim pitched in and helped paint primer on the lower wall. The lower scaffolding plank helped protect him from the occasional drip from above.
The image below shows the end of the addition primed. The day after we apply primer was almost always a "play day." This allowed the primer a full 24 hours to dry before we applied the latex topcoats. The day off also gave us an opportunity to explore middle Georgia.
|
 |

The image above shows Elizabeth applying the first coat of color to the north gable. She prefers to first paint the white trim color and let it dry and then she paints the yellow next to it. Below, the north-facing wall is complete.
|
 |
|
|