
I had to do the 4,600 mile service
on the Aprilia, so I got my first peek under the airbox.
I thought it was pretty cool looking, so I took a few pics.
Click on any image to enlarge it.
Lifting the tank needs no explanation. The two bolts you can see near the steering head end are all there are. The rider's saddle has to come off first, and you'll need to center the steering. The prop rod is stored under the passenger saddle.
|
The airbox lid and filter have been removed in this photo. |
Seven bolts and the airbox lid is off. This airbox has been derestricted. Note the size of the intake hole on the right. It used to be about an inch across. I think the twin velocity stacks on the throttle bodies are cool.
| Coolant fill and idle adjust are visible on the left. | 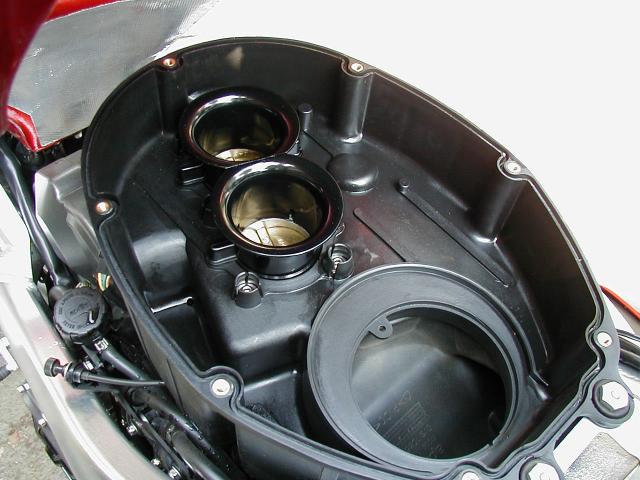 |
Removing the airbox lower reveals the throttle body. To remove the airbox lower, loosen the six captive screws around the velocity stacks. You don't have to remove the fresh air intake plenum clamp, it's flexible rubber and will pop out from between the frame rails. You can leave the front holddown bracket attached too. You can see the injectors bolted to the side. At this point the front plugs are accessible, as are the throttle cable adjusters for cylinder sync. It appears to me that the valve covers could be removed for clearance checking without further tear-down.
 |
The tube at the top of the photo is the airbox drain. Remove the plug if liquid is visible in the tube. |
At 4,600 miles, they basically want you to "inspect" things. Blow out the air filter, clean and regap the plugs to 0.7 - 0.8mm. Sync the cylinders, set the idle to 1,250 rpm (hot). If you haven't already, this is the first official oil change interval after 600 mile service. My plugs were out of spec. Everything else was fine.
Go back to Falco home page.