Adding an Automatic Bilge Pump
to your Amphicar
(while keeping your original there)
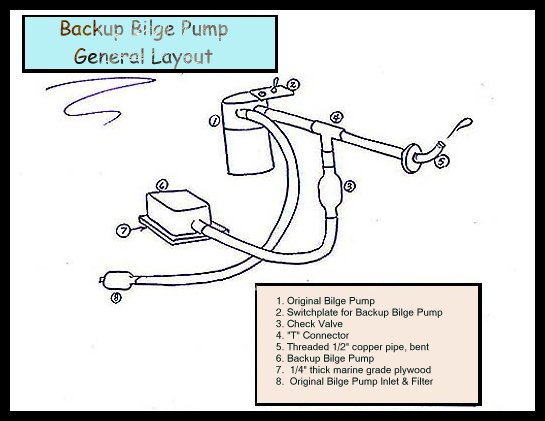
The Guardian™ 500 g.p.h. backup bilge pump I mounted in my Amphicar is just one of many models of float-activated automatic bilge pumps available for $30-50 at any marine supplies
store. I rigged mine up with a separate Rule™ switchplate featuring "on", "off" and "auto" settings, a built-in fuse and a little red "power" light that would just stay on all the time to indicate that power is available to the pump, but which I simply disconnected (otherwise it'll drain your battery after a few days). As shown in the diagram, I screwed one side of the switchplate right onto the top-plate of my old late model original bilge pump, seeing as how those screws are a perfect fit and all, and I just leave it set on "auto". Of course, you could choose to simply hook up your float-operated pump straight to the battery. If so, then please use an inline 20 Amp fuse for safety's sake, OK?
My pump is mounted with the included stainless steel woodscrews onto a quarter inch thick
piece of a rare West African hardwood called "Wenge" that's epoxied onto the floor of the bilge, below rear passenger's seat on the righthand (i.e. starboard) side, just a few inches clear of the emergency brake cable rubber
booty. Of course, you can use any wood you like. I do realize that, unlike me, not everyone hangs out with exotic wood peddlars. A thin piece of water-resistant marine grade plywood might be advised for those Amphis known to have a few dribbles. I suppose one could also use a piece of plexiglas, if that's what's handy.
My pump, like most automatics, draws up water through vents around the bottom half
of its housing, and has a single 3/4" diameter outlet to which is attached a suitable hose that reaches up through the engine compartment to the
battery area, to about a foot below the middle of the original bilge pump's
output hose (see diagram). At the far end of the new hose is attached a single
inline "check valve" (a valve which allows the water to flow in one
direction only, in this case outward). Another small piece of hose is then fitted, first on the output end of the
check valve, and then onto the bottom part of a "T" shaped hose
connector. The original bilge pump's output hose is then cut in half to allow
for the remaining "cross" ends of the "T" connector. Of course, depending on which size check
valve and "T" connector may be available, it may also be necessary to use several small lengths of different width hoses and plastic hose adaptors to link everything up.
All connections
should be securely fastened with suitable hose clamps, and the new pump's output hose secured away from your prop shafts with cable ties, garbage bag twisties or strips of reindeer rawhide gummed to suppleness by your Eskimo grandma...whatever. Just do it, or you'll risk the new hose rubbing up against the prop shafts and eventually puncturing.
The drawing above is very general to allow for the many many different types of automatic bilge pumps, check valves and whatnot available, but it's all really very straightforward. The best thing to do is just lay all the crap out in the aisle of the marine supplies shop and just "eyeball it" until it looks right. (In case you want to use exactly the same pump and switch as I used, you'll find exact information about these described here, including links to order them online.)
Any elegance found in the above simple design resides in the fact that it uses only ONE check valve, relying on the original bilge pump's impeller to itself act as the second. Unfortunately, the "scavenging type" impeller of the new backup pump I chose wouldn't work well as a check valve too.
I've actually tested this setup in the drink, with a deliberate controlled leak at boatramp's edge with the rear seat out, and the automatic backup kicks in with a healthy squirt astern once about an inch of water collects in the bilge. Engage the Amphi's original bilge pump as well, and it sploodges out back there like a firehose.
Item number 5 in the above diagram is something EVERY Amphicar should have, even, or rather, especially if it doesn't have an automatic backup pump. It's a simple 2˝ inch long piece of 1/2" diameter copper plumbing pipe threaded at one or both ends, which has been heated with a blowtorch and then bent in the middle into a smiley shape. This is then handscrewed right into the white plastic bilge output thingee "astern". With this, you'll SEE in your rear view mirror if you're bilging or not...Cost: about 25˘.
Since you're clearly fascinated by this whole topic of pumping bilge, or you wouldn't have read this far, you can learn more than you ever really wanted to know about bilge pumps at All About Bilge Pumps thanks to David Pascoe's marinesurvey.com in Fort Lauderdale. A special tip o' the hat goes to Mike Israel's Amphicar Harbor for this tip.
On a related note, you should also check out the Amphicar Technical Information Site, offered by our webtoed English comrade David Chapman "across the big pond", wherein he describes, among other useful tidbits, How to Install a Bilge Water Alarm for Only about Ł5 (That's just about 8 Yankee Dollars). Or, you can buy an off-the-shelf battery-operated Sunox water alarm for only $8.99 plus shipping by clicking here.
OR...Take me back into the clammy arms of Ruprćcht & more Amphicar stuff!
PSSST! Before you leave, you can toss a nickel into Ruprćcht's pocket by simply clicking the hauntingly exotic banner just below...Thanx!


What's that Music? Why, it's the theme from "Titanic"
(In honor of Mike Israel's Maiden Voyage!)
Copyright ©1998, 1999 Niblet Web Services. All rights reserved.