Sonic Hedgehog Using VPA
VPA (VGA Planets Assistant) is a player utility written by Alex V. Ivlev for VGA Planets.
Note: To use the registered features of VGA Planets you still need a registered version of Planets.

VGA Planets is a graphical, multi-player, play by electronic mail, space war game by Tim Wisseman.

The idea of this page is to show VGAP players what VPA is like and to help new users through the basics of using VPA, as Alex says hes not very good at writing help files. I'm not saying I'm any better but this has to help, but please do read VPA's help files including the VPA.FAQ
Things to note:

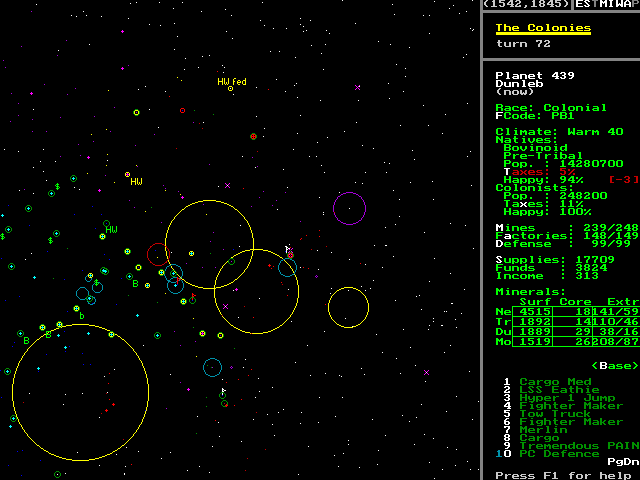
Here is the first screen shot that I will show. Its the standard Echo Cluster (zoom level 1) while my cursor was on one of my Planets. I only use this zoom to have a look at the whole map. The Big Yellow Circles are in fact Moderate Ion Storms, below are just some of the other things on the map, the rest will come clear later.
My Planet, Base, Ship. Ally Planet, Base, Ship. Enemy Planet, Base, Ship. Unknown Planet.
Full Map with Planet details
Down the right hand side we have The above is always there when viewing the map. The next bit is the info of the planet that I've selected, I will show you this later.

ZOOMING: Though its nice to see the whole map on the screen, it is very cramped. VPA has 5 levels of zooming.
Zoom level 1 Zoom level 2 Zoom level 3 Zoom level 4 Zoom level 5
Zoom level 1
Zoom level 2
Zoom level 3
Zoom level 4
Zoom level 5
The light blue circle is in fact a minefield of mine which the size is 39Lys radius. The distance between the allied planet and my closest ship is 4.1Lys

PLANET INFO: The selected planet has the following details
Owned Planet info
  • Planet number, name and how old the info is (now)
  • Race the planet belongs to.
  • Friendly code of the planet, you can change this by pressing F.
    There are also some special keys,
    CTRL-F Change the Friendly code of all planets with the same Friendly code as this one
    R Randomize the Friendly code for this planet
    CTRL-R Set the same random Friendly code for all the planets that have the same Friendly code as this one
    ALT-R Randomize all planet Friendly codes except planets with NUK, ATT or mf?
  • Climate of the planet (Class and Temperature)
  • The Natives (if any), Government, Population, Tax rate and Happiness with modifier (in red due to over taxing, this is the amount the happiness will change next turn). The Tax rate can be changed by pressing T and then using the MOT interface, CTRL-T will show how much money is and isnt being collected for a given tax rate.
  • Colonists Population, Tax rate and Happiness (with modifier when needed). Tax rate can be changed by pressing X and then using MOT.
  • Mines, Factories and Defense of the planet shown as current/max. These can be changed with M, A or D and then when editing (MOT) you can arrow up/down between them.
  • Supplies on the planet. You can Sell supplies by pressing S (MOT). Note: VPA will sell supplies when needed.
  • Funds on the planet (ie, Money).
  • Income is the total amount of money that will be collected from both the Native and Colonists.
  • Minerals are shown in 3 columns. Whats on the Surface (what can be used this turn) Whats in the Core and the Extraction is 2 figures shown as "Amount mined this turn" / "Percentage" (amount per 100 mines)
  • Base shows us there is a base at the planet and we can swap to it by pressing B. If we didnt have a Base at this planet but there was enough Money and Minerals to build one then it would come up Build Starbase and pressing B would build a StarBase, then it would show up as and pressing B again will stop the building of the StarBase.
  • Next is a list of all the ships in orbit (in id order). Pressing 1-0 will select that ship, if there are more then 10 ships then PgDn will list the next set of 10 ships, PgUp will then list the 10 ships before. OR you can scroll through all the ships using the UP/DOWN arrows. (Note: All objects are listed in this list and not just ships. ie Minefields etc -but more on this later)
  • ALT-U will unload the cargo from all your ships that are in orbit.
  • Using the RIGHT/LEFT arrows will select the next planet you own in id order.
  • If you select a planet that you dont own then you will only get the info you do know about it. With Planet 54 Ka'Hat, some of the info is current (now) found with a sensor sweep and is shown in the Light Green, where as the rest is 4 turns old shown in Dark Green.

  • You can also select a planet by
    Picking it with your cursor.
    Pressing F7 and typing in the id number or part of the name.

BASES: We have pressed B from our planet and this is the info we can now see down the side.
Base Info
  • Starbase number and name
  • Defense of the Starbase. Press D to increase the defense of the Base (MOT).
  • Damage (if any)
  • Fighters on the Base. To buy more Fighters press Y (as shown lower down)
  • Primary Order of the base. Press O to change
  • Tech levels at the base. Press T to upgrade Tech levels (MOT). Note: VPA will automatically upgrade your Tech level when building a ship thats higher Tech than the Base.
  • Base Storage lists the items that are already built. Pressing HOME/END will scroll through the list if there is more than 1 page
  • Build ship. Press B to swap to the Ship Construction Screen.
  • Clone. Press C to Clone a ship (will only show if there is a ship to be cloned) This will swap you to the Ship Construction Screen and then also change the ship's Friendly Code and Warp.
  • Buy Torps / Fighters. Press Y to buy Torps or Fighters for the Base (MOT).
  • Fix Ship and Recycle. Press F or R to Fix or Recycle a selected ship.
  • Planet. Pressing P will get you back to the Planet info.
  • And there is the list of ships that we've already seen, Once again we can use 0-9, PgUp/PgDn and the Up/Down arrows to select.
  • Using the RIGHT/LEFT arrows will select the next Starbase you own in id order.
One can easily see which ship is being built (if there is one) as all the items being used to build it show up Yellow and the line changes to as shown in the Screen shot to the right. Pressing B again will allow you to Stop or Change the building or pressing C to change to Cloning.
Base building ship

SHIP BUILDING: So we decide to build a ship at our Base... This is what we see.
Screen for building ships

There are 4 lists that we can move about in using the arrow keys, these are Hulls, Engines, Beams and Tubes. Our cursor is the Green line (which is at the Lady Royale) and the Yellow items are what we have selected. Just arrow Up/Down for the item you wish and then arrow Right/Left for the next list.
Each list has its "Info" box (top left), at the moment it is on Hulls as thats the current list we are in. As you can see this has the spec's on the current hull, you can change the number of Beams and Torpedo Tubes that you wish the hull to have by pressing B and T. At the bottom of the box in Blue are any special abilities the hull has (ie, Cloaking, Bio-scanner etc etc). When you move to another list the "info" box will change to 1 of the 3 boxes shown on the right.
Items that have a bracketed number next to them (ie, Cobol, Virgo, StarDrive 1 etc etc) is whats in stock and wont cost anything to use. Items that are grey (from Positron Beams down and from Mark 5 Torps down) are above the Bases Tech levels (which can be found in the middle box of the top row) But VPA will automatically upgrade the Tech Levels if needed as shown in the "Resources to Build" info (found bottom right), this area will let you know if you are short of anything and it will show up in Red if there is. If all is well then there will be the and you just need to press S to build the above ship. You will then notice the option which allows you to undo your actions by pressing S. You can also Build (and unbuild) items manually by using the + key (- for unbuild)
Engine specs
Beam Specs
Torp Specs

SHIP IN SPACE: We have now selected one of our ships thats in space,
Ship with trace
Ship detail
Known ship
Unknown Ship
On the map we see the Trace line of the selected ship showing us where its waypoint is set to (Solid Yellow) and where it came from in the last 2 turns, the Dashed Yellow being last turn and the Dotted Yellow the turn before. If you have Traces toggled on (Shift-T) then you would see this for every ship (yours and enemies), Ion Storms, Worm Holes etc etc... all the time (until toggled off).

And down the side we have the current ships details,
  • Ship id number.
  • Race it belongs to.
  • Hull type of the ship.
  • Name of the ship. We can change the name by pressing N.
  • Location of the ship, at the moment it is in space at 1820,1188.
  • Destination of the ship. I have Planet names = Off in the VPA.INI file so it shows us the planet id and not the planet name. The Double Wave symbol tells us the waypoint is within the planets gravity well.
  • Warp and the Estimated Time of Arival. We can change the Warp by pressing W.
  • Fuel shown as Have/Max
  • Burn is the fuel we are going to use to get to the Destination.
  • Mass of the ship.
  • Friendly Code of the ship, can be changed by pressing F. There are also some special keys,
    CTRL-F Change the Friendly code of all Ships with the same Friendly code as this one
    R Randomize the Friendly code for this Ship
    CTRL-R Set the same random Friendly code for all the Ships that have the same Friendly code as this one
  • Crew on the ship, will show in Red if the ship is under crewed.
  • Damage, will show in Red.
  • Mission. Change by pressing M and select from a list. With missions Tow and Intercept you then select the ship you wish to Tow or Intercept.
  • Primary Enemy. Change by pressing E and select from a list.
  • Equipment showing the ships Engines, Beams and Torps (or Fighter Bays)
  • Cargo shown as "Space Used/Max" and then the amount for each type of cargo. Pressing C will allow you to jettison the cargo (MOT) in to space when not at a planet. Pressing T will allow you to transfer cargo (MOT) to another ship only if one is there.
  • And there is the list of ships also at this point. Notice the current ship is selected by the grey bar. You will also notice my ships are listed in Green by name and my allies ship is listed in Yellow by Hull type and any Enemy ships would be listed in Red by Hull type.
If the Ship you select doesnt belong to you then you might see a number of things, In the second example we see,
  • The Ships id
  • The Ship belongs to the Lizards
  • The Assumed Hull Design is a Virgo, we know this either from our Ship Sensers Or we have told VPA this (maybe an ally told me what the ship was?). We can let VPA forget the Assumed Hull by pressing F.
  • The Ships name.
  • The Ships location.
  • The Ships last Warp Speed, VPA also shows the Ship is being towed by my ship from the first example.
  • The Min-Max amount of Neutronium (Fuel)+ Cargo onboard.
  • And the Total Mass of the Ship.
In the third example we know even less about the ship,
  • We dont know the Hull Design but we can tell VPA the Hull Design by pressing H.
  • At the bottom is a list of the Races Hull Designs it could be, pressing A will then list all Races Hull Designs that it could be (ie, if it was cloned)
SHIPS AT A PLANET OR BASE:
When your Ship is at a Planet you can also press,
When at a Base you can also press,

Setting a Ships Waypoint: The steps for setting a ships waypoint are,
Ships Waypoint
Ships Distance info
  1. Select the ship you wish to change the waypoint for.
  2. Press the Right Mouse Button (or Space Bar), this will bring up a brown circle around the ship with a line following to the cursor. You will also see the Distance box in the bottom right of the screen, this shows you the Distance to the target and the Time taken with Fuel used to reach the target for each Warp. The Yellow line shows the current Warp setting and if any are listed in Dark Grey (not shown in example) means you dont have enough fuel for that Warp.
  3. Select the new location for the ship. Use the Left Mouse Button to select objects or the F7 and F8 keys to search for Planets and Ships.
  4. Double click the Left Mouse Button (or Ctrl-Enter)
And thats how I set my waypoints most of the time. Sometimes there is a need to do something else,

MOVE OR TYPE INTERFACE (MOT):
With the Move Or Type interface (better known as MOT) one can,
MOT


  • Right/Left arrow to increase/decrease the value by 1.
  • CTRL-Right/Left arrow to increase/decrease the value by 10.
  • ALT-Right/Left arrow to increase/decrease the value by 100.
  • SHIFT-Right/Left arrow to change the value to the Max/Min.
  • Type in the number required.
  • Up/Down arrow to select the next item when applicable.

MARKERS: Allows you to place Notes, Circles and Lines on the map.
Markers
  • Pressing the INSERT key will allow you to place a Marker on the screen where the cursor is, unless a Ship is selected in which case the Marker will be attached to the ship (ie, the Marker will move with the ship each turn).
  • You have 9 different Marker types with 15 different colours for each type to choose from, use the Arrow Keys to move the white selection box to the one you want and then press Enter.
  • The first 6 types will allow you to add text in any 8 postions around the Marker (as seen in the example). The 7th type will draw a Circle of a given Radius and the last 2 draws lines (Solid or Dashed).
OTHER THINGS YOU CAN DRAW: The below functions will be drawn in Grey and will disapear if the screen redraws for any reason (from a Zoom etc etc..)

MESSAGES AND V.C.R.s:
Pressing F3 will get you to the Message and VCR screen, if you were at a VPA placed Marker then you will find you are at the corresponding message.
At the top of the screen you will notice 3 lines made up of dots labeled "Incoming Messages", "Outgoing Messages" and "VCRs".
By pressing the
When you're on the incoming message line you will see the current message in the message box with these options at the bottom,
When on the outgoing message line you will see the current outgoing message with these options,
When on the VCR line you will see the result of the current battle with these options,
Recipients
When sending messages to players you are able to select the races to send it to by using the
  • Up / Down arrows to move the Yellow line up and down.
  • Space to select (or deselect) the current race,
    a selected race is shown with a *
  • Enter to send a message to the selected races.

Note:
  1. Selecting "Universal Message" will send the message to all available races.
  2. A race that is grey (the Crystals in this case) can not be selected due to being wiped out of the game. VPA will grey any race that has a score of 0 (zero), this can cause a problem if your Host is using a "Score Blanker" since all races would show as having a score of 0. If your Host is using a "Score Blanker" then you need to set DullMessages = On in your VPA.INI file.
  3. In Team Games you will also get the option "Team Message".
Also,
VPA keeps all VCRs, all Outgoing messages and Important Incoming messages from every turn. However you can not change the turn number while in the message screen. If you wish to view an old message or VCR you must change to that turn (using + / - keys) before entering the message screen (F3)

COMBAT SIMULATOR: Pressing F5 will take you to the Combat Simulator screen.
Combat Sim Setup
You can also change the current combat settings by pressing,
And last of all are these three buttons,
VIEWING THE BATTLE: This is what we see,
VCR in progress
And if you like pressing buttons you can press,
And for those of you that thought Alex didnt have a sense of humor, wait until you see what happens when you capture a ship or planet.

Note: Phost games will use the PVCR and not this Combat Viewer.

SCORE TABLE: Pressing F10 will bring you to the Score screen.
Score with Power Graph
The numbers in brackets are the difference between the "current turn" and the "compared to turn", the default "compared to turn" is the turn before (as shown in the top left of the screen).
In this game I took over the Colonies in turn 16 so thats why the Power Graph doesnt start at turn 1.

Keys you can press are,
OTHER LITTLE THINGS:

And after all that there is still a lot more features that I havent covered. This page has only covered the stuff I use most of the time (plus a little bit more) so please do read the Doc files that come with VPA.

If you want to see my VPA.INI file you can click here to view it.

You can download VPA from the VPA Homepage.

This page was written by Steven Gedye (Sonic Hedgehog) 7 August 1997.

This page hosted by Get your own Free Home Page