HOW TO MAKE A
HOMEMADE RAM-AIR KIT
by V6Sprout
ESTIMATED COST:
$20-$30 Canadian
$15 US
PARTS REQUIRED

-WHITE PVC plumbing pipe NOT
THE BLACK STUFF
(its thicker and heavier), the pipe should
come in an 8 foot length
-from the 8 ft pipe you will need to cut - 1
x 3 inch piece
-1 x 38 inch piece
-1 x 10 1/2 inch piece
-1 pack of mesh screen
-cut two pieces 6x6 inches each-1 x T-Joint
-1 x 90 degree elbow (no lip on ONE end)
-2 x 90 degree elbow (lip on both ends)
-1 x 45 degree elbow
-Jack stands are helpful
-Hack saw
-Spray paint (color of your choice, at least
2 cans)
Here are the directions to make you own home made ram-air
kit! This kit was made for 94-98 3.8L V6 mustangs but should work
for 99-up stangs as well, but you may need a few modifications! This
kit uses the stock fog light openings so if you have fog lights here then
they will have to be removed in order for this set up to work, you can
try to modify this set up to make it work with fog lights but the openings
will have to be re-positioned to another location, possibly the opening
in between the fog lights!
Before installing any of the
parts you may want to paint them first! I painted mine
blue to match my car! Otherwise it will look like you have Dixie
cups in your fog light openings, I installed mine first without painting
it! Not pretty!
Dont forget to paint INSIDE
the pieces that go in the fog light openings because you will be able to
see inside them!
STEP 1. Remove
your air silencer from the air box. This makes it easier to cut!
STEP 2. Cut
the end off of the air silencer, two inches from the end.
Picture #1
STEP 3.
Reinstall the air silencer to the air box.
STEP 4. Position
a 90 degree elbow onto the end of the air silencer, press it on as far
as it will go, try twisting it as you press it on,
it will help it go on farther (use one of the elbows with a lip on both
ends)
Picture #2
STEP 5. Reinstall
the air box assembly in the car.
STEP 6. Insert
the 3 inch long PVC pipe (white piece) into the 45 degree elbow, then insert
the 10 1/2 inch long PVC pipe into the
other end of the elbow.
Picture #3
STEP 7. From
underneath of the car, attach the 45 degree elbow to the 90 degree elbow
on the air silencer, the 3 inch long PVC
pipe (white piece) is used to attach these two elbows. You may have
to move the 90 degree elbow on the air silencer
around a bit in order to get a good fit! Adjust it so that
the elbow does not hit the wheel well cover!
Picture #8
Now would be a good time to support
the front end of the car on jack stands as this will make it
easier to work underneath the
car!
STEP 8. Attach
the 90 degree elbow with no lip to the T-Joint, the end without the lip
should slide into the T-Joint, if you can
not get a 90 elbow without a lip on it, try using a normal 90 elbow but
use a 3 inch PVC pipe to attach the elbow to
the T-Joint! This will reposition everything SLIGHTLY but should
still work! This will be the opening for the
passenger side fog light, cover the opening with a 6x6 piece of mesh using
elastics to hold it in place, I used 3 elastics
for each opening!
Picture #4
STEP 9. Attach
the T-Joint assembly to the already assembled parts on the car! The
T-Joint should fit SNUG into the fog
light opening, you may have to pull down on the bumper cover a little to
fit it in between it and the piece of Styrofoam
under the bumper! Once again a little adjusting is needed in
order to get a good fit! The 90 degree elbow will have to
be adjusted to the right angle to match up with the 10 1/2 inch long PVC
pipe in the fender! Once again some adjustments
will have to be made. Patience is the key!
Picture #9
STEP 10. Cover the
remaining 90 degree elbow with a 6x6 inch piece of mesh!
Picture #5
STEP 11. Attach the
38 inch long piece of PVC pipe to the remaining elbow.
Picture #6
STEP 12. Attach these
to the already installed parts on the car! This is by
far the hardest part of the whole assembly, its a tight
fit to get everything in but with a little work it will go in, you will
probably have to pull on the bumper cover on drivers side
as well to get the pipe to go into the fog light opening. Also there
are two black pieces of plastic under the car that get in
the way of the long 38 inch PVC pipe, just bend them over to the
side and the pipe will hold them out of the way, they
bend back easy and will not harm them from doing so!
Picture #10 & #7
AND THATS IT!
Everything is held in place by itself, no gluing or fastening down parts!
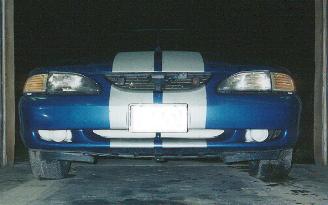
Here is a pic of the set up once
finished!
(this is shown unpainted for clarity purposes)
Click Picture # after each step to view photo's of parts or click on the picture below.
click picture to view all photo's
Just re-check all of your attachment and make sure
that the openings in each fog light space are covered with mesh, they may
slide off during installation. This mesh prevents any bugs or debris
from getting into for air filter! Trust me a lot of bugs will get
into your filter if you dont use the mesh! Horsepower improvements
vary with each car. I notices a 2MPH improvement in the 1/4 mile
with my ram-air kit but I also have quite a few mods, on a stock engine
you will not find a noticeable gain, heck I dont even notice any gain,
at least that I can feel any ways!
Horsepower gain, IF ANY,
will be noticed at higher speeds, not at lower speeds!
Have fun!
If you have ANY questions
EMAIL ME!
:
V6Sprout@Netzero.net
©Jamie Hiscoe/2000
HOME