Converting 35mm Slides to Digital
 Slides scanners are fairly expensive beasts, so I set about finding a cheap and cheerful way to transfer my several thousand 35mm mounted slides to digital.
Once converted they could be saved to Compact Disc, which take up a lot less room than boxes or magazines full of slides.
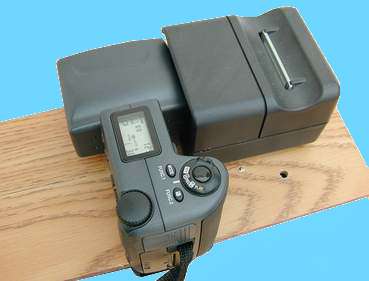
The macro feature on my Nikon CP990 can focus down to 20mm which is close enough to get the whole of the slide in frame.
I tried taking shots with the slides resting on a torch with several layers of greaseproof paper, polythene boxes and tissues (Real Blue Peter stuff!) to diffuse the light, but the exposure time were too short (less than 1/40 sec) so the pictures were a bit blurry, .
I had an old slide viewer (present day cost about £8), so I removed the plastic (!) lenses and tried taking a shot with a slide in the viewer. The results were promising but the exposure times were still low enough to give some camera shake. At this point I set about mounting the lot on a platform.
The distance between the slide and the lens, to get a full shot of the slide was about 60mm. With a zoom lens accuracy isn't too important plus the zoom gives you the option of zooming in to a smaller portion of the slide.
Finding a piece of wood was easy, a piece of 10mm plywood and it wasn't too difficult to get the slide viewer mounted onto the board. Just two small nuts and bolts and it was done, being careful to keep it at right angle to the platform.
The next part of finding a standard camera mount screw was slightly more difficult, I decided to plunder an old tripod, drilled the hole and woked out where to drill the hole so that the lens was poiinting bang in the middle of the slide.
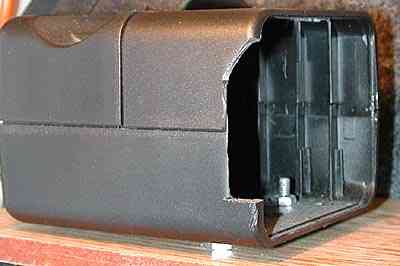 On fixing the camera to the platform I discovered that it wouldn't fit into the slide viewer properly so I had to remove some of its side..
As well as the nut holding the slide viewer to the platorm, you can also see that the slide viewer has been raised to ensure the camera is fairly central in the vertical as well as the horizontal plane. This adjustment was trial and error with some thick nuts and washers.

Now the whole device is assembled and ready to go. It's important to ensure that the camera lens is parellel to the slide before tightening up the camera screw. Find an old slide frame (with no film in it) and do a colour balance, or just set the camera to tungsten. I noticed after a few pictures the viewer's batteries were starting to fial enough to upset the colour temperature of the light, so I bought a power supply which gave 3 volts output and soldered this to the viewer. This seems to work OK, and as I have a Nikon power supply for the camera, changing batteries when I have a slide transfer session is not necessary. Now if only I had a larger compactflash card. (The Nikon CP 990 is good inasmuch as you can take the flash card out without having to remove it from the platform.
In order to get perfect focus you have to take the photogaph on the emulsion side of the film, which means that the digitised picture is back to front, and therefore has to be flipped to the correct way round. There is lots of software presently available to do this.
Gamma is something which is also affected. Set your camera to 'light' or such to improve the picture quality in the blacks, or alternatavly put it through photo software to improve the quality.
The CP990 has a 35mm slide format size, but I prefer to use the full size and crop later. You never manage to get the slide framed perfectly (well I don't).
As you can see from the image below the results are remarkable good. Good enough to print to A4 and sometimes to A3. Some darker slides do take quite a bit of fiddling, especially if the colour has faded due to age. This slide was taken in 1989 and the vignetting on the slide has nothing to do with the transfer process but is thanks to the original 28mm lens.

Untouched - straight from the camera
Click on image or here for full size(1MB>.

After cropping, horizontal flipping and some colour correction...No sharpening!
Click on image or here for full size(473KB>.