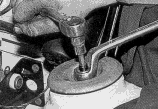
| Step 1: Separating
Suspension fron the Front Axle. After removing the
front wheel. |
 |
Uprating your Suspension:
This is a major job but not too hard to achieve. I recommend
getting it professionally checked afterwards.
This is a full photo tutorial taken from the book "Improve
and Modify Ford Fiesta" published by Haynes.
Amazingly you can still buy this book today for about a tenner.
Go and order it now! Most of the products inside are out of
production but it's still a valuable source of information.
Tools Needed:
I wouldn't give yourself any less than a day to do this work so don't rush on with it one afternoon if you're going to need the car the next morning for work !
FRONT SUSPENSION ( The hardest bit!)
| Step 1: Separating
Suspension fron the Front Axle. After removing the
front wheel. |
|
| Step 2: Remove
the Stub Axle. With the previous steps completed it
should be easy to lift the stub axle clear of the
suspension unit. |
 |
| Step 4:
Removing the Suspension Unit. Remove the top plate and
simply pull the suspension unit out from under the car. |
 |
Step 5: Re-assembly. Simply do
the reverse of the above step to assemble the new
suspension unit. Add the new spring to the new unit,
compress it and affix the upper spring plate using the
Allen key and spanner again. |
Step 6: Fixing to Car. After releasing the valve spring compressors
you should be ready to replace this new unit in the old
units hole under the car. |
 |
REAR SUSPENSION ( The easy safe bit!)
| Step1: Fig (1) | Step1: Fig (2) | |
| Step 1:
Disconnection After removing the wheel remove the
lower damper mounting bolt.(1) |
 |
 |
| Step 2: Remove
the Spring Believe it or not, once the damper has been
released the spring can be just pulled out - no
compression! |
 |
| Step 3: Release
the Top. Open the boot and remove the dust cap from the
strut tops. |
 |
| Step 4: Assembly. Pop
in the new spring and slip the new damper into the old
damper's hole. |
 |
| Step5: Fig (1) | Step5: Fig (2) | |
| Step 5: Refitting the Lower Arm. Firstly you'll need to grease up the locator peg.(1) Now try and fit the location arm onto this peg. Note: The new bush will be very tight. Impossible isn't it ! |
 |
 |
Step 6: Tightening
Now that its all together you'll need to tighten up all the nuts
and bolts, again using the correct torque settings and applying
grease to save them from siezing up in the future.
Step 7: FINISHED
Thats it !
You may need to get your tracking checked and adjusted due to the
new lower position and stiffer suspension.
Make sure that all the work carried out above is done to the
correct torque settings.
Torque settings can be found in the Haynes Workshop Manual.
PS: It is easier than it looks, just think it over a bit before
you do it!