
#33. Dolphins and diver from "Relief Carving - Patterns, tips and Techniques by William f. Judt". This beautifully designed relief pattern was very hard to execute especially at the relatively small size of 14" wide by 22" high. The carving was done on three pieces of basswood laminated together by a wonderful craftsman, Clayton Cummings. This carving requires many different skills. First cutting the oval and sanding the edge is quite a challenge. The routering is especially difficult because of the oval shape with the outer shell border and the kelp winding throuigh the pattern. Carving was a mixture of traditional gouges and also a variety of power bits. The background and coral at the bottom was stamped using a leather #104 punch. Because basswood is relatively soft you cannot stamp very hard. If you do stamp too hard, the basswood turns to mush and fibers are sticking up everywhere. The finish is the Sanding Sealer/Hard Paste Wax recommended in Judt's book. I am very pleased with this method. It is the first time I have used it. this carving took over a year of on and off carving to complete.
Last Updated Jan 1, 2009 E-mail Brian Graham
#16. Elbow Lake Cottage Sign - Entered in Canada's Capital 1998 Carving Competition. This sign was finished with the West System (epoxy coating) and a UV resistant varnish coating. The paint was acrylic. It is carved from 2" Basswood stock, 22" wide by 9" deep. I constructed the hanging frame of 2" x 2" with a fancy support bracket from Home Depot.

#4. Cougar from the book "Relief Carving with Bob Lundy". This relief is only about half the size suggested in the book, but it is one piece of Basswood 15" x 9". Bob Lundy gives excellent detailed instructions with great illustrations.
 #8. This relief is from Dave Bennett's Video "Relief Carving in a Different Light". He has a wonderful teaching technique. This is in high relief with a three dimensional look to the finished carving. The carving is 12" wide by 10" deep, only half the size suggested in the video. This made the carving very difficult. A router was used to initially get the 5 levels established - then hand tools were used followed by power tools to do the bridge holes, the texturing of the trees and the window holes in the house. The carving was finished with linseed oil and the frame was hand made of maple to fit the carving. The carving is held in the frame very loosely to let natural expansion and contraction to take place. Proper lighting is very necessary for a carving of this nature.

#7. This West Coast Haida Indian low relief in pine is from a pattern in "Step by Step Woodcarving" by Allan and Gill Bridgewater. I love the bold colors on the plain wood.

#98. "Pelican on Post" is another example of a low relief but a little deeper than the Haida relief. This was done on a 3/4" basswood plank with the bark on. It is a combination carving and woodburning project. Ensure that your initial knife cuts around the pelican's bill give enough room. So many students make this too narrow and the bill does not look right. Use a small dremel to get the area between the bill and the body carved out. Round over edges of bird slightly. Woodburn the feathers, post and grasses. Remember to only carve out the top part of the post. Finish with 2 or 3 coats of Krylon Latex Gloss or Matte spray.

#9. This relief of geese about to land was carved from a 2.25" thick piece of Basswood chainsawed by myself and a friend two years previous near Elbow Lake. I left the wood essentially as it was - no planing! the geese were wood burned to outline their features. The carving was finished with MinWax and buffed with a cotton cloth.

#20. I used a purchased plate of basswood beautifully turned by Clayton Cummings of Campbell's Bay, Quebec. The religious scene is from Bill Judt's "Relief Carving Treasury". The quote around the edge by Joubert from The New Dictionary of Thoughts was first typed on a computer; enlarged on a photocopier; individually cut out and spaced around the edge in an area marked by a compass. I stained the carving with honey maple stain, rubbing off the middle part to give it a lighter colour.

#21. Another pattern taken from Judt's "Relief Carving Treasury", this Sailing Ship was done in basswood not white birch as suggested by Judt. This is a very satisfying project which doesn't take very long to do. Judt stamps his backgrounds. The basswood does not stamp well and therefore to bring out the ship I stained the background with the honey maple stain. Be very careful with the stain, because if you get it on the border or the ship you won't be able to get it off unless you seal the ship and background first so the stain does not sink in. A nice way to display a small light carving like this is to use the stand as seen here. If you put this on a wall by itself, it will not show up very well.
 #26. I had really wanted to do a relief of horses for some years and finally saw the most beautiful picture of two horses gazing over a fence. I carved it out of basswood and decided the rope effect around the oval border would look good. Minwax Prestain was used before the other stains were applied. I stained the horses with a honey maple stain, the hair with a black oak stain, the fence with a cherry mahogany stain and the outside edges with the honey maple stain. The rope and background had no stain. After the stains were applied, the whole carving was sprayed with Deft clear satin.

#22. This relief is from a picture out of Bob Lund's Relief Carving book in the Gallery section. I added the piece for the head and horns to the original basswood piece from Elbow Lake. I wanted the head to really have a 3 dimensional look to it and give the carving the extra life I thought it needed. The area around the head was worked on with a power Dremel to cut down on the chance of breaking off a horn and to facilitate getting behind the head, ears and horns. The face was woodburned to give it more life. The whole carving was finished with Minwax and buffed.
#118. Finally a flower relief - a Calla Lily, from patterns by Mack Sutter in Floral Woodcarving. It was done on 2 inch thick basswood. I wanted to do this as an example for my beginner relief carving class. This is a very good pattern for a beginner to work on. It is simple but elegant. After carving, I woodburned the leaf pattern on the carving. I finished the carving with 3 coats of Krylon latex gloss spray.

#141. This Haida Mask was done in a class at Merrickville taught by Bruce Stackhouse. Bruce had taken a class from a native of Haida ancestry who taught at Bruce's shop Wood-N-Feathers the previous year. We had a lot of fun doing this project and learned a lot about the Haida art and the meaning of the various carved elements from a book called Learning by Designing (Pacific Northwest Coast Native Indian Art) by Jim Gilbert and Karin Clark. The mask was carved of basswood and finished with acrylic paints and has copper in the eyes.

#129. This relief carving of a Buffalo is from a pattern in "Wildlife Carving in Relief" by Lora Irish. Lora's book documents the carving of this animal very well and I would encourage relief carvers to obtain the book and follow her approach using levels and layers. If you have not carved using this technique it is well worth the effort. You have to be extremely careful in carving the horns as they are tightly restricted and will become narrow if undercutting is used to early in the carving. This carving was finished with 2 coats of double boiled linseed oil on the entire carving. Then the linseed oil mixed with "burnt sienna" oil paint (3 linseeed to 1 of oil) was applied just to the buffalo. Then "burnt umber" oil paint was mixed with the linseed and applied to the bead forehead and mane to make those areas a little darker.

#134. This relief carving is a face in profile. It is called "Old McDonald" and is from Ivan Whillock's book called "Relief Carving Techniques". I have not attempted the human face in my carvings to any extent and used this project to learn from a very accomplished relief carver. It was done on a 3/4" basswood plank sold to me by Harold Hawkins from our carving club. The wood was a particular joy to carve and the carving went very well. I had a lot of fun with the hat! The carving is finiched with 2 coats of Sanding Sealer. Possibly one could be more adventurous and stain the face or the background but since it was a learning tool, I left it alone.
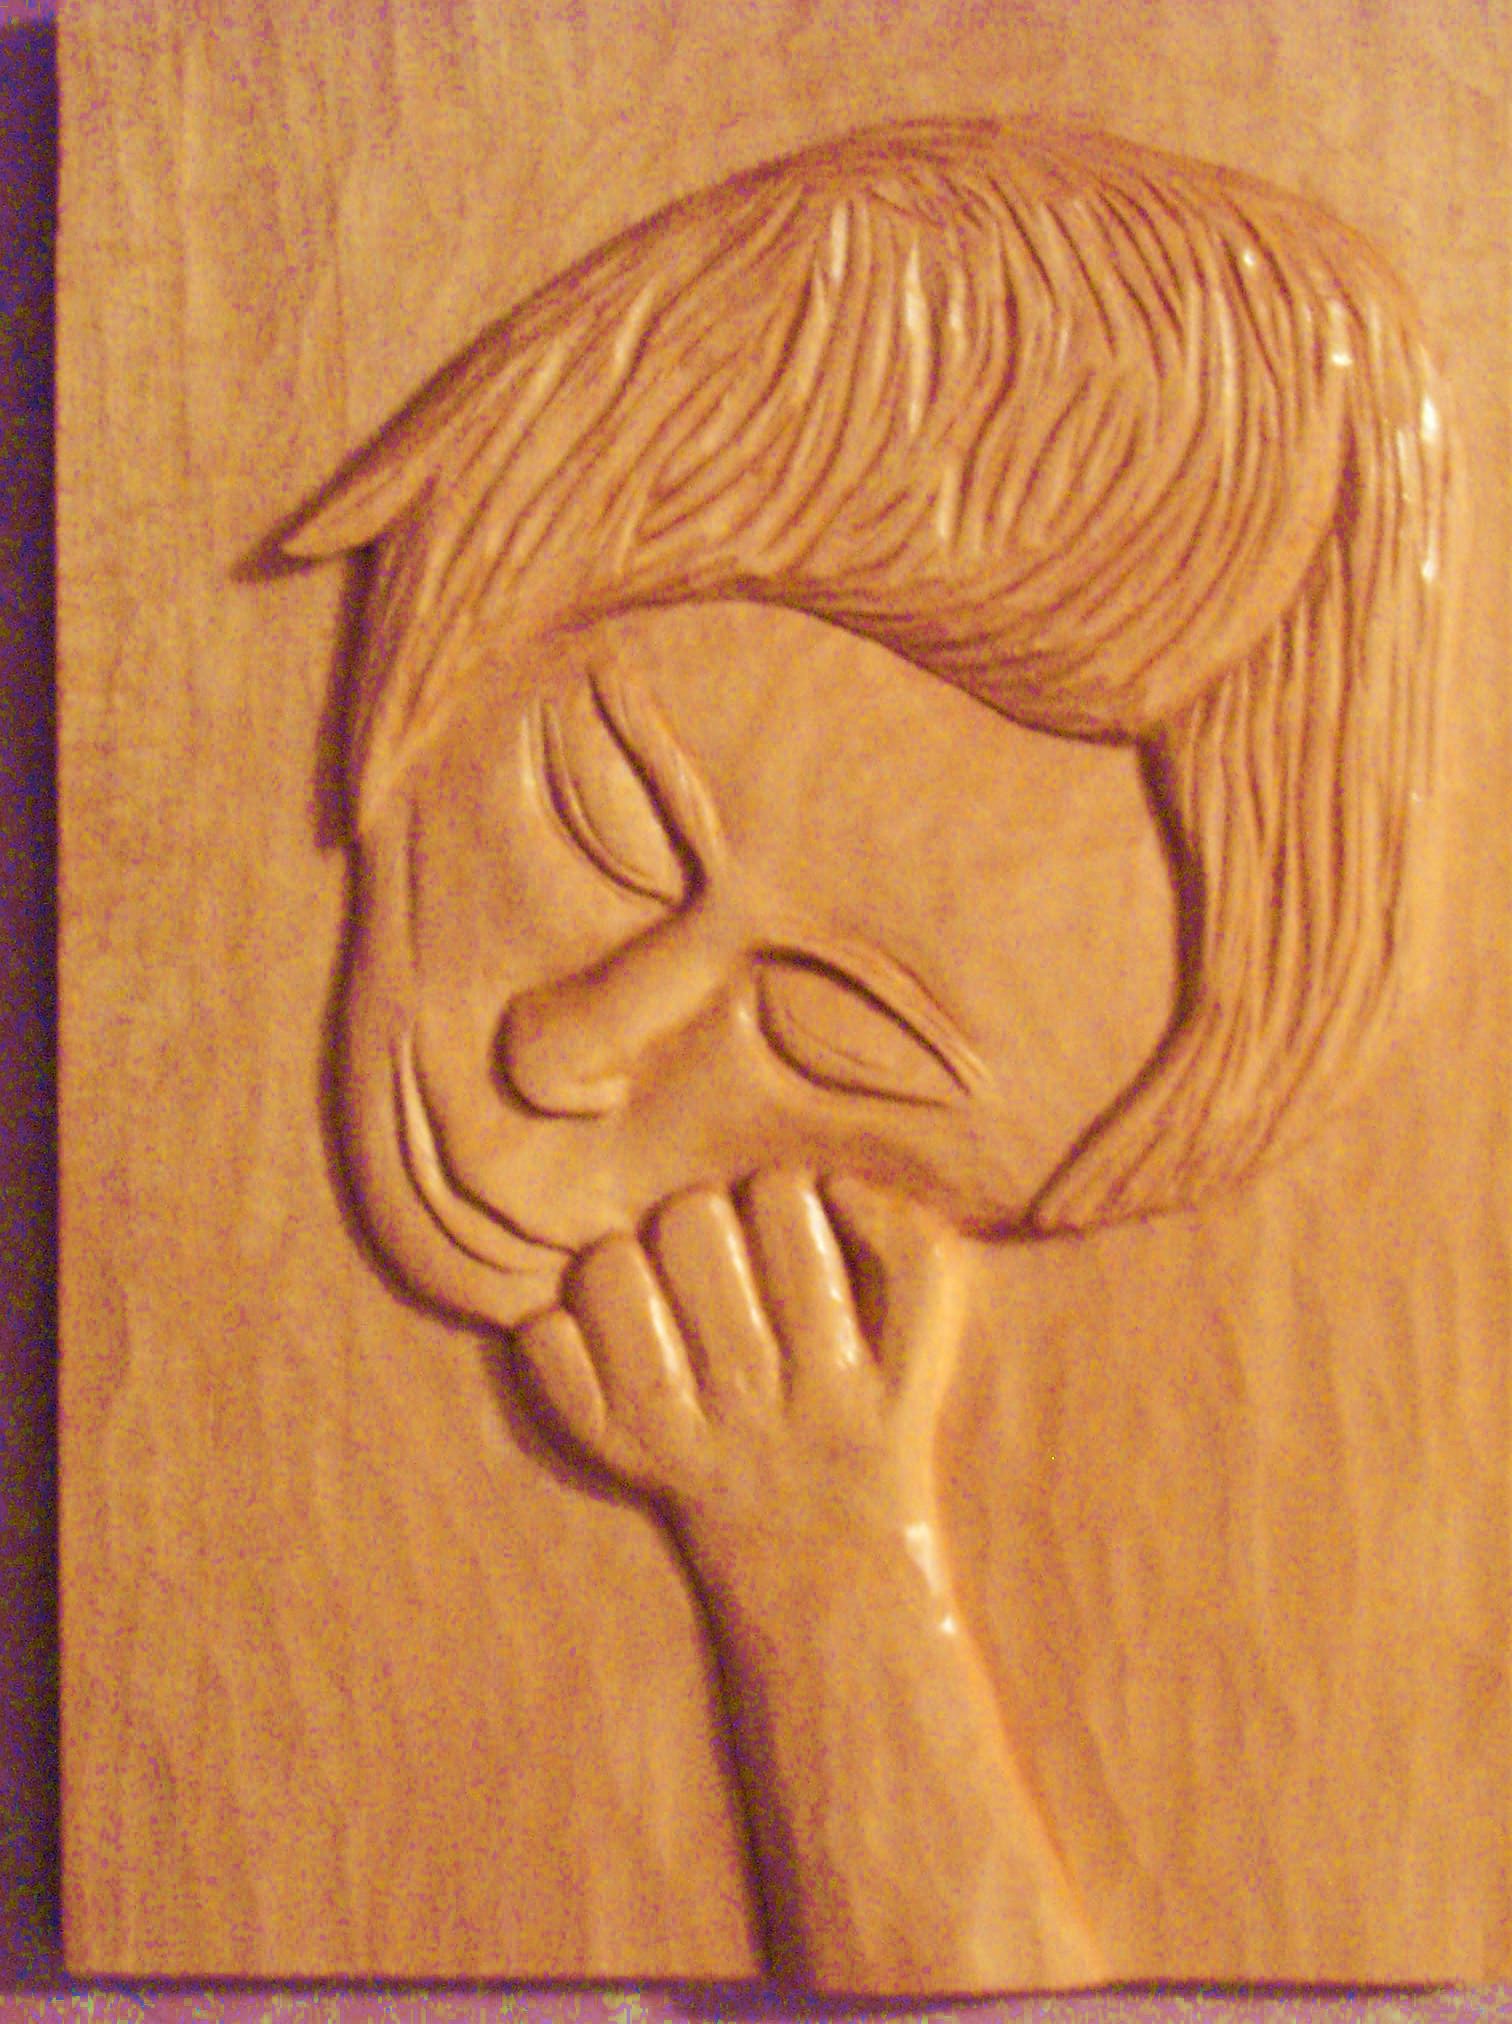
#126. This relief carving is a front view face. It is called "Deep in Thought" and is another from Ivan Whillock's book called "Relief Carving Techniques". I wanted to see how the front view was to carve. It was done on a 3/4" basswood plank. You will note that in this carving all of the ground wood was removed from around the face. This lets the carving come out of the background a little more. I have changed the hand position in this carving as I thought this position seemed more natural. The carving is finished with 2 coats of Sanding Sealer.

#140. Called Native Spirit is from Lora Irish's Wildlife Carving in Relief - what a beautiful pattern. I was thrilled to do this one! And had great fun finishing it. The piece is done on 3/4 " basswood about 11" square. It is all reliefed from one piece - the frame is the same piece - no added pieces. I used a matt carbon black finish on the background to mask gouge tooling. It is painted with acrylics. The depth of the carving is about 3/8" max.

#142. This one is "Lonesome Cowboy" in butternut from Ivan Willock's book called Relief Carving Techniques. This is a wonderful book for all carvers - no matter what level they are at! The piece is actually two pieces of butternut laminated together. My friend, Bas Donaughue did an amazing job of laminating the pieces! Butternut is not the greatest for relief carving as it chips a lot and is a little dark to see pattern. I finished it with the sanding/sealing method of Judt. You put on a sanding/sealer (can be bought at Home Depot - Behr product) then you sand it with a 0000 steel wool. You then vacuum it off very well and then apply Minwax. Buff it up and it looks beautiful!
To view the price list for any of the above RELIEF pieces click here.