This chapter covers the basics of the Cisco Secure Access Control Server interface, and familiarizes you with the very simplest of actions in this medium.
In this chapter, you learn the following topics:
Navigating the HTML interface
Starting point for configuring your server
Locating configuration items
Preparing to add users
If you recall during the installation process of Access Control Server (ACS), you were given the opportunity to enable advanced configuration options by enabling a check box. As I look back to my first install and navigation of ACS, this spot is where I thought to myself, "I'll get to it later."
As it turns out, I should have gotten to it sooner because by enabling those check boxes, more configuration items are visible in the HTML interface. For example, when I attempted to configure some authorization parameters, the options were not visible, and I spent a good hour or better trying to figure out what I did.
In this chapter, you familiarize yourself with the interface of ACS and apply some basic configuration to make your job as an administrator a little bit easier.
NOTE
I assume throughout the course of this chapter that you have followed the install of ACS according to the laboratory example in Chapter 5, "Deploying Cisco Secure Access Control Server for Windows Server." If you are using a Cisco Secure Solution Engine, you might have some slight differences. All in all, the HTML interface of the Cisco Secure Solution Engine and the software version of ACS for Windows Server should be close to identical.
Navigating the HTML Interface
If this is your first time using ACS, it is important to take the time to learn how to navigate the interface.
Note that the main web page of ACS is divided into frames. You access different menu items on the left-hand side of the page, perform configuration in the middle, and have access to some help on the right-hand side.
Because you use the menu a great deal in you configurations, the next sections look at each menu item and what types of configuration can be performed at each level.
User Setup
When you select the User Setup menu item, your middle frame changes to the "select" screen. Here, you can do a few things. You can add a new user, search for an existing user, find users alphabetically or numerically, or simply list all users at one time. User Setup is seen in Figure-1.

Figure-1 User Setup
To begin your configuration, add a username. To do so, follow these steps:
|
Step 1 |
Enter a username; for our example, use aaauser and select the Add/Edit button. |
|
Step 2 |
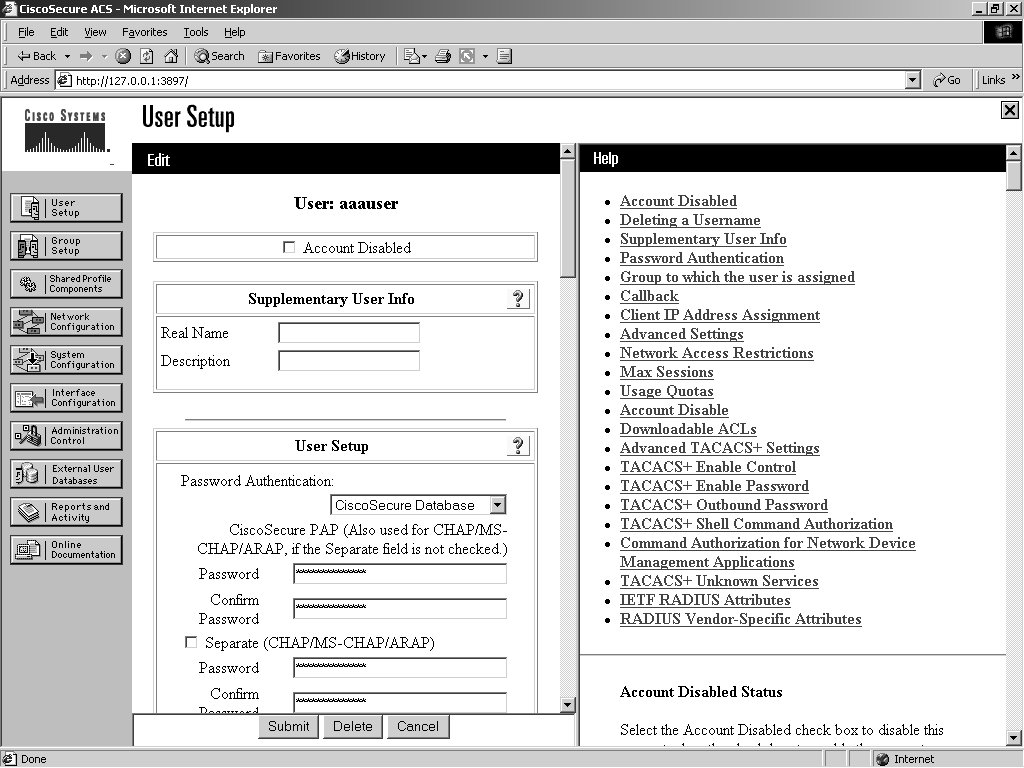
Now, you can edit user attributes. Moving from top to bottom, you can disable a user account, enter supplementary information, and configure the user's passwords. Figure-2 displays the option for authenticating against a Windows NT/2000 database or the Cisco Secure Database. |
|
Step 3 |
Enter the password cisco for this user. Optionally, you could select the option to use the Windows database. The default is to check the Cisco Secure database. |
|
|
Here, you can also distinguish which group the user is a member of. By not specifying a group, the user is placed in the default group (group 0). You can have the same attributes to configure in the group setup as you have in the individual user setup; however, user configurations override that of the group of which they are a member. |
|
|
Within User Setup, you can also configure callback settings, IP address assignment, and account disable properties. Some of the more advanced user attributes and configurations are discussed in Chapter 7, "Configuring User Accounts." |
|
Step 4 |
Click Submit to create your first AAA user in ACS. Because you have not selected a group, this user is placed in the default (group 0) group. |

Figure-2 Authentication Location Options
NOTE
By selecting the List All Users button after creating your user, you should see a single user entry on the right-hand side of the ACS interface. This ensures that the entry has been successfully created.
Group Setup
To begin your configuration, recap what you have configured thus far. You have a user called aaauser who has a password of cisco and is placed in the default group. This user is authenticated to the Cisco Secure database only. To examine the group that this user is in, follow these steps:
|
Step 1 |
Select the Group Setup menu item. You are given three options there. Figure-3 shows these options. |
|
|
The options are Users in Group, Edit Settings, and Rename Group. Users in Group lists all of the users that are assigned to the group that is visible in the drop-down menu. A total of 500 groups numbered 0 through 499 exist. |
|
Step 2 |
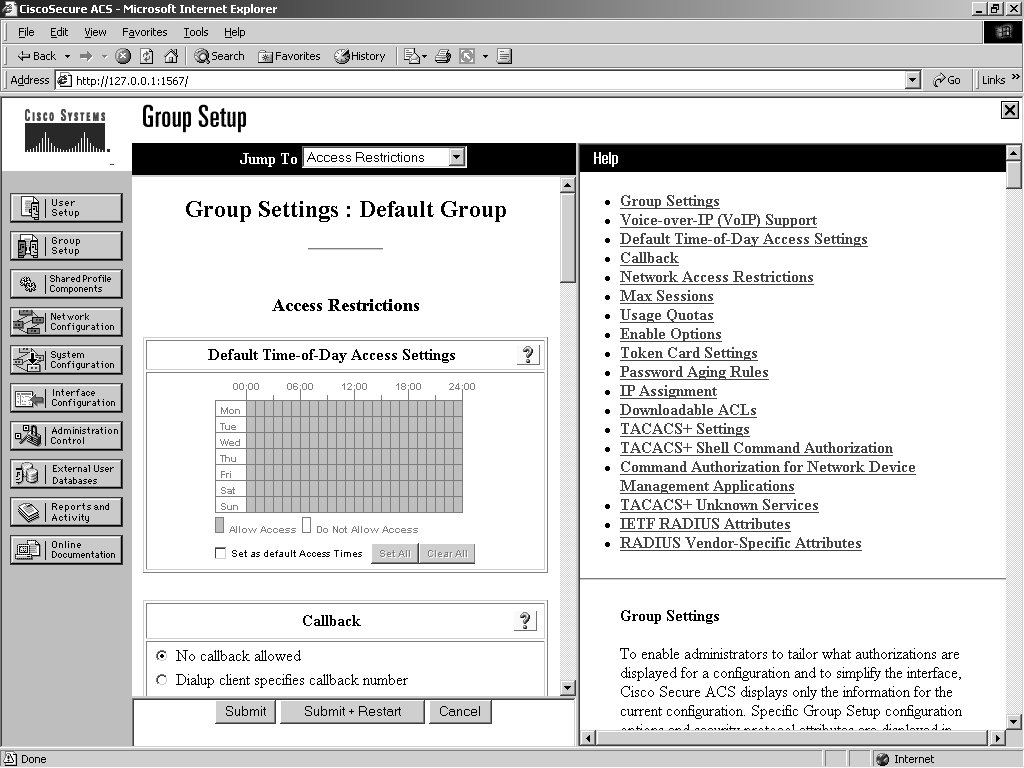
To view the group settings that your first AAA user is a member of (by default), simply select the 0:Default Group and then select Edit Settings. This selection changes the main window, and you are now in the Group Configuration section. This is seen in Figure-4. |
You can note a few highlights while you are here. First of all, take a look at jump to at the top of the screen. This feature is a real time saver. Try it out a few times by jumping to the IP address assignment section and then back to access restrictions. Notice that in the group configuration you have the ability to configure time-of-day access restrictions. This is not available at the user level. You can also configure Callback, IP Assignment, and TACACS+ settings. Under TACACS+ Settings you can configure shell command authorizations, apply privilege levels, set auto-commands, and so on. These types of configurations are discussed in Chapter 8, "Configuring User Groups," and Chapter 10, "Configuring Shared Profile Components."
NOTE
Some of the fields might not be visible in either the Group Setup or User Setup. As you become more familiar with ACS, you will be able to enable or disable certain fields at either the group level or the user level. This capability is explained in detail in Chapter 7 and Chapter 8, so do not worry if some of the items discussed in this chapter are not visible in you ACS device.
When you make group changes, you are required to submit and restart the ACS services. Your changes do not take place until you have done so. If you are making multiple changes to a group, it is best to submit without restart after each change until you have completed all changes, and then restart the ACS services.

Figure-3 Group Setup

Figure-4 Configuring the Default Group
Shared Profile Components
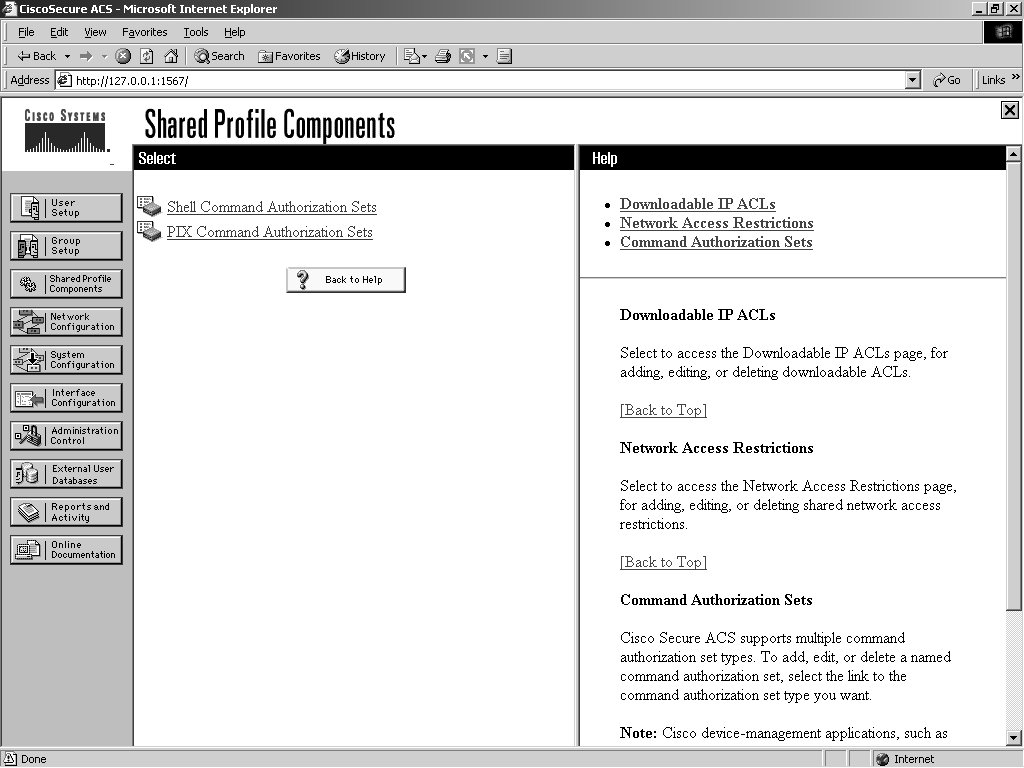
Shared Profile Components allows you to specify Shell Command Authorization Sets and PIX Shell Command Authorization Sets. By creating these command authorization sets, you can control the commands a user can execute on a device by applying the command authorization set to the user profile in the TACACS+ settings, or at the group level. Figure-5 displays the Shared Profiles Components configuration menu. By default, you can select Shell Command Authorization Sets and PIX Shell Command Authorization Sets. Optionally, you can configure Downloadable ACLs or Management Center Authorization Sets. For these options to be visible, you must select them in the Interface Configuration page.
Another benefit to the Shared Profile Components configuration page is the ability to configure Shared Network Access Restrictions.

Figure-5 Shared Profile Components
By selecting one of these links, for example, Shell Command Authorization Sets, you are taken to the configuration page for this shared profile component. This configuration is discussed in Chapter 10. You can see what this configuration page looks like in Figure-6. As you can tell, at this point, none are defined.

Figure-6 Shell Command Authorization Sets
Network Configuration
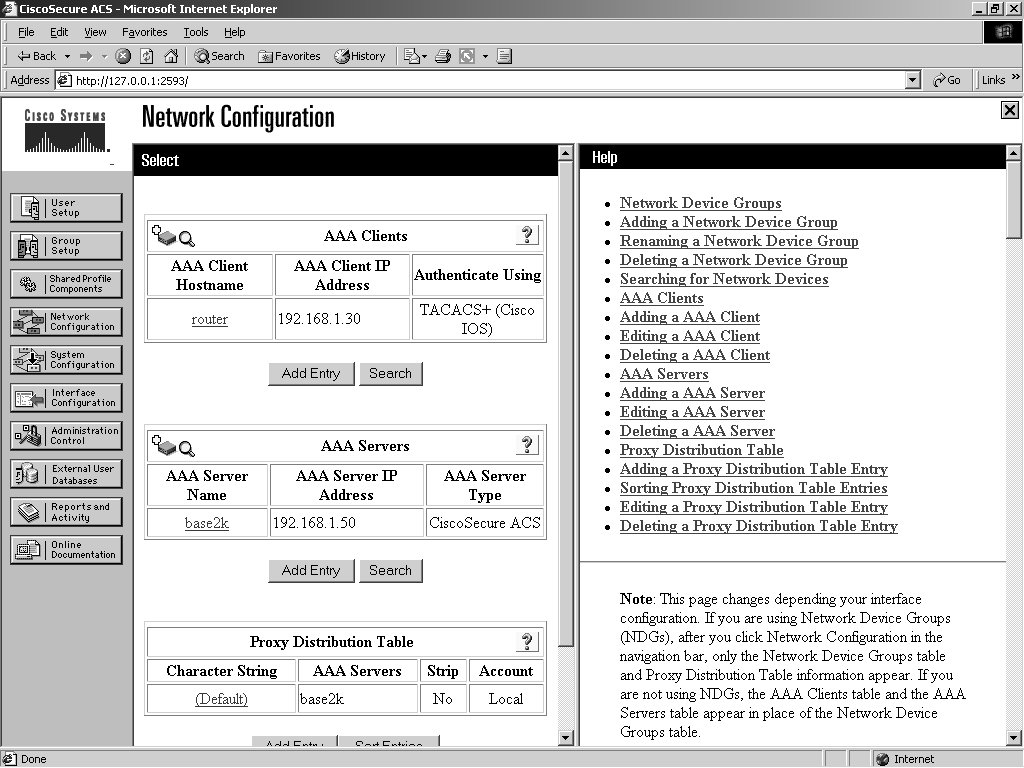
The Network Configuration section is where you add, delete, or modify settings for AAA clients. At least one entry in this section should be placed there during install of ACS. You can see this in Figure -7. The AAA client is the device you added during the install. The AAA server is the Windows server, or rather the ACS server itself, that is entered here during the server installation.

Figure-7 Network Configuration
By selecting that entry, note that you can control the IP address of the device, key, and authentication method. You can also see a total of four check boxes in Figure 6-8. They are as follows:
Single Connect TACACS+ AAA Client (Record stop in accounting on failure)—Single Connect TACACS+ AAA Client allows a single TCP connection between this AAA client and ACS. The normal operation is to establish a separate TCP connection for each request. For example, if you are using TACACS+, and you have a user that connects to the AAA client, when authentication occurs, a TCP connection is established. When another user connects, another session is established and so on. This eliminates those multiple TCP sessions. However, this is not recommended unless the connection between the TACACS+ AAA client and ACS is extremely reliable. If you decide to use this option, and the connection between the ACS and TACACS+ AAA client goes down, ACS never receives accounting stop packets for all users accessing the network through that AAA client. This causes them to remain in the logged in users list until it's purged. The logged in users list is covered in Chapter 12, "Reports and Logging for Windows Server."
Log Update/Watchdog Packets from this AAA Client—The Log Update/Watchdog Packets from this AAA Client allows accounting packets that are sent by the AAA client to be logged by ACS, specifically the logging of update or watchdog packets. It does not control overall logging of accounting packets. Watchdog packets are a means of creating better session length granularity to safeguard against the possibility of a device going down and thus never sending accounting stop packets for the users accessing the network via that device. Customers who have high priority on maintaining session length data might find this more useful than others.
Log RADIUS Tunneling Packets from this AAA Client—The Log RADIUS Tunneling Packets from this AAA Client option allows RADIUS tunneling packets from the AAA client to be logged by ACS.
Replace RADIUS Port Info with Username from this AAA Client—This enables the use of a username rather than port numbers for session state tracking. This option is useful when the AAA client cannot provide unique port values. For example, if you use the Cisco Secure ACS IP Pools server and the AAA client does not provide a unique port for each user, Cisco Secure ACS assumes that a reused port number indicates that the previous user session has ended, and Cisco Secure ACS can reassign the IP address previously assigned to the session with the non-unique port number. By default, this check box is not selected.
When you make changes to an AAA client, you must submit and restart the ACS services, similar to group changes. If you want to delete an AAA client, you are also required to submit and restart the service for changes to take effect.
System Configuration
Under System Configuration, you find many sub-configuration links beginning with Service Control. These sub-configuration links can be seen in Figure 6-9. This is where you can stop and start the ACS services. You can also do so in the Service Control of Windows 2000. By stopping the ACS service inside of ACS, you do not stop the ACS web server. If you want to stop the ACS web server, you need to do so in the Service Control of Windows. This web service is called CSAdmin.
The next System Configuration feature that you can manipulate is Logging. In this feature is where you can configure the local logging configuration, such as failed attempts and TACACS+ and RADIUS Accounting. You also configure Open DataBase Connectivity (ODBC) and remote logging here, as well as other ACSs.
Date Format control is straightforward. This is where you can change the format of the date displayed on reports. After you change the format, you must log out of the server to actually see the changes take place.

Figure-8 AAA Client Setup for ACS

Figure-9 System Configuration
You can log out of ACS, short of closing the browser, in a few ways. One way is by clicking the Cisco Systems logo in the top left corner of the web browser screen and then selecting the Log off button. Another method is by clicking on the X in the top right portion of the window.
The next option is Local Password Management. From here you can set password length, as well as password options. You can also configure options for Remote Password Change and logging of password changes.
As for ACS Backup, you can schedule backups to be done manually or at specific times. You can specify a location for the backup files to be stored as well as manage the files. When ACS is backed up, it creates a file with the extension of .dmp. This file is now present when you enter the ACS Restore link. Here you have the ability to select from numerous backup files, as well as determine if you want to restore the Users and Groups, System Configuration, or both.
ACS Service Management enables the administrator to determine how often to test the availability of ACS authentication services. This is the CSMon service configuration. This allows ACS to test itself and take action when its test is unsuccessful. The available actions, should no authentications be recorded, are as follows:
Restart all
Restart RADIUS/TACACS
Reboot
Take no action
If the reboot option is selected, this causes the server that is running ACS to reboot. You also have the ability to add custom actions to this list.
You can also decide that you want to log attempts to log in to disabled accounts. Do this by selecting the check box labeled Generate event when an attempt is made to log in to a disabled account.
This is also where you can configure e-mail notifications and NT Event Log setup.
The ACS Certificate Setup is where you configure the ACS device with digital certificates. You use this when you configure the ACS to use https for administrative sessions.
Global Authentication Setup is where you can allow protocols such as PEAP, EAP-TLS, EAP-MD5, and MS-CHAP.
Interface Configuration
Moving on to the Interface Configuration menu item, as seen in Figure-10, you find a selection from the following sub-configuration links, depending on whether you have selected TACACS+ or a form of RADIUS when you entered your AAA client:
User Data Configuration
TACACS+ (Cisco IOS)
RADIUS (Microsoft)
RADIUS (Ascend)
RADIUS (IETF)
RADIUS (IOS/PIX)
Advanced Options
NOTE
If you do not see RADIUS options here, you need to add an AAA client that uses the RADIUS protocol. Interface Configuration is directly affected by Network Configuration.
The User Data Configuration link enables you to customize the fields that appear in the user setup and configuration. Here you can add fields such as phone number, work location, supervisor name, or any other pertinent information.
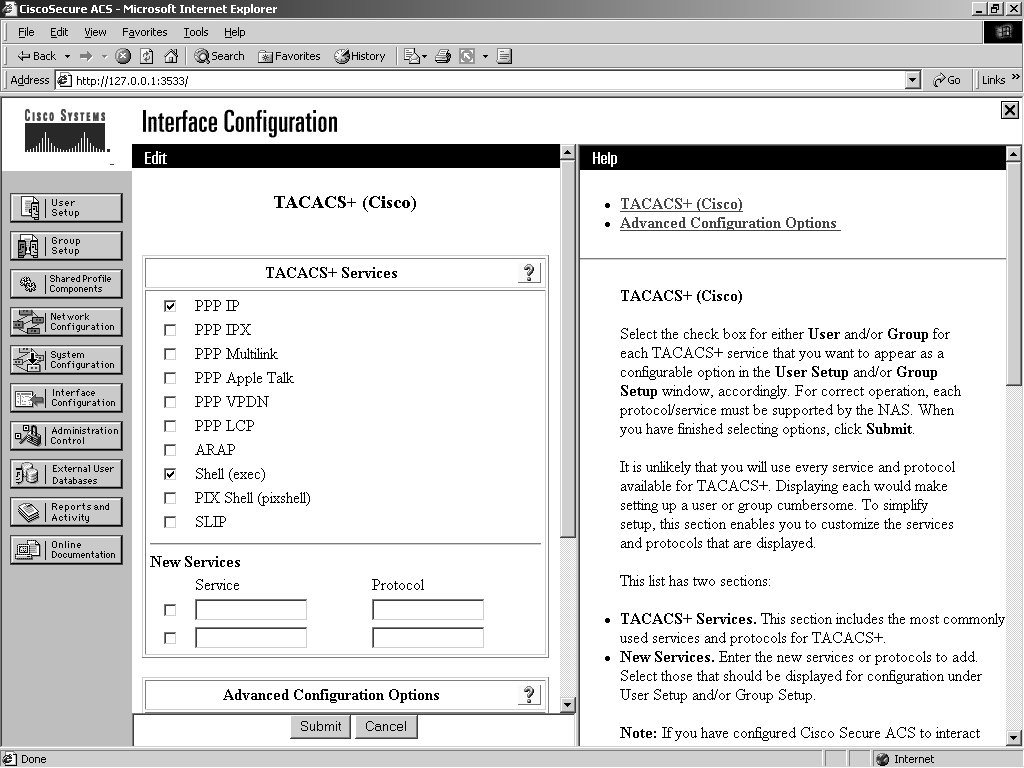
The TACACS+ (Cisco IOS) link enables the administrator to configure TACACS+ settings as well as add new TACACS+ services. You can also configure advanced options that affect what you see in your interface. It is important you understand how this works. Depending on the current configuration of your server, if you go to the TACACS+ link, you might or might not see two columns. If you do see two columns, you are able to configure user-level settings as well as group level. Figure-11 displays what you see before enabling per-user TACACS+/RADIUS attributes.
In Figure-12, you can see the change to the TACACS+ (Cisco IOS) settings page after going through the following steps:
|
Step 1 |
Select the Interface Configuration button on the left side menu. |
|
Step 2 |
Select Advanced Options. |
|
Step 3 |
Select Per-user TACACS+/RADIUS Attributes. |
|
Step 4 |
Select Submit. |
|
Step 5 |
Select TACACS+ (Cisco IOS). |

Figure-10 Interface Configuration

Figure-11 TACACS+ (Cisco IOS) Before User Attributes

Figure-12 TACACS+ (Cisco IOS) After User Attributes
You should now have two columns available, User and Group. By selecting these options at the user level or group level, you enable these configuration options within each menu.
Here is where the user-to-group relationship comes into play. If an option is selected to appear in both the user and group configurations, and the user-level configuration is different than the group level, the user-level configuration takes precedence. Most of the features are available in both user and group configurations with a few exceptions. At the user level, you can configure passwords, expiration, and static IP addresses. At the group level, you can configure password aging as well as time-of-day restrictions for different categories.
Administration Control
The Administration Control section is where you configure all aspects of ACS for administrative access. Here you have the ability to add administrators and configure Access Policy. Information such as IP addresses that are allowed to access ACS, IP addresses that are not allowed to access ACS, and HTTP port allocation can be configured here.
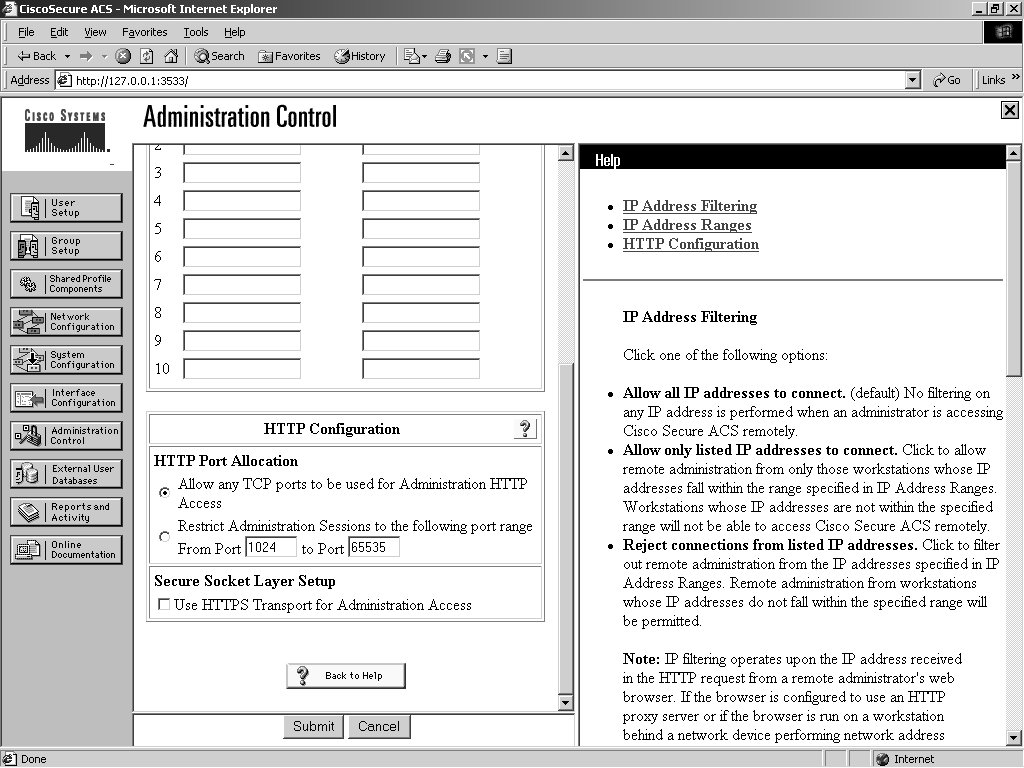
Recall that ACS uses port 2002 as the listening port, but after connection to that port is made, you are redirected to a random port number. When ACS is positioned behind a firewall, this random port assignment becomes a security issue. You have the ability to specify a range of ports used so that you can configure access restrictions within your firewall to match, as seen in Figure-13. This is especially helpful when using a PIX Firewall.
NOTE
The Secure Socket Layer Setup option was not available in version 3.0.

Figure-13 HTTP Port Allocation
Session Policy enables you to alter the timeout, allow automatic local logins, and respond to invalid IP addresses. You can also choose to lock administrator access after a certain number of tries.
NOTE
Audit Policy enables you to configure File Management and Directory Management options.
External User Database
In this section, you see where to configure an unknown user policy. This same topic is covered in extensive detail in Chapter 11, "System Configuration." You also configure database group mappings to external user databases as well as perform the actual database configuration. Further, you are given a list of compatible databases, and you can choose which one you will configure to be used with ACS.
The servers that are available for use as an external database are as follows:
Windows NT/2000
Novell NDS
Generic LDAP
External ODBC Database
LEAP Proxy RADIUS Server
RADIUS Token Server
VASCO Token Server
ActivCard Token Server
PassGo Defender Token Server
CRYPTOCard Token Server
SafeWord Token Server
RSA SecurID Token Server
Each version of ACS includes more and more support for external databases while greatly improving the functionality of the ACS database.
Reports and Activity
The Reports and Activity section provides a wealth of tools in not only troubleshooting, but also monitoring your network. In the time that I have been a security instructor, I make it a point to teach students that if you are going to log it, you better look at it. So many times I have been in networks running Intrusion Detection Systems, SYSLOG, and other types of monitoring, yet nobody takes the time to look through the logs.
Within ACS, you have the ability as an administrator to monitor your network security on a number of levels. The available logs that ACS keeps for you follow:
TACACS+ Accounting—All the Accounting reports include information such as time/date, username, type of connection, amount of time logged in, and bytes transferred. The information that is included in these reports is configurable by the administrator in the System Configuration section under Logging. This is looked at in more detail in Chapter 12. These reports can be found at Program Files\CiscoSecure ACS v3.x\Logs\TACACS+Accounting.
TACACS+ Administration—The TACACS+ Administration reports include all of the command requests from AAA clients such as routers or firewalls where command authorization is configured. These reports can be found on the hard disk of ACS at Program Files\CiscoSecure ACS v3.x\Logs\TACACS+Administration.
RADIUS Accounting—See the first bullet item in this list. These reports can be found in Program Files\CiscoSecure ACS v3.x\Logs\RADIUSAccounting.
VoIP Accounting—See the first bullet item in this list. These reports can be found in Program Files\CiscoSecure ACS v3.x\Logs\VoIP Accounting.
Passed Authentications—Passed Authentications is straightforward. The information gained within these report assists with user administration as well as in troubleshooting users that are failing authentication. These reports can be found in Program Files\CiscoSecure ACS v3.x\Logs\Passed Authentications.
Failed Attempts—Similar to Passed Authentications, this report assists with user administration as well as in troubleshooting users that are failing authentication. These reports can be found in Program Files\CiscoSecure ACS v3.x\Logs\Failed Attempts.
Logged-in Users—Again this report assists with user administration as well as in troubleshooting users that are failing authentication; however, the Logged-in Users file is rather unique. Most of the logging files in ACS create a comma-separated value (CSV) file and store them for each period, usually one day, on the hard drive of the server. The Logged-in Users file is not saved as a CSV file. As users log in, they are maintained in this file, organized by the name of the AAA client. You can purge the entries if they appear to be hung entries.
Disabled Accounts—This report enables you to view accounts that have been disabled.
ACS Backup and Restore—The ACS Backup and Restore report is available only if the option in Interface Configuration is enabled. This log maintains a history of the dates and times that ACS was backed up and/or restored. These reports can be found in Program Files\CiscoSecure ACS v3.x\Logs\Backup and Restore.
Remote Database Management Source (RDBMS) Synchronization—The RDBMS Synchronization is also available only when the option is configured in the Interface Configuration Advanced Options. You don't enable the report; you enable RDBMS Synchronization. This allows ACS to keep report information on RDBMS Synchronization. This logs the time and reason for RDBMS Synchronization. This is discussed in more depth in Chapter 11. These reports can be found in Program Files\CiscoSecure ACS v3.x\Logs\DbSync.
Database Replication—Database Replication is yet another report that must be enabled in interface configuration. This report logs the time that the ACS database was replicated to the backup server. This configuration is discussed in Chapter 11. These reports can be found in Program Files\CiscoSecure ACS v3.x\Logs\DBReplicate.
Administration Audit—Administration Audit logs all of the activity in ACS that is performed by administrators. This keeps track of who logged in, what users and groups they made changes to, and what time they logged out. These reports can be found in Program Files\CiscoSecure ACS v3.x\Logs\AdminAudit.
User Password Changes—This report tracks changes to users' passwords performed through the User Changeable Password Module. These reports can be found in Program Files\CiscoSecure ACS v3.x\CSAuth\PasswordLogs.
ACS Service Monitoring—The last report is the ACS Service Monitoring report. This report keeps track of all the events that ACS has had within the services it monitors. An example of a service that might be monitored is CSAdmin or CSTacacs. By default, CSMon is enabled. This is, however, configurable. To configure this, you must go to System Configuration and then ACS Service Management. Here, you can choose to monitor the login process, generate events when someone tries to log in to disabled accounts, and so on. These reports can be found in Program Files\CiscoSecure ACSv3.x\Logs\ServiceMonitoring.
The Reports and Activity interface is seen in Figure-14.
As far as viewing these reports goes, you can view them in the ACS interface or from the hard drive of the ACS server. The logs are stored as CSV files.
You can view the reports in spreadsheet programs like Microsoft Excel. For even more functionality, you can import these into third-party software such as Crystal Reports. These reports are discussed in more detail in Chapter 12. If you do not have access to the hard drive of the ACS server, you are given the ability to download the logs from the ACS interface.

Figure-14 Reports and Activity
Online Documentation
The online documentation of ACS is there to help you out if you get stuck. If you have followed along on an ACS server up to this point, you have probably noticed that in different configuration menus you find some brief help on the right-hand side of your screen in the browser window. The online help is more detailed configuration information. You can access the PDF form if you have the CD-ROM, or it is available in the ZIP file that you downloaded from the Cisco website.
Starting Point for Configuring Your Server
Often, it is difficult to find a starting point for configuring your ACS. It might seem logical for you to begin in many places.
In this step sequence, you begin your configuration of ACS by applying administrator passwords and controlling access to the ACS device. Then you configure some interface parameters that influence the look of the HTML interface. This makes it easier to administer.
You begin by assigning an administrator password to the ACS device. Follow these steps to complete this task:
|
Step 1 |
Select Administration Control from the left menu bar. |
|
Step 2 |
Select Add Administrator. |
|
Step 3 |
Enter the required information into the input fields such as admin name and password. In the example in Figure 6-15, the user ADMIN is entered. The password used is cisco. |
|
Step 4 |
If this is the first entry for an administrator, select the Grant All option. |
NOTE
This allows your administrator to have full administrative access. Later, as you add more administrators, you can specify what groups they can modify.
|
Step 5 |
Select Submit. |
|
|
You now see that your administrator has been added to the ACS device. If you access the ACS device from the server it is installed on, you will, by default, not need to authenticate. This is against some security policies, so change that. Follow the steps below to force ACS to authenticate administrators even when they access ACS from the server itself. |
|
Step 6 |
Select Session Policy. |
|
Step 7 |
Deselect Allow automatic local login. |
|
Step 8 |
Select Submit. |
|
Step 9 |
To test your work, click the X in the top right-hand corner of the screen. Then, you can log back in to the ACS device. If you see Username and Password fields, you were successful. |
|
|
Now, plan for the possibility that ACS might be behind a firewall and that perhaps you want to administer it from outside the network. Go back to the Administration Control section and control the ports that are redirected when ACS is accessed. |
|
Step 10 |
Select Access Policy. |
|
Step 11 |
Scroll to the HTTP Configuration. |
|
Step 12 |
Select the radio button that indicates you want to Restrict Administration Sessions to the following port range. |
|
Step 13 |
Add a port range, such as 65501 to 65535. |
|
Step 14 |
Select Submit. |

Figure-15 Adding an Administrator to ACS
This now restricts the port ranges that ACS redirects your browser to and does so to the range that you specified.
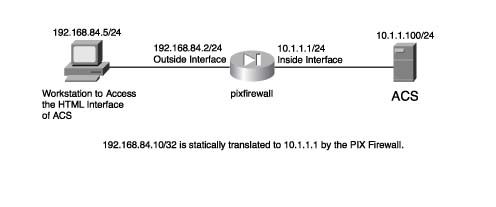
In Figure-16, you see an example of a network similar to that described in the preceding step sequence. A PIX Firewall, an ACS server, and a separate workstation are used to demonstrate the login and management actions based on the preceding steps. You are going to run into an issue here. When you access ACS using an IP address, all links to ACS configuration pages use the IP address. When you access the ACS from outside a firewall and you are performing Network Address Translation (NAT), you initially access ACS using a NAT address, but when you are redirected to one of the previously restricted ports, ACS returns the private (nontranslated) IP address. This causes you to lose management connectivity. By accessing ACS using a domain name, or the hostname, all links to configuration pages return the domain name or hostname instead of the private (nontranslated) IP address. This sustains your management connection.
Figure-16 also shows the topology using a PIX Firewall. The ACS is on the inside network, and a workstation from the 192.168.84.0/24 network is going to access ACS for management. Before you can access the ACS device, you need to allow access through the PIX Firewall to ACS. Follow these steps to configure the access list on PIX Firewall to allow access to the ACS. It is assumed that you already have a firewall configuration in place. If you attempt to do this in a production network, you might need to add these steps to an existing access list:
|
Step 1 |
Enter Configuration mode on the PIX. |
|
|
Pixfirewall#config t |
|
Step 2 |
Create an access list that enables administrators on any network to access the administrative port of ACS. |
|
|
Pixfirewall(config)#access-list ACS-in permit TCP any host 192.168.84.10 eq 2002 |
|
Step 3 |
Add another access list statement that allows the administrator to access ports 65501 and higher on the firewall after the ACS redirects. |
|
|
Pixfirewall(config)#access-list ACS-in permit TCP any host 192.168.84.10 range 65501 65635 |
|
Step 4 |
Apply the access list to the outside interface of the PIX Firewall. |
|
|
Pixfirewall(config)#access-group ACS-in in interface outside |

Figure-16 Simple PIX Firewall Network
Now you are at the point where you must access the ACS device via Domain Name System (DNS). This causes ACS to return a DNS resolved name to the workstation. If you access the ACS via IP address, it returns the private IP address (RFC 1918), and you can no longer access the device after you sent your login credentials. Figure-17 shows the login prompt as seen from the remote workstation when accessing ACS by DNS name.

Figure-17 Login with DNS Name Resolution
Now that you are logged in, note that your URL has been redirected to a different port and that it matches the HTTP port range that you specified earlier. You also want to note that ACS returned a DNS name and not the private (nontranslated) IP address upon redirection.
Configuring Your Interface
You have modified the authentication policy and configured session policy. You now are almost ready to make ACS work for you. Now you configure the interface to make it easier to manage, which is the goal in the coming sections. To do this, you need to disable some of the advanced options. Don't worry; when the time comes, you will enable them again.
TACACS+ Settings
To ease your configuration and help make things a little easier while you are learning, you need to disable some of the advanced TACACS+ features. You disable any advanced configurations at this point, and as you increase the functionality of ACS by adding more for it to do, you bring these configuration parameters back. Follow these steps to turn off the advanced TACACS+ settings:
|
Step 1 |
Begin with accessing the Interface Configuration section by clicking the left menu button titled Interface Configuration. |
|
Step 2 |
In the beginning of this chapter, Interface Configuration was discussed as well as how selecting an option makes certain options visible in the HTML interface. Here, simply select the link TACACS+ (Cisco IOS). This refreshes your screen to the edit page. |
|
Step 3 |
Deselect Advanced TACACS+ Features. |
|
Step 4 |
Select Display Time-of-Day access grid for every TACACS+ service so you can override the default Time-of-Day settings. This is shown in Figure 6-18. |
|
Step 5 |
Ensure that Display a window for each service selected in which you can enter customized TACACS+ attributes is deselected. |
|
Step 6 |
Ensure that Display enable default (Undefined) service configuration is deselected. |
|
Step 7 |
Select Submit. |
The preceding steps are going to allow you to see a Time-of-Day grid where you have the control to configure Time-of-Day parameters. This might not be the first thing you always want to do; however, it is very noticeable when made visible, and that is the goal here.
To check your work, follow these steps:
|
Step 1 |
Click Group Setup. |
|
Step 2 |
Select Edit Settings. |
|
Step 3 |
You should be able to see the Time-of-Day grids. |

Figure-18 Configuring Time-of-Day Settings
Advanced Options
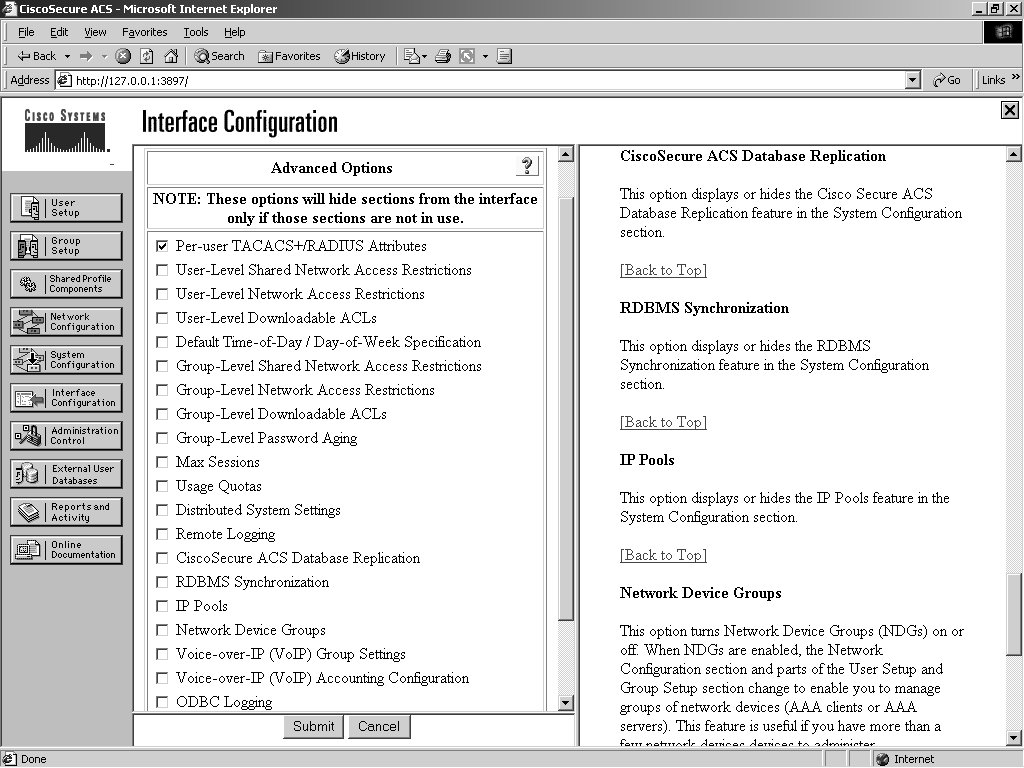
Another way to clear out some of the clutter when you are learning is to disable the Advanced Configuration options. You might want to configure these settings, but for now, turn all of them off except for the Per-user TACACS/RADIUS Attributes. To do so, follow these simple steps:
|
Step 1 |
Select Interface Configuration. |
|
Step 2 |
Select Advanced Options. |
|
Step 3 |
Ensure sure that everything except Per-user TACACS+/RADIUS Attributes is deselected. This enables you to do some individual user configurations without crowding the interface with all the available options. |
|
Step 4 |
After you complete these steps, verify that your configuration matches Figure-19. Figure-19 demonstrates the selection of Per-user TACACS+/RADIUS Attributes. |

Figure-19 Per-User TACACS+/RADIUS Attributes
Preparing to Add Users
You are almost ready to add users to the ACS database. Before you do so, customize the interface a little more so that you can keep some more detailed information that might help you in keeping track of users. In the ACS user configuration, you have the ability, by default, to include Supplementary User Info, as shown in Figure-20. This includes a real name and description.

Figure-20 Supplementary User Info
To add additional fields for more information to be added, follow these steps:
|
Step 1 |
Access the Interface Configuration menu. |
|
Step 2 |
Select User Data Configuration. Place a check mark in the box titled Display for number 3 and 4 to indicate that you want these fields to be displayed. |
|
Step 3 |
Edit or input the relevant headings for each field you plan to use in addition to the two defaults. In Figure 6-21, Phone Extension and Cubicle Location was used. |
|
Step 4 |
Select Submit. |

Figure-21 User Data Configuration
You can check your work by following these steps:
|
Step 1 |
Select User Setup. |
|
Step 2 |
Enter aaauser in the field provided. |
|
Step 3 |
Select Add/Edit. |
|
Step 4 |
You should now see the two new Supplementary User Info fields that you created. See Figure 6-22. |

Figure-22 Supplementary User Info (After Edits)
Summary
At this point, you should be familiar with the interface of ACS and prepared to add a user to the database. Remember that the look and feel of your interface are dependent on what features you have made available in the Interface Configuration section. As you progress with your configuration of ACS, you will add more features and make more configuration options visible in the interface. This is merely a starting point.