PAINTING RED ROSES
This lesson is a continuation of the drawing lesson on roses that you should view before attempting your own painting.
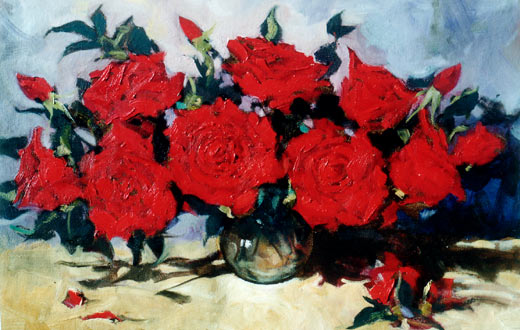
I have done the painting in four stages and will attempt describe each stage as they are shown below. The student should try and complete this painting in one session as it is essentially a 'wet in wet' project that relies on the fluidity of the paint.
First of all I covered a primed canvas (16" x 13") in a 'thin' mix of raw umber. Technically this is usually referred to as a 'imprimatura'. When I say 'thin' I mean a mix diluted with turps that spreads like watercolor and dries very quickly. When almost dry I use chalk to draw in the design. For this classic or formal design I place my imaginary 'horizon' about one third up from the bottom and then center the vase. If you prefer you could use charcoal for the drawing.

With the drawing complete I begin painting the centers and shadows in the roses. For this I use 'cadmium red deep' with perhaps a toutch of the umber or burnt umber in the very centers.
Next you should really load up a half to three quarter inch flat bristle brush with 'cadmium red' and begin to paint between the cadmium red deep with broad singular strokes that will represent the foremost of the petals (see below). Note that your brushstrokes should become a little thinner ... use the edge of your bristle brush for this ... as the petals near the center of the flower.

For the leaves I use a mix of ultramarine blue and yellow ochre. Liven this up with some strokes of deep red. Shadows should never be bland. Where the light strikes some of the leaves you might want to bring them up with a little cadmium yellow and a blue/white mix (see the green highlights above).
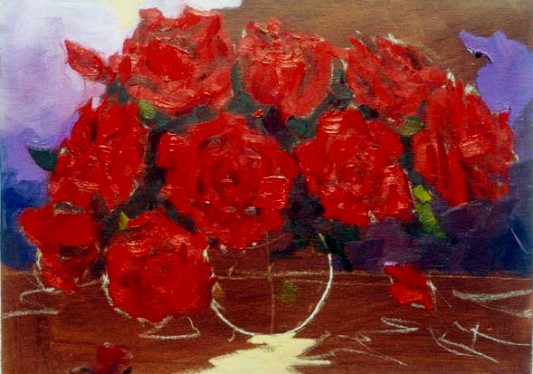
Next I would like you to consider the 'negative' space. That is what I call most of the area around the roses, in this case the background, the foreground and the cast shadow. Here you might mix up a mauve with your cadmium red and ultramarine blue lightened with white and again load up your brush and begin 'cutting in' the outline of the particular blooms that interact with the background.Use a medium if your paint is too dry. It should be creamy and fluid so you will need to recharge your brush after every three or four strokes. You can do a similar thing with the foreground with a mix of raw sienna and white. Spend some time and thought doing this 'cutting in' and if a shape does not appeal rub it off with a rag and try again. Try an achieve a balance between shapes using more one stroke 'concave' shapes for the rose blooms in outline.
DANGER ... do not overwork the brush strokes otherwise the painting will lose its freedom and immediacy. If the hues begin to look too garish you can always tone them down by adding a little raw umber.
Finally you will be left with the water filled glass bowl. This is nothing but a mirror for what surrounds it. Basically you should 'smear the bowl' with all the adjacent colors as I have done and when this looks satisfactory use the chisel-edge of a bristle brush to show some of the rose stems as they are seen through the glass. Add a little 'white' highlight to the glass. Such highlights are best with titanium white/naples yellow mix which gives a better 'glow' than just pure white.
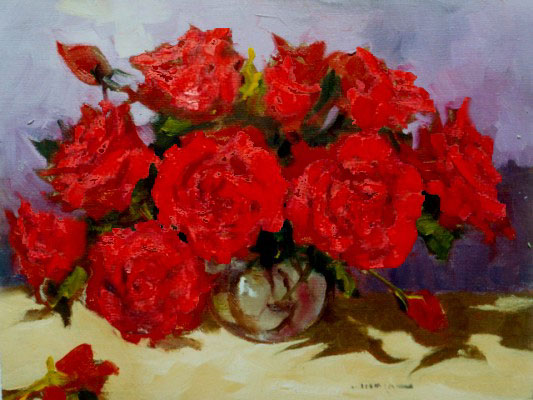
Here is another variation on the same theme on a larger canvas (24" x 16").
Advanced lesson menu
|