1995 Integra Pictures
 Here it is. If I was in our house this car would already be lowered.2, 3. (Dec 9, 1997)
 These are actually the stock lenses. I just cut them open pulled the stock orange inserts out and then glued them back up with silicon. Here is a picture of them in the process of my customizing. (Dec 23, 1997)
 Here is a shot of my Iceman intake. This one single mod made a HUGE difference! G-Tech showed QM going from a 15.5 to a 15.2. 3 tenths of a second just from an intake. (Jan 2, 1998) **UPDATE** after several runs it appears this intake didn't take that much off my times.
 Here is a shot of the Sprint 2.5" lowering springs. These made a HUGE difference in the handling department. Of course I paid the price in ride quality. Very rough riding and I don't think my stock shocks are going to hold up much longer. I will have to change these out for some Tage-Techs soon. (Jan 20, 1998)
 Here is a shot of my pedals. On the brake pedal I actually had problems with the mounting clamp. The only way I could get it to go on was to move it over to the side so it was closer to the gas. And now that they are on I like it this way better because I can Heal & Toe better. (Jan 20, 1998)
>
 Here is a shot of my shifter. This was completely custom done. I shortened the throw, the height, and as you can see in the picture where it rests. In this picture the shifter is in Neutral. Notice how it leans towards the driver seat. I did this so it's easier to reach.
Here it is again but from a side angle. (Jan 20, 1998)
Here is a shot of my shifter. This was completely custom done. I shortened the throw, the height, and as you can see in the picture where it rests. In this picture the shifter is in Neutral. Notice how it leans towards the driver seat. I did this so it's easier to reach.
Here it is again but from a side angle. (Jan 20, 1998)
 Here is the finished product of my bumper and mesh grill. It came out pretty good. Here is an updated shot of the car from the front. Here is one from the back. Another picture of the grill but a close up. (Jan 20, 1998)
 Here is a picture of the Tage-Techs and "Sprint" springs in the front. The car actually rides too soft now. The reason they rode crappy before was because I did not cut enough of the bump stop and they were bottoming out. (March 17, 1998)
 Here is a picture after 20 hours of back breaking labor (sanding, buffing, and polishing) to my wheels. The picture is not the greatest quality but you can still tell they are shinny. Click here for a close up of the wheels. (April 20, 1998)
 Here is a picture of my polished Ultra Flow muffler. This only took about an hour to do though. Here is another shot. (April 23, 1998)
 Here is an up to date picture after I got a hold of some red spray paint. Also notice that I have TWO strut braces! Two is better (and stiffer) than one! A couple more pictures here and here. (August 30, 1998)
 Here is picture of my Racers Image strut bar. I got this bad boy brand new for ultra cheap! $60 for both front and rear!!! Sorry guys it was a one time deal and I can't get another set for that price though. Can you believe that cost is $20 on those things??? The aftermarket is making a killing, at least on strut bars! (August 30, 1998)
 Here is a must do if you have a friend with a timing light. Make a mark on the distributor tower for a reference, then make make several different adjustments and label where each adjustment is on the distributor. This way you can change you timing and always return exactly where it was. I marked where 14, 16, and 18 degrees BTDC were. (August 30, 1998)
 Here are my 16" Konig Tuner wheels with 40 series Nitto rubber. (August 30, 1998). ***Update*** I now run Yokohama A520 tires in a 205/40VR16 and I'm MUCH happier with them.
 Here is my 22mm rear sway bar. It's the factory issue from an Integra Type-R. It took a little fabricating of the frame mount bushings but well worth it in the end.
Here is another shot of the bar.
Here is my 22mm rear sway bar. It's the factory issue from an Integra Type-R. It took a little fabricating of the frame mount bushings but well worth it in the end.
Here is another shot of the bar.
 Here is my RSR header on the kitchen counter before I put it on the car.
 Here is a picture of my new exhaust (Greddy SP) and my polished "self made" lower rear tie brace.
 Here is a picture of my "self made" rear trunk brace. Doesn't seem like it would do much but since the ITR has one in this spot...
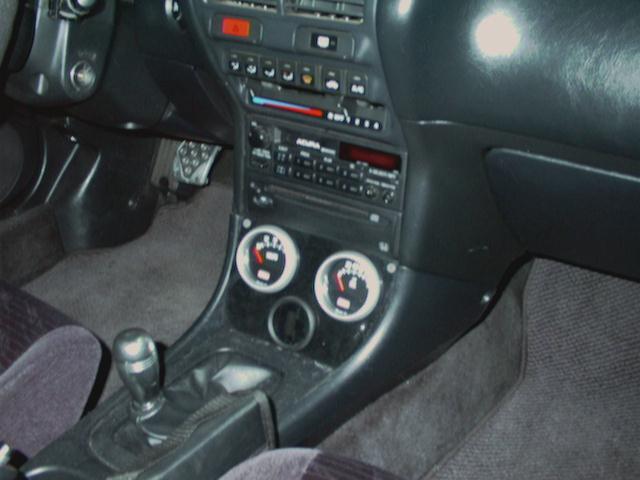
 Here is a picture of gauges in my center console. I pulled out the cup holder, ash tray and cigarette lighter socket to mount these here. The oil gauge is nice to have but I sure do miss that cup holder! :-(
 Here is a picture of my passenger rear shock. You can pretty clearly see how I had to cut down the spring perches and reweld them to get the car to sit somewhat level. Normally Koni shocks have several slots for the spring perch to sit on but mine didn't???
 Here is a picture what happens if you run on a road course without taking off the cheap plastic center caps off Koni wheels. This is after I got back from Willow Springs. The braking needed to slow the car down for the turns generated so much heat that the center caps melted enough to deform them and they just fell off the wheel.
 Here is a picture of my 15" race wheels with 225/45ZR15 Hoosier R3S03's R-compound tires mounted on them.
 I bought my Hoosiers used so there was only about half of the tread left, but it still only took 22 short autox runs to wear them down to the cords. Here is a close up of what a corded R-tire looks like. I now run Kumho 205/50ZR15 V700 race tires and I'm very happy with their grip for the price, plus they last longer.

 Here it is. If I was in our house this car would already be lowered.2, 3. (Dec 9, 1997)
 These are actually the stock lenses. I just cut them open pulled the stock orange inserts out and then glued them back up with silicon. Here is a picture of them in the process of my customizing. (Dec 23, 1997)
 Here is a shot of my Iceman intake. This one single mod made a HUGE difference! G-Tech showed QM going from a 15.5 to a 15.2. 3 tenths of a second just from an intake. (Jan 2, 1998) **UPDATE** after several runs it appears this intake didn't take that much off my times.
 Here is a shot of the Sprint 2.5" lowering springs. These made a HUGE difference in the handling department. Of course I paid the price in ride quality. Very rough riding and I don't think my stock shocks are going to hold up much longer. I will have to change these out for some Tage-Techs soon. (Jan 20, 1998)
 Here is a shot of my pedals. On the brake pedal I actually had problems with the mounting clamp. The only way I could get it to go on was to move it over to the side so it was closer to the gas. And now that they are on I like it this way better because I can Heal & Toe better. (Jan 20, 1998)
 Here is a shot of my shifter. This was completely custom done. I shortened the throw, the height, and as you can see in the picture where it rests. In this picture the shifter is in Neutral. Notice how it leans towards the driver seat. I did this so it's easier to reach.
Here it is again but from a side angle. (Jan 20, 1998)
Here is a shot of my shifter. This was completely custom done. I shortened the throw, the height, and as you can see in the picture where it rests. In this picture the shifter is in Neutral. Notice how it leans towards the driver seat. I did this so it's easier to reach.
Here it is again but from a side angle. (Jan 20, 1998)  Here is the finished product of my bumper and mesh grill. It came out pretty good. Here is an updated shot of the car from the front. Here is one from the back. Another picture of the grill but a close up. (Jan 20, 1998)
 Here is a picture of the Tage-Techs and "Sprint" springs in the front. The car actually rides too soft now. The reason they rode crappy before was because I did not cut enough of the bump stop and they were bottoming out. (March 17, 1998)
 Here is a picture after 20 hours of back breaking labor (sanding, buffing, and polishing) to my wheels. The picture is not the greatest quality but you can still tell they are shinny. Click here for a close up of the wheels. (April 20, 1998)
 Here is a picture of my polished Ultra Flow muffler. This only took about an hour to do though. Here is another shot. (April 23, 1998)
 Here is an up to date picture after I got a hold of some red spray paint. Also notice that I have TWO strut braces! Two is better (and stiffer) than one! A couple more pictures here and here. (August 30, 1998)
 Here is picture of my Racers Image strut bar. I got this bad boy brand new for ultra cheap! $60 for both front and rear!!! Sorry guys it was a one time deal and I can't get another set for that price though. Can you believe that cost is $20 on those things??? The aftermarket is making a killing, at least on strut bars! (August 30, 1998)
 Here is a must do if you have a friend with a timing light. Make a mark on the distributor tower for a reference, then make make several different adjustments and label where each adjustment is on the distributor. This way you can change you timing and always return exactly where it was. I marked where 14, 16, and 18 degrees BTDC were. (August 30, 1998)
 Here are my 16" Konig Tuner wheels with 40 series Nitto rubber. (August 30, 1998). ***Update*** I now run Yokohama A520 tires in a 205/40VR16 and I'm MUCH happier with them.
 Here is my 22mm rear sway bar. It's the factory issue from an Integra Type-R. It took a little fabricating of the frame mount bushings but well worth it in the end.
Here is another shot of the bar.
Here is my 22mm rear sway bar. It's the factory issue from an Integra Type-R. It took a little fabricating of the frame mount bushings but well worth it in the end.
Here is another shot of the bar.
 Here is my RSR header on the kitchen counter before I put it on the car.
 Here is a picture of my new exhaust (Greddy SP) and my polished "self made" lower rear tie brace.
 Here is a picture of my "self made" rear trunk brace. Doesn't seem like it would do much but since the ITR has one in this spot...
 Here is a picture of gauges in my center console. I pulled out the cup holder, ash tray and cigarette lighter socket to mount these here. The oil gauge is nice to have but I sure do miss that cup holder! :-(
 Here is a picture of my passenger rear shock. You can pretty clearly see how I had to cut down the spring perches and reweld them to get the car to sit somewhat level. Normally Koni shocks have several slots for the spring perch to sit on but mine didn't???
 Here is a picture what happens if you run on a road course without taking off the cheap plastic center caps off Koni wheels. This is after I got back from Willow Springs. The braking needed to slow the car down for the turns generated so much heat that the center caps melted enough to deform them and they just fell off the wheel.
 Here is a picture of my 15" race wheels with 225/45ZR15 Hoosier R3S03's R-compound tires mounted on them.