
This page is currently under construction, so please excuse the mess. This was my first tutorial for Paint Shop Pro and I've been working hard to create many more. I have been trying to find the time to update my pages which includes uploading new pages, tutorials, graphics, and much more.
Lightning Tutorial for Paint Shop Pro 4:
1.) Open up a New File ( I used 300x300 for my example and Black background) use 16 million colors.
2.) Create some purple squiggly lines that branch off. Use the following settings:
Using the airbrush tool for all of the steps-the only thing that changes is the Size and Colors.
NOTE: All the colors I'm using for this tutorial are from the default PSP palette! The default purple color settings are red=128 green=0 blue=255.
Size=50
Shape=Round
Opacity=30
Texture=None
3.) Create Blue Squiggly lines over the purple squiggly lines using Size=30 and the default red=0 green=0 blue=255.
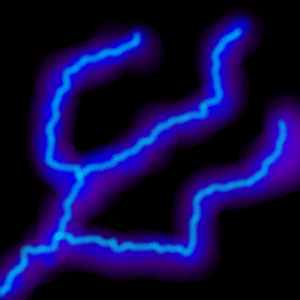
4.) Now repeat again with Light Blue using Size=10 and default red=0 green=255 blue=255 (See Picture).
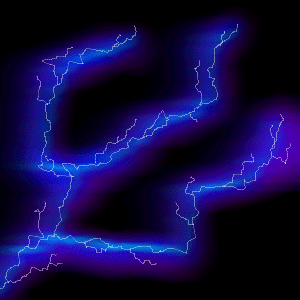
5.) Go to Image/Deformations/Wind and use settings between 13-18 (I used 18 for the demo: See Picture).

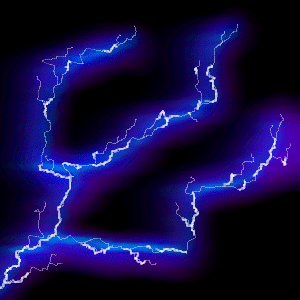
6.) Using airbrush using Size=1 and White for color create your lightning bolts. Create random squiggly lines that branch off. You should
follow your previous colors from previous steps but, also create some new branches off of those bolts of lightning. You should get some
pictures of real lightning bolts to use as references for your picture. (See Picture)
7.) Now use Size=2 and White to go over existing bolts to widen the main bolts and to highlight certain areas. (See Picture.)
How do I Create Good Transparent Shadows:
Here is a handy tip that can help you put an end to nasty looking transparent shadows. When you open up PSP and create a new
piece of art and create a cool piece of text with an awesome drop shadow. Or perhaps you made use of the Blur Tool to create a
delicate soft drop shadow underneath some intense lettering and then your try to create a transparent background and everything goes up
in smoke.
When you create your transparent background, select a background color that is predominant in the background that
you have chosen for your web page and use it as the background color of your new image.
Open both a new window in PSP and the graphic you've selected as the background for your web page.
Using the eyedropper, pickup the color in your background and then "Flood Fill" it into the new window.
Create the text and add your special effects, and save as a transparency.
NOTE: Make sure that the background color is the color selected as the background color on the color palette.
Now you have to save as a Transparency using the following:
Select Save As:
Save as type: *.gif
Click on the Options button
Select set the Transparency Value to the Background Color
Click OK
Sub-type: Version 89a-Interlaced
Click Save
Masks Explained; How to Use this Powerful Feature:
Here is a brief tutorial on Masks and my explanation of masks along with some diagrams.
A mask is basically just a stencil. The difference between a stencil and a mask is that a mask can also be set to recognize different shades of gray and a
stencil is just black or white. A mask can also be Inverted or Reversed---> why don't we call it what it is and use normal
English-- it means reversed. In the example diagrams you'll see that whatever areas are NOT masked will receive the color (the circle in diagram 1 and the surrounding area around
the circle in diagram 2)
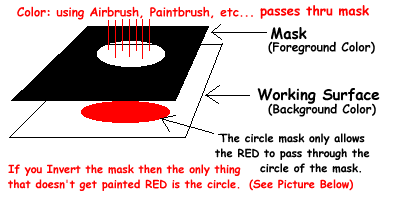 (Diagram 1)
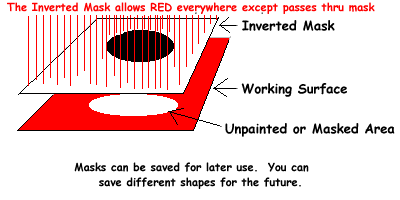 (Diagram 2)
You also have a couple of options when creating Masks. You can create Mask from Image or Selection as
well as a New Blank Mask. You can also use Masks in conjunction with other Images and let the Images
come through the mask to produce some pretty cool texts and images. Please check out my Masks Tutorial Page.
Graphics created using Jasc's Paint Shop Pro
Click the icon below to download your own copy today!


Created by Rick Mercer on September 6, 1997.
All graphics were created using Paint Shop Pro 4.12.
Pages created with GOMER HTML Editor v2.07 32bit (beta) by Stoopid Software.
Any questions, comments, etc. can be send to rickmercer@juno.com.