1.) Click on File and then click New and then type in a size (I used 100x100 for this tutorial) and then click OK.
2.) Click on the Line Tool with the Width set to 1 and while holding down the Shift Key click and drag out a long verticle line.
NOTE: You are going to Hold down the Shift Key and dragging out your lines for this entire tutorial.
3.) Now Shift and drag a Horizontal line through the middle of your first line. This line should be a little shorter than the first. (See example below.)

4.) Move your mouse pointer to the middle of your first two lines. (See example below.) While holding down the Shift Key your going to drag
a line at 45° to the upper left and make that shorter than your first verticle line and your second horizontal lines.

5.) Repeat Step 4 three more times so that you are creating a total of four lines at 45° angles. (See Example below.)

6.) Zooming in real close is helpful for this next step. Click on the Retouch Tool and then holding the mouse pointer at the end of each line and then while holding down the left mouse button
your going to drag (or smudge in this case) the line, moving from the middle of your star and dragging outwards. This will create a diffused
end to your lines that you created instead of a harse line. (See the examples below.)

7.) You might have to repeat this a couple of times to get the desired effect.
TIP: Don't worry if the lines vary off to the sides! All you have to do is make your Background Color the
Primary Color in the Color Palette and then using the Line Tool drag a verticl line on each side of your lines thus covering your mistakes.
It helps if you use the Zoom Tool to zoom in real close so using the Line Tool is easier. If you Zoom in and practice using the Retouch Tool
then smudging gets real easy after awhile.
8.) Using the Airbrush Tool with the following settings: (Foreground Color is White)
Size=50
Shape=Round
Opacity=10
Texture=None
Hold the mouse pointer in the exact center where all the lines intersect and click the mouse button once.

9.) Using the Airbrush Tool with the following settings: (Foreground Color is White)
Size=30
Shape=Round
Opacity=30
Texture=None
Hold the mouse pointer in the exact center where all the lines intersect and click the mouse button 1-2 times.

10.) Using the Airbrush Tool with the following settings: (Foreground Color is White)
Size=10
Shape=Round
Opacity=50
Texture=None
Hold the mouse pointer in the exact center where all the lines intersect and click the mouse button 5-6 times.

NOTE: There are lots of different ways to go with this tutorial. You can add more lines that stick out of the center or you star along with the standard eight or you create really small stars with only a horizontal and a vertical line and then use the Airbrush set at Size=3-5 and Opacity=30-50 (See the Title Header at the top of this page in lower left corner.) You can also apply the Airbrush rings around your star first and then use the Retouch Tool afterwards to smudge out from the center of your star to create a more radiant effect. (See Example below.) Check back here in the future for a link to an Stars Example Page that will show you some examples of other effects that can be achieved from this Basic Star Tutorial.

1.) Repeat Steps 1-7 above then using the Airbrush Tool with the following settings: (Foreground Color is White)
Size=50
Shape=Round
Opacity=10
Texture=None
Hold the mouse pointer in the exact center where all the lines intersect and click the mouse button once.
2.) Using the Airbrush Tool with the following settings: (Foreground Color is Blue)
Size=45
Shape=Round
Opacity=10
Texture=None
Hold the mouse pointer in the exact center where all the lines intersect and click the mouse button once.

3.) Using the Airbrush Tool with the following settings: (Foreground Color is Red)
Size=38
Shape=Round
Opacity=10
Texture=None
Hold the mouse pointer in the exact center where all the lines intersect and click the mouse button once.

4.) Using the Airbrush Tool with the following settings: (Foreground Color is White)
Size=30
Shape=Round
Opacity=30
Texture=None
Hold the mouse pointer in the exact center where all the lines intersect and click the mouse button 1-2 times.

5.) Using the Airbrush Tool with the following settings: (Foreground Color is White)
Size=10
Shape=Round
Opacity=50
Texture=None
Hold the mouse pointer in the exact center where all the lines intersect and click the mouse button 5-6 times.

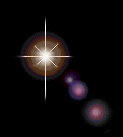
6.) Now if you want to create the light refracting off of a lense. (See image below.) Repeat Steps 1-5 again using smaller Sizes but the Opacity
everything else can reamain the same. You should have the balls of light that are closer to the starburst overlap and then the further
away from the starburst the bigger they get and the further apart they should be.
NOTE: You can also add some other colors in between the steps above and just make sure that you decrease the
Size for each new color. For example after Step 3 you could set Orange as your Foreground Color and decreae Size to 34 and then continue
onto Step 4. Experiment and have fun!
| Home Page | Paint Shop Pro | The Button Shop | E-Mail Me |


