[Originally posted to REC.PHOTO.DIGITAL late 1998]
Homemade Macro Lens
While this post centers mainly on my Olympus D-220L digital camera, this info probably applies to just about any point and shoot style digital camera. What follows I broke down and separated into four categories of “Background”, “Discovery”, “Drawbacks” and “Conclusion.” That way, since the following is a bit lengthy, people can skip over parts if they want.
===== Background ===== my camera doesn’t do good macro and lenses for it are expensive
My Oly D-220L is a nice camera that does all the basic stuff you expect from a basic digital camera. No zoom and the "macro" mode just means you can get to within about 7-8 inches of your subject, but small things still look small and far away. This camera is the kind with the basic sliding door lens cover so you have no threaded lens area to add lenses and filters like you do with some of the more expensive models. But after playing with this camera I really wished I had the ability to get even closer shots of small things.
So like many of you in the same boat, I searched around and found some options like the Tiffen line of adapters and lenses for digital cameras. Now they do make a "macro lens" set that has three lenses you can use separately or stack up to get various close up shots. But these lenses cost about $50 mail order. That wouldn't be so bad, but to get these on my particular camera, you need their special snap on lens adapter (snaps over the camera body so you can then screw on small lenses in from of the camera lens). The lens adapter apparently only comes if you buy the tele and wide angle lens kit. This set runs upwards of $80-$100. So to make a long story short, to get the macro lenses I would have to spend a total of nearly $150. That's a lot of money for some of us.
===== Discovery ===== I found a way to get better macro shots cheap!
On a recent vacation, my daughter was given one of those cheap pair of plastic binoculars you can get at most toy stores for a few bucks. You know the ones that barely magnify anything when you look through them? Between her (age 5) and my one-year-old son, this thing was doomed to a short life and it wasn’t long into the trip that these were broken. But being a pack rat of sorts, for some reason I decided to keep the two pieces that hold the larger lenses (opposite the eyepieces). When removed from the binoculars, these look like, and work like, a jeweler’s lens where you can hold it to your eye and look at things closely. Granted, not nearly as powerful as a real one, but definitely magnified.
So I am at home sitting at my computer desk goofing off with the digital camera when I notice those lenses sitting on my desk. Hmmm… I wonder… At this point these are roughly 2-inch long tubes with a lens attached to one end. So I take one, hold it over the camera lens and try some shots. Wow! I actually get good results and can get a clear macro shot closer than I could with the camera by itself. So then I try both lenses stacked. While it is a little difficult holding these two lenses together and against the camera and lining them up all with one hand so I can hold the camera and take the picture with the other, I manage and get even better results.
Next I take one of the pieces and remove the lens itself from the rest of the tube. With a pocketknife and patient prying I manage to free the lens from the rest of the plastic body. I take this lens and place it over my camera lens and use a little scotch tape to hold it in place. Works nicely. I can get in much closer with my camera now and take some very decent macro shots. Probably about as good as I would have achieved with the basic Tiffen macro lens set.
The next day I suddenly recall that I have an old laser an old employer was going to throw out, so I grabbed it. And I thought I remembered having a small selection of misc. mirrors and glass lenses with it. Sure enough, after digging out the box with the laser, I locate the lenses. Two in particular seemed especially suited for my camera. The first is roughly the same size (US quarter size) as the plastic binocular lens and it turns out takes roughly the same macro shots, although maybe even a bit closer (I will have to verify that later). The other is a bit smaller than a dime and just barely covers the camera lens. This smaller lens turns out to give an incredible macro shot. Again, I use a bit of tape just catching the lens edge to hold it in place.
===== Drawbacks ===== I have to use the LCD to line up shots
Since these type of camera use a different lens in the viewfinder than the one that actually takes the picture, in order to figure out the correct distance away from an object is to use the LCD to view the shot. Besides, with the tiny lens, you get to within a few centimeters of what you are shooting, so the viewfinder lens is looking somewhere else completely. What does this mean? Well first off, using the LCD as a monitor to line up shots will kill your batteries in no time. As if our energy hog cameras needed an excuse to kill batteries even faster, right? So taking shots with this homemade macro lens system requires either a basket of alkaline batteries on hand, investing in a charger and rechargeable batteries, or getting an AC adapter for your camera. I use the latter choice. BTW, I don’t use the Olympus one as I thought it was way over priced for what it is. The Oly AC adapter is rated for 6.5V and able to deliver a max current of 2 amps. I made my own a while back but it was rather large and not well suited to port around the house. Now I am using a 5V AC adapter that is able to max out at 3 amps. This seems to work well on my camera. If you take the batteries out of the camera, you will get the low battery indicator most of the time, but the camera generally operates fine. With batteries, even weak ones, this seems to fool the camera and keeps the low indicator off. I picked up the plug that fits the camera at Radio Shack.
The other problem with my system, which is minor, is that I have to tape the lens to the camera. If I figure out how, maybe later I will come up with some sort of holder, but likely I will stick with tape for a while. It does the job and is cheap.
===== Conclusion ===== coming up with a cheap lens set is possible on many cameras
I never would have thought of this had I not had those binocular lenses lying around. It appears from the small handful of lenses I tried, just about any magnifying lens you can get your hands on will work if you just stick them over your camera’s built in lens and use the LCD monitor to figure out the focal length. Go to your local toy store and invest in a pair of those cheap ‘Made in China’ binoculars and remove the lenses (they don’t do much good in the binoculars anyway) and give it a shot. If it doesn’t work for you, then you only stand to loose the $2.39 you spent and a little time.
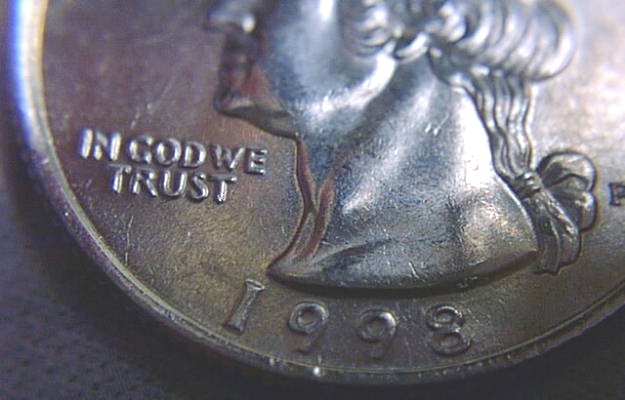
When I get a chance, I will HTML this document and put it up at my web site along with sample shots plus pictures of some of the parts I am talked about above. In the meantime, for those of you who would like to see what is possible, the following link is a picture of the lower half of a US quarter taken with the smallest (and best macro) lens I tried. Good luck with your own experiments.
Macro shot of US quarter dollar…
Back to Miscellaneous page
Up to Main page (Top Level)
Last modified: January 04, 1999
© 1998, 1999 ptimlin@yahoo.com