
 white
carve
white
carve
 red carve
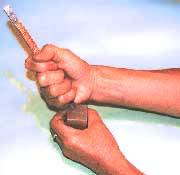
knife technique - fist holding
A steal stone,
Pencil,
Sandpaper (fine grain),
Carving knife,
Paper or tracing paper,
. . . . . . . . . . . . . . . . . . . . .
1. Prepare the stone
a) Place the fine grain sandpaper over a flat surface,
b) Smooth out the carving surface of the stone by grinding
gently over the sandpaper,
c) Always move the stone in a cirular motion so that
the applying force would be more
even,
d) For better result, use wet sandpaper and grind with
water,
e) The resulting carving surface should be very smooth
and flat,
2. Prepare the knife
a) Sharpen the blade as often as possible before and
after carving,
b) Use the same fine grain sandpaper and grind with water
for better result,
c) Wash the knife after work,
3. Prepare the pattern
a) Make a good design of the pattern to be carved, position
the characters so that they appear to be well-balanced,
b) Use a pencil, draw the pattern heavily on a sheet
of paper,
c) Transfer the pattern to the stone by rubbing the pencil
marks onto the carving surface (the pattern then
will be reversed)
d) Go over the reversed pattern with pencil to darken
the lines,
e) Check the layout by viewing it with a mirror, this
helps you to compare the pattern
layout on stone and paper,
f) Make any final adjustment if neccessary,
4. Carving
2 ways of making a carve:
a) White carve
-- You chisel the pencil marks, so that
the other part of the stamp is coloured by the ink,
b) Red carve -- You
chisel around the pencil marks, so
that only the letters themselves are coloured by the ink,
5. Knife technique
2 ways of holding the knife:
a) hand writing -- hold the knife like writing with a pen,
b) fist holding -- or grap it in the palm like holding
a fist,
6. Printing
a) Clean the carved surface with a brush before
dampen with ink,
b) Don't soak too much ink, but spread evenly by
dipping lightly 3 to 4 times,
c) Print on paper over a flat surface with a firm
and verticle stroke,