The Central School Butterfly Garden – Outdoor Club Project
Creating outdoor classrooms such as this butterfly garden project
enabled the students to observe what goes on beyond their classroom window. The
planning of this garden to suit the interests and capabilities of grade school children
met up with several challenges, but the cooperation and dedication of all involved yielded
great results!
 As a Master Gardener volunteer, I provided the club with a list of materials,
and plants needed, and created a design for the area that they were given to use.
The children each picked a plant and did research on it. would most attract butterflies
(purple, red, AND orange). The post is 6 feet tall, and buried in 2 feet, so
the final height would stand 4 feet tall.
As a Master Gardener volunteer, I provided the club with a list of materials,
and plants needed, and created a design for the area that they were given to use.
The children each picked a plant and did research on it. would most attract butterflies
(purple, red, AND orange). The post is 6 feet tall, and buried in 2 feet, so
the final height would stand 4 feet tall.
First, the area needed a focal point, one that would clearly let
visitors know that this area was for butterfly habitat. I donated a butterfly
hibernation box as a symbol of the purpose of this project. The children decided to
paint it in colors that would most attract butterflies (purple, red, AND
orange). The post is 6 feet tall, and buried in 2 feet, so the final height
would stand 4 feet tall.
 Another hard feature was a concrete stone, with their dedication inscriptions,
year, etc. This was created with the help of a parent or two.
Another hard feature was a concrete stone, with their dedication inscriptions,
year, etc. This was created with the help of a parent or two.
The first thing that needed to be done was tilling. The school grounds management turned over the soil. As I arrived on planting day, the children were breaking up clods by hand (and foot). The teacher in charge of this project wanted to be sure that the children did as much of the work as possible, so some things were accomplished in primitive and sometimes unconventional fashion! Amendments of humus, peat moss, composted manure and topsoil were mixed in, originally, with the children using rakes. Some of the children used their hands for mixing, sending clouds of peat moss dust into the air.
 Digging
holes presented a big challenge. Dense clay made it difficult for the children to
dig, even standing on the shovel didn't help. Adults stepped in to finish up
the holes, and even then, much effort was needed to accomplish this task. Each
child was standing by, worms in hand, and after having named each worm, dropped a few into
each hole. Topsoil was mixed into the hole with the worm, as each plant was lowered
into the hole. Watering and maintenance work will be done as
a classroom activity.
Digging
holes presented a big challenge. Dense clay made it difficult for the children to
dig, even standing on the shovel didn't help. Adults stepped in to finish up
the holes, and even then, much effort was needed to accomplish this task. Each
child was standing by, worms in hand, and after having named each worm, dropped a few into
each hole. Topsoil was mixed into the hole with the worm, as each plant was lowered
into the hole. Watering and maintenance work will be done as
a classroom activity.
I went back two weeks later, to see how things were looking and to take
some final pictures. The area had been mulched. The butterfly bushes and
butterfly weed were blooming. It looked like things were really taking off.
I felt something tickle my leg. It was a ladybug. A very good
sign.

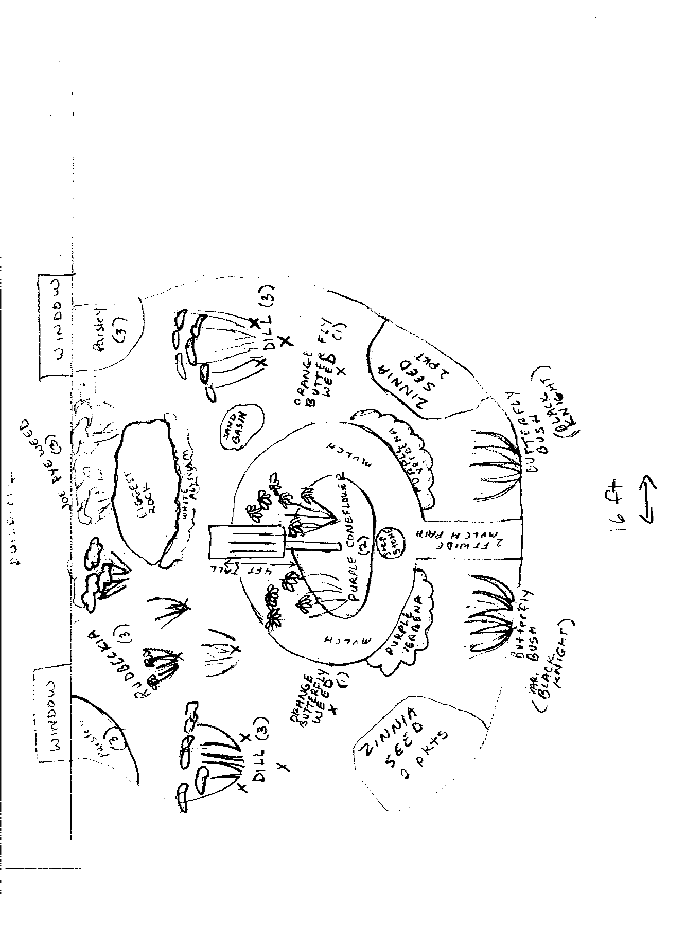
Listed below is a list of
supplies and plants we used for the butterfly garden project. My original design for
the area is also displayed below.
The consultation and information
I have given to the school, and on this page is provided as a service of the Master
Gardeners of St. Charles County, Missouri, and the University of Missouri Extension and
Outreach Program. The mission of the St. Charles Master Gardener program
is to provide horticultural information and training to the gardening public, based on
University of Missouri research specific to the local climate, soils, and plants.
---------------------------------------------------------------
SUPPLIES LIST
Amendments: compost, humus, peat moss, composted
manure
Recommended: 1 cubic yard of a mixture of
the above tilled into the soil.
area measures 11 ft long x 16 ft wide x (2” depth of
amendments)
The following recommendations are necessary:
Add and till in above recommended soil amendments
Recommended plants/supplies:
Mulch
Shallow basin with an inch or two of sand (to keep wet for
butterflies)
Plants:
Parsley (6)
Dill (6)
White Alyssum (6)
Joe Pye Weed (3)
Butterfly Bush, var. Black Knight (2)
Purple Verbena (4)
Zinnia seeds (4 packets)
Purple Coneflower (2)
Orange Ascepias (Butterfly Weed) (2)
Rudbeckia (Black-eyed Susan) (3)
Fran Pike
Master Gardener –
University Extension-St. Charles County